
Managing Rent Terms in Landlord and Tenant Matters
The Rent & Arrears section in RunSensible allows you to record and manage rental payment information, track outstanding rent balances, and maintain accurate financial records for a Landlord and Tenant matter. To access this section, open the relevant matter, select the Landlord-Tenant Law tab, and click Rent & Arrears from the left-hand menu.
The Rent & Arrears page displays a financial summary, including Current Rent, Recorded Rent Balance, Other Outstanding Charges, Total Recorded Balance, and Deposit Balance. These fields provide an overview of the rental amounts and outstanding balances recorded for the matter.
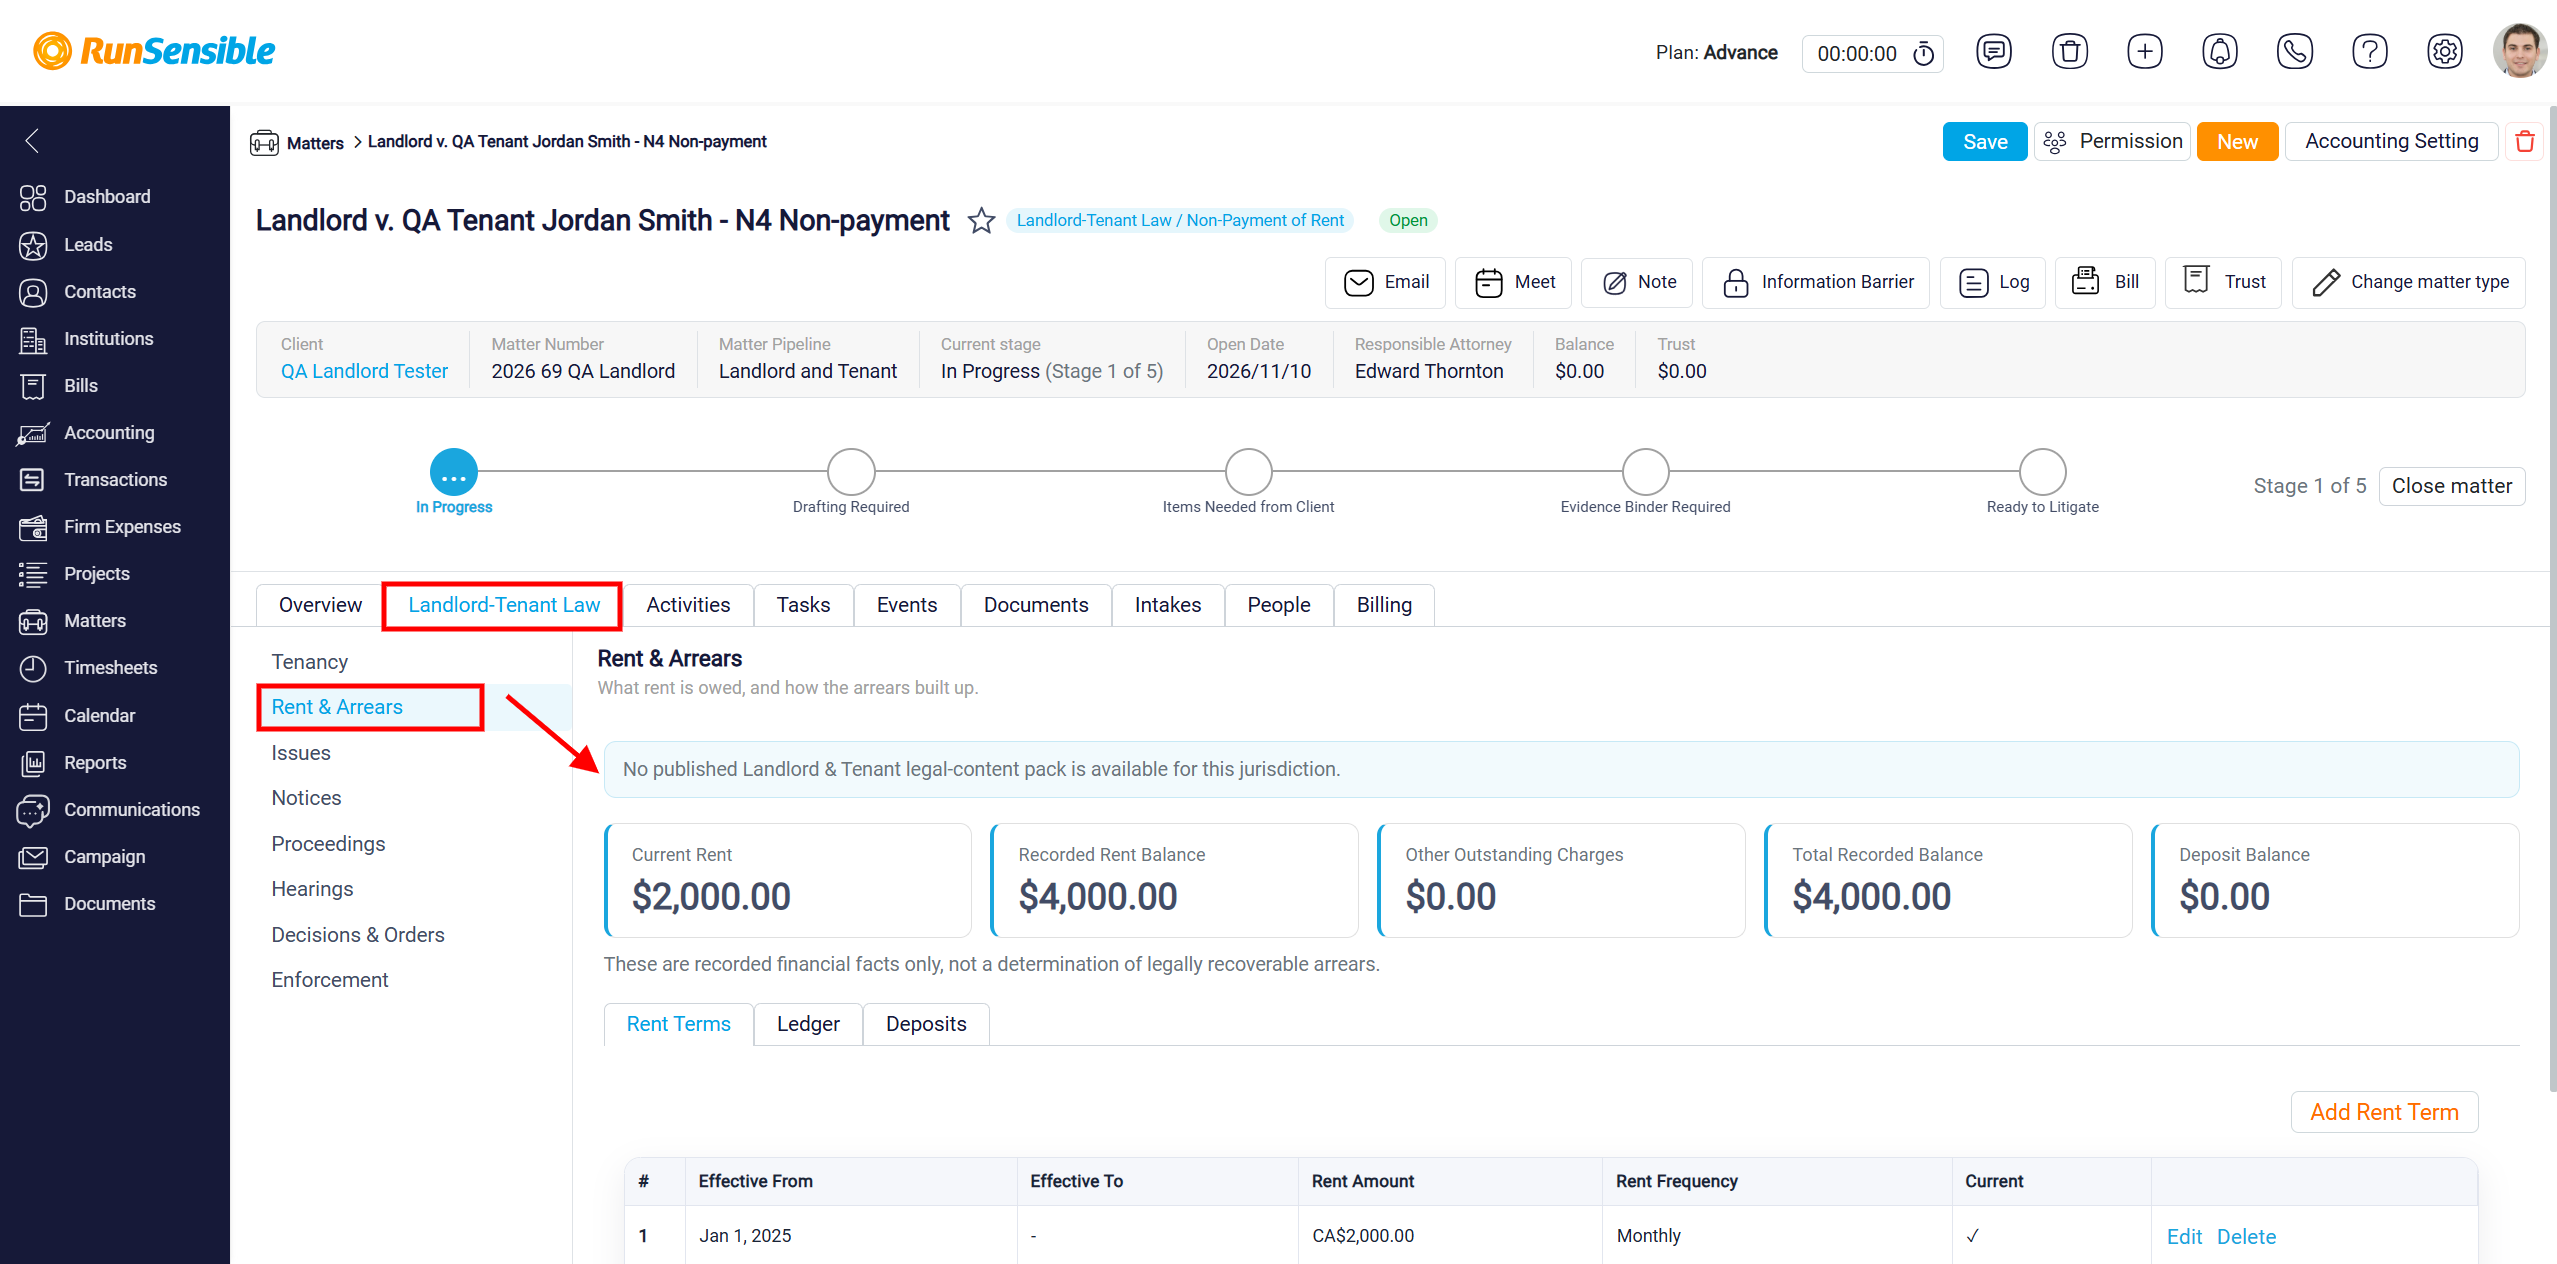
To add rental payment details, select the Rent Terms tab and click the Add Rent Term button.
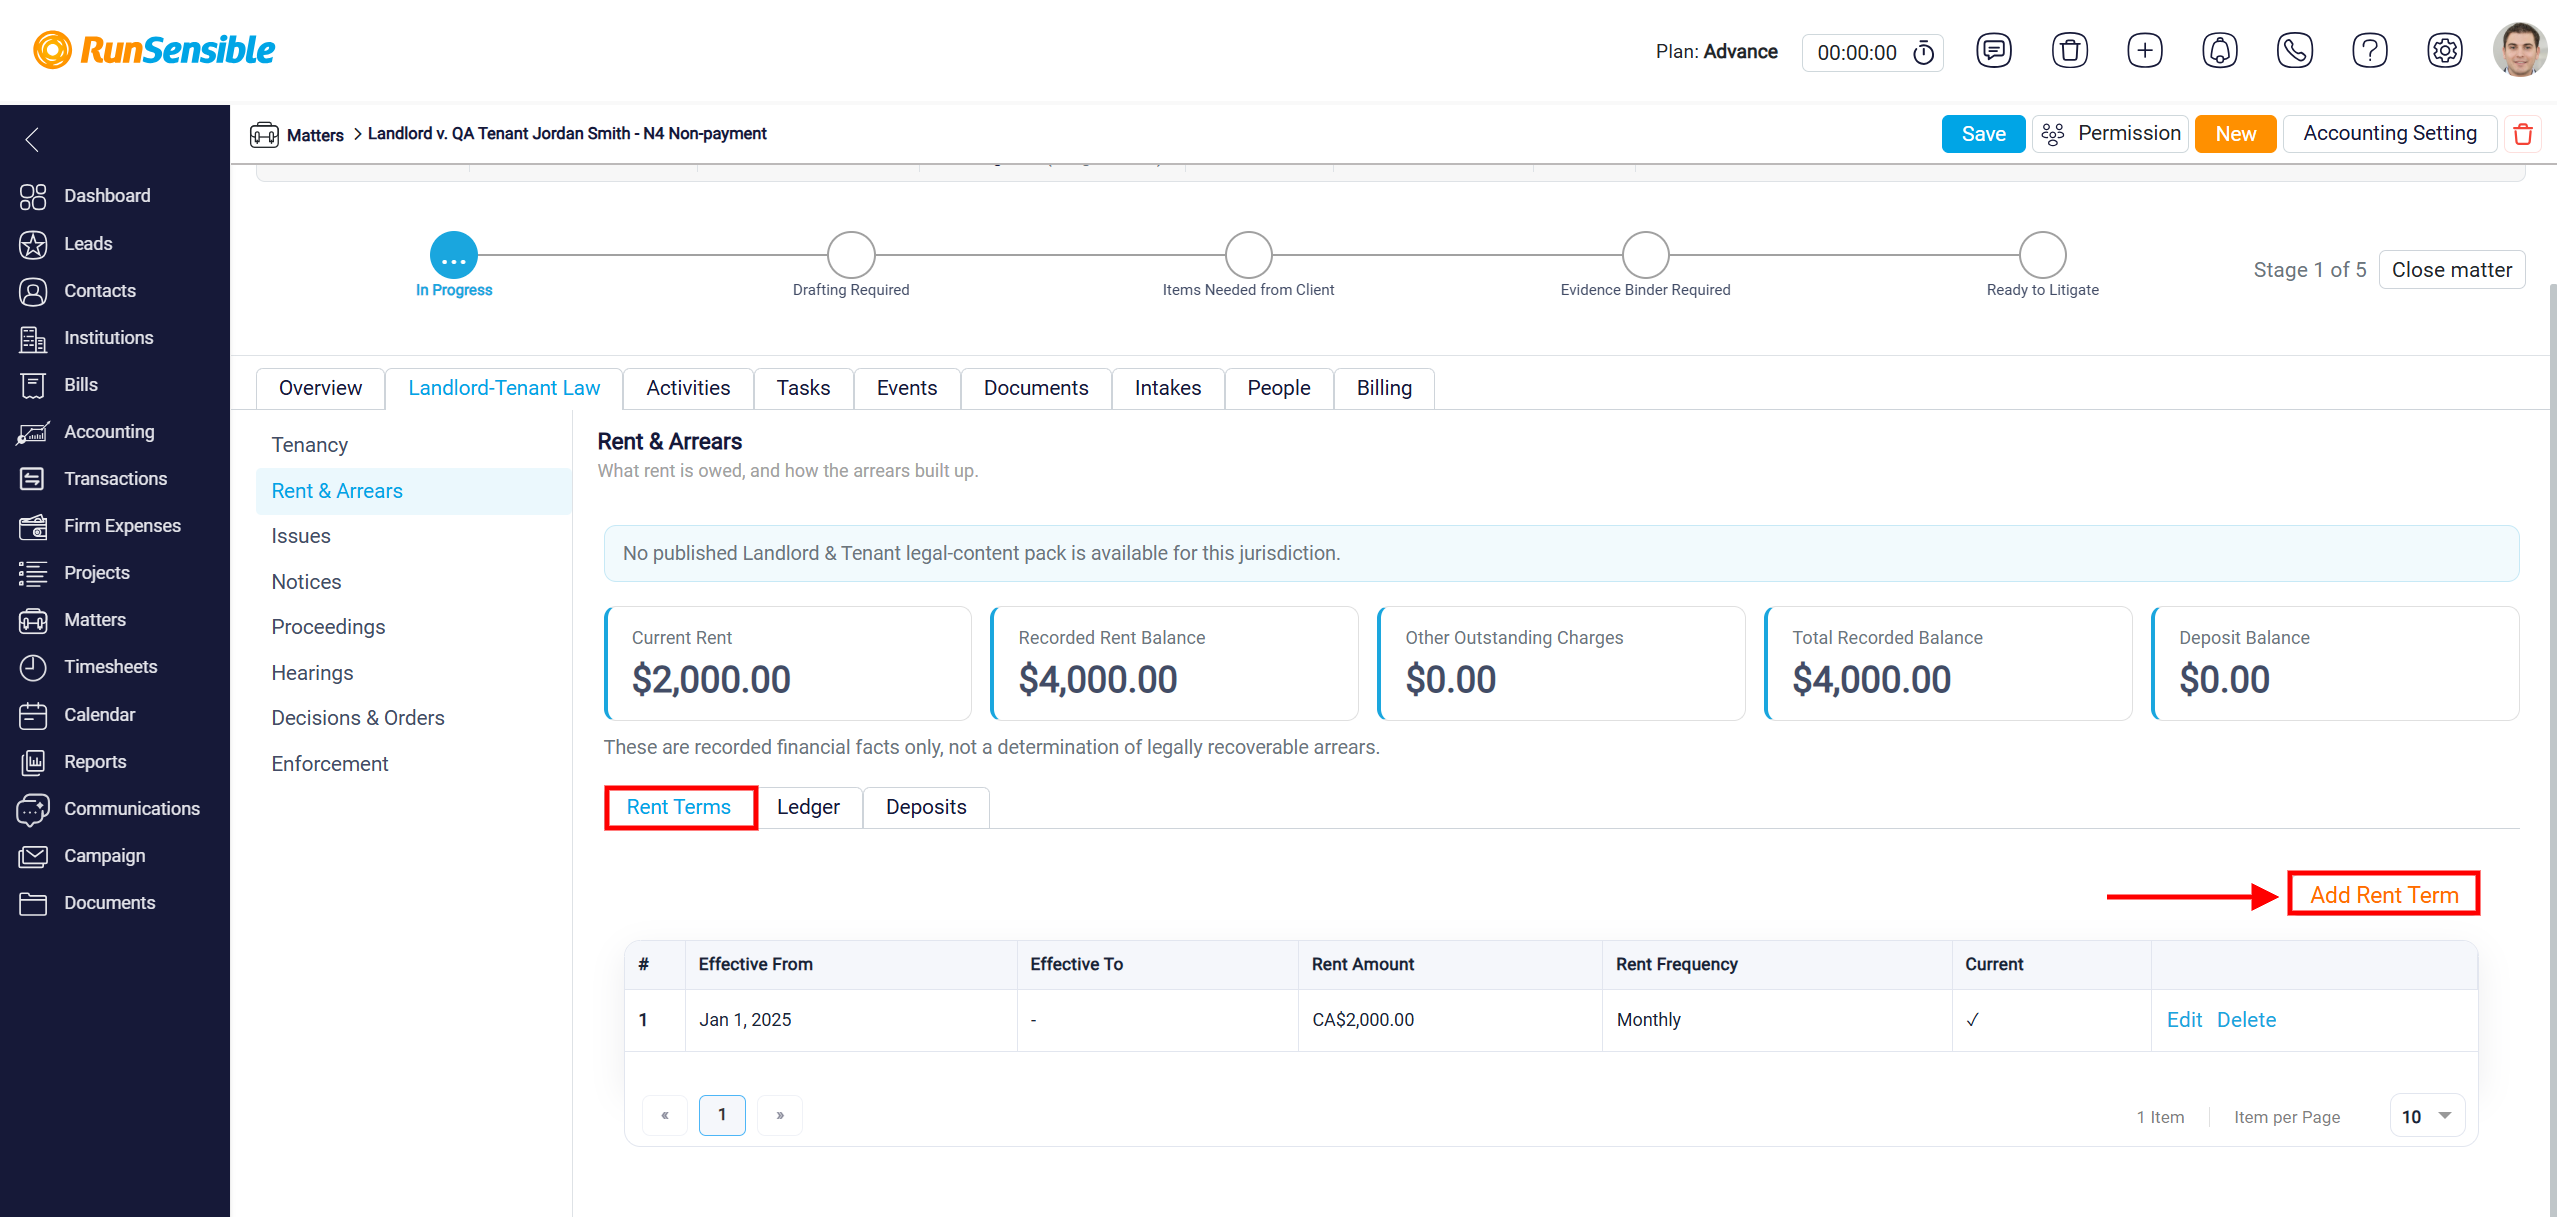
The Add Rent Term window will appear, allowing you to enter the rental payment details. In the Rent Amount field, enter the amount the tenant is required to pay, and select the appropriate Currency, such as CAD. Next, choose the Rent Frequency to specify how often rent is payable, such as monthly, and enter the Due Day to indicate the day of the month when payment is due. Use the Effective From field to specify the date when the rental terms begin and the Effective To field to indicate when they end, if applicable. Once all the necessary information has been entered, click Save to record the rent term or Cancel to close the window without saving.
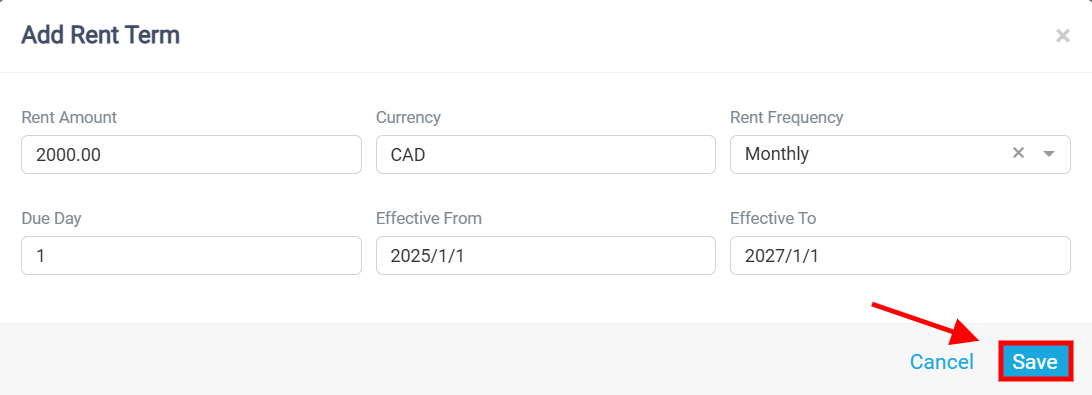
Once a rent term has been saved, it will appear in the Rent Terms table. The table displays the Effective From and Effective To dates, Rent Amount, Rent Frequency, and Current status, allowing you to review the rental payment arrangements associated with the matter.
The Current column indicates whether a rent term is currently active. A checkmark identifies the current rent term. The Current Rent summary at the top of the page also displays the recorded current rental amount.
To update an existing rent term, click Edit next to the relevant entry and modify the necessary information. To remove a rent term, click Delete. You can also click Add Rent Term to record additional rental arrangements or changes to the rental terms.
The Ledger tab in the Rent & Arrears section allows you to record and track rental charges, payments, credits, and adjustments associated with a Landlord and Tenant matter.
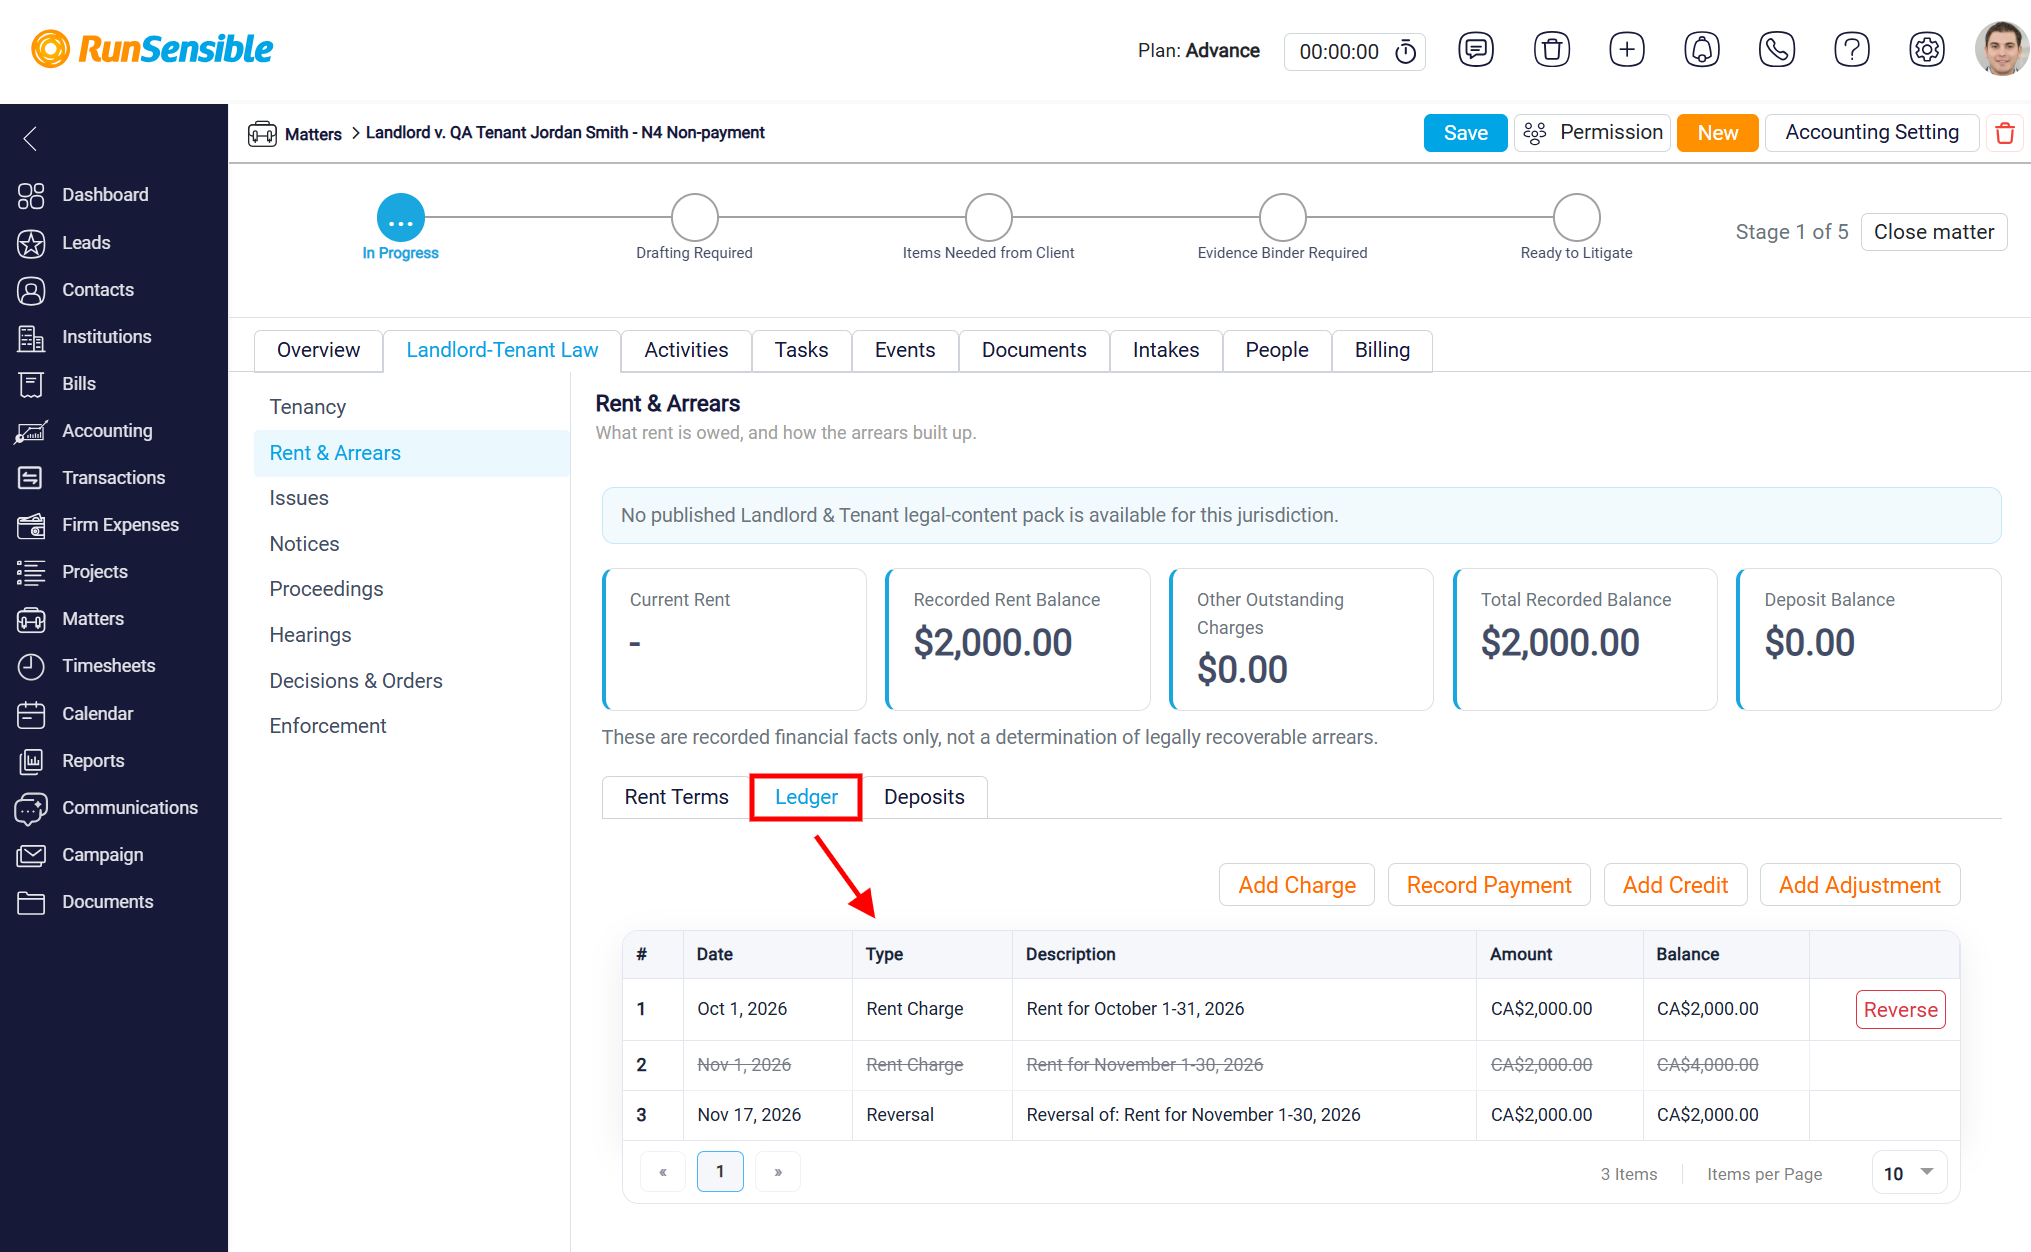
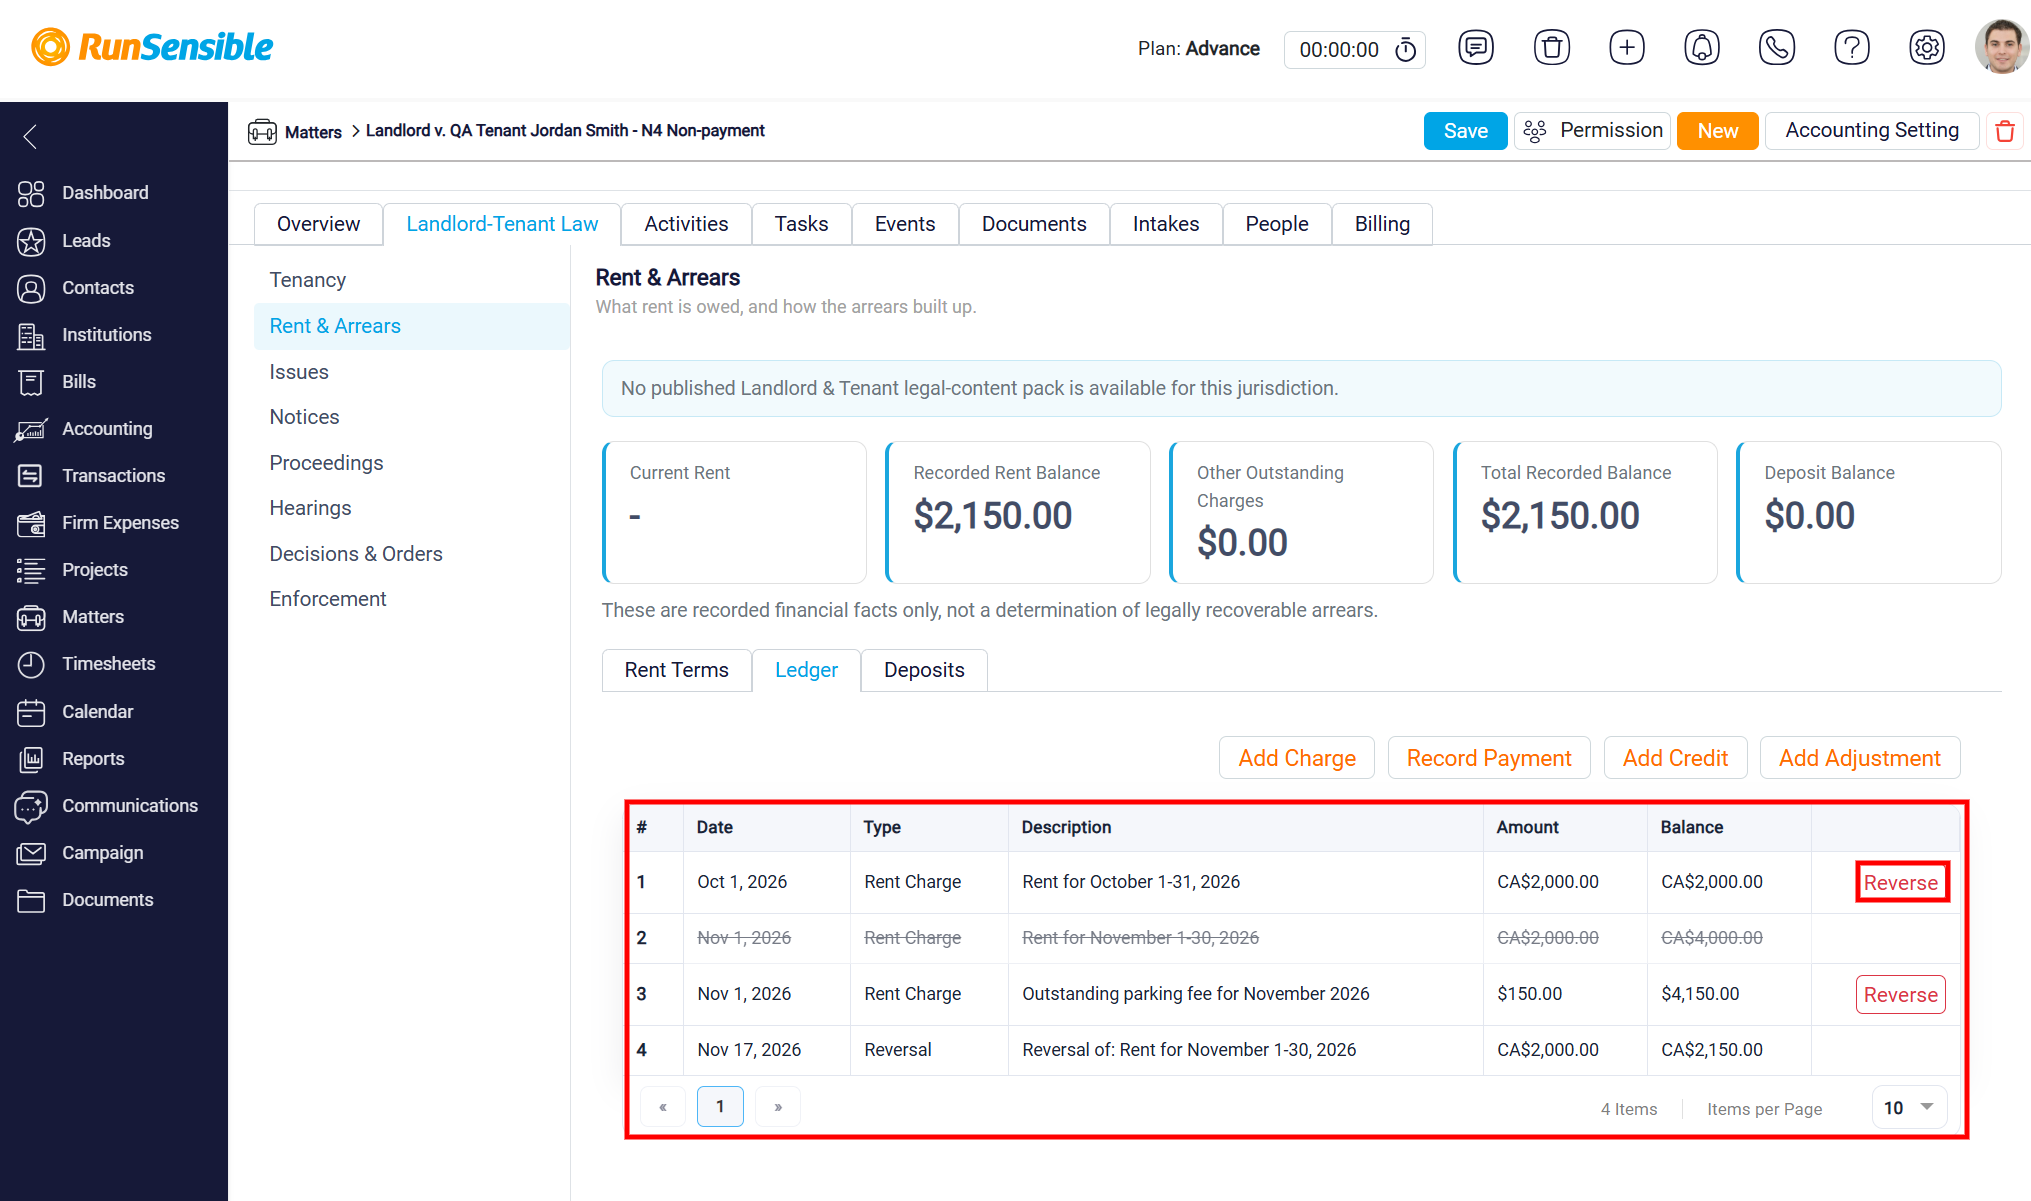
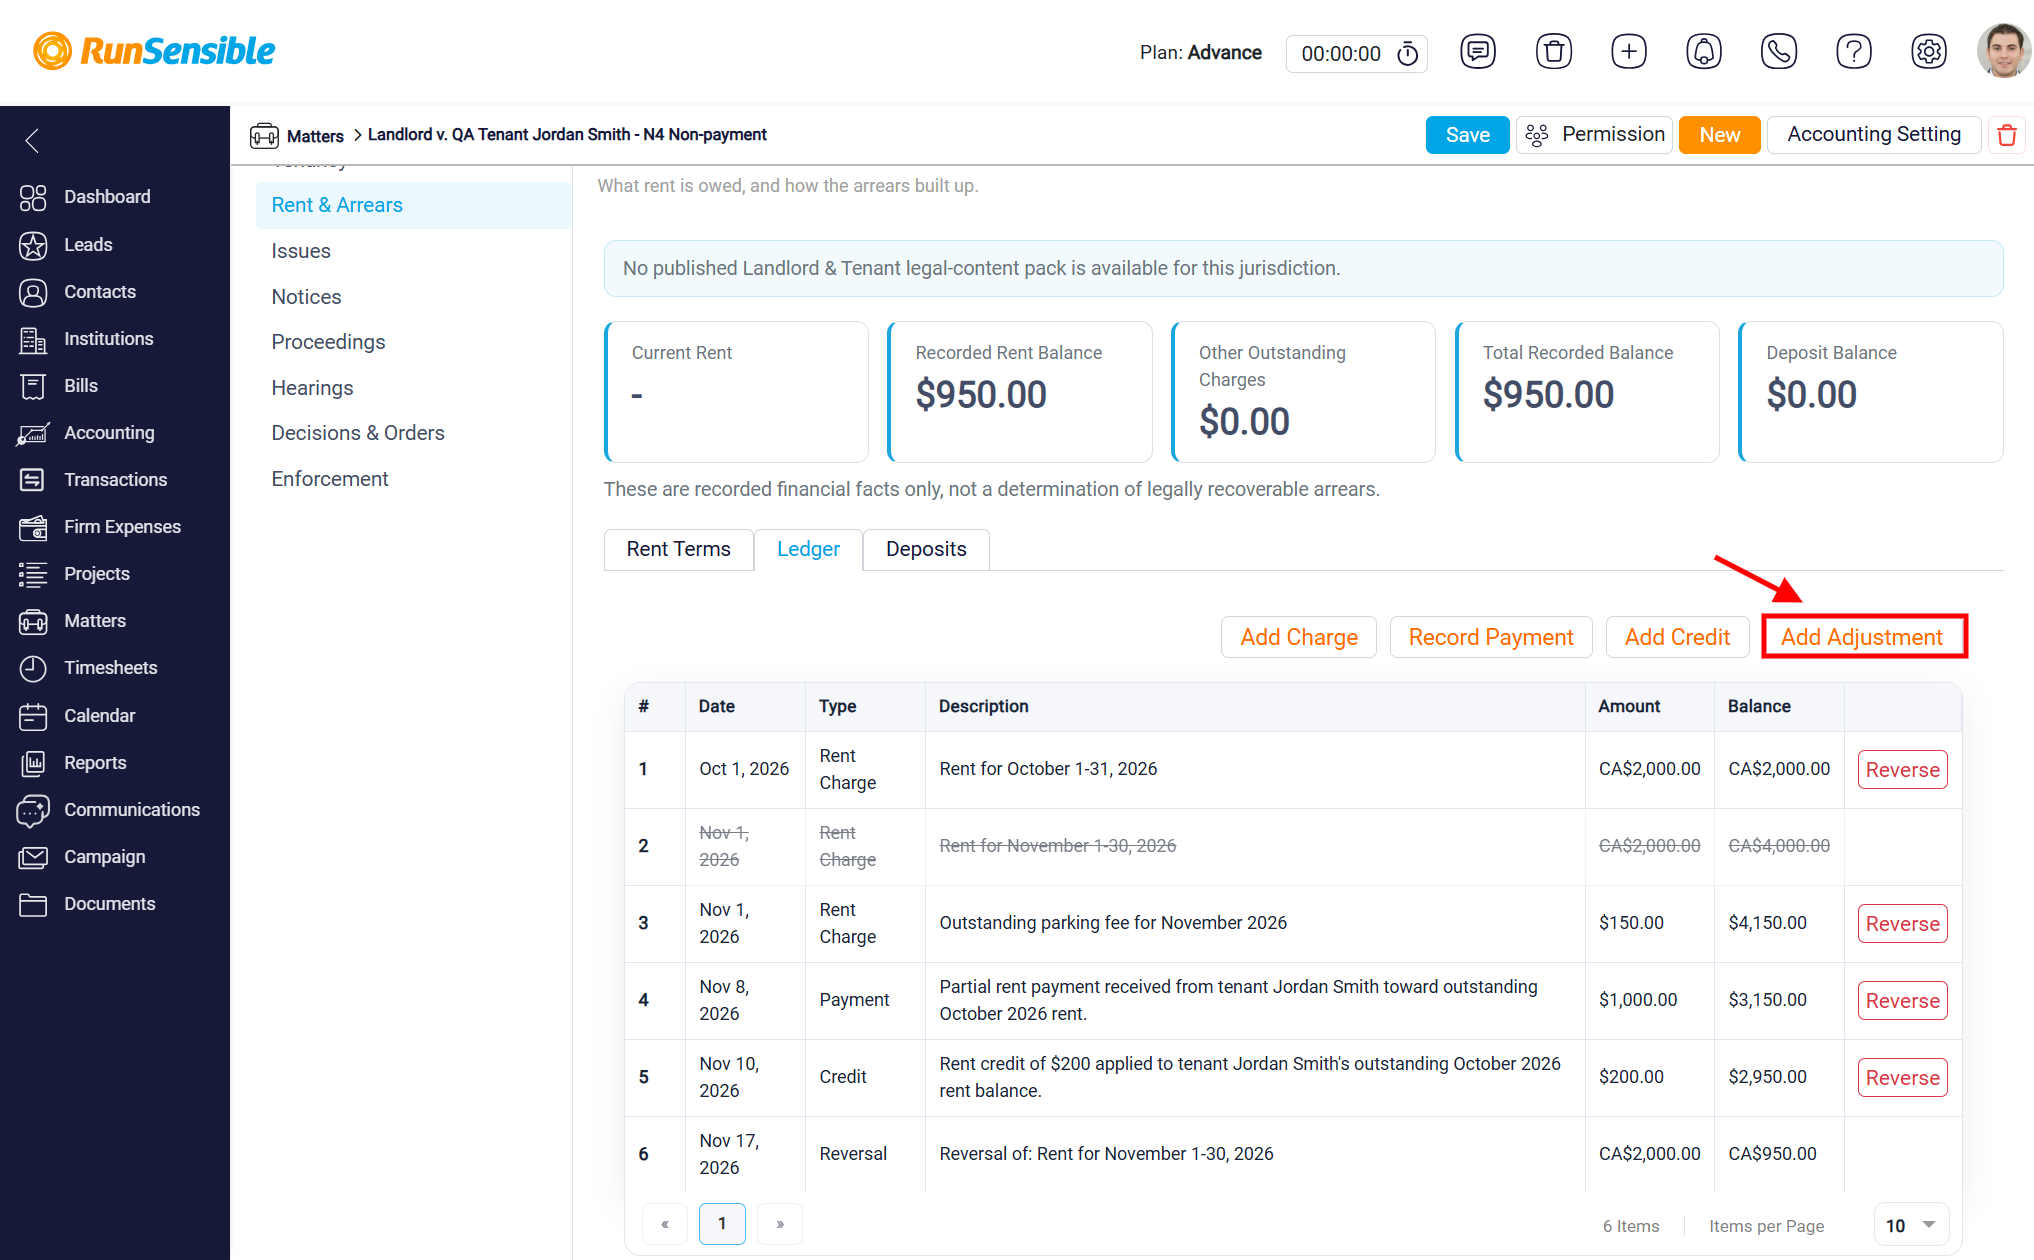
The Ledger table displays all recorded financial transactions, including the Date, Type, Description, Amount, and Balance. This information allows you to review rental charges, monitor outstanding balances, and maintain an organized record of financial activity. The Ledger tab also provides options to Add Charge, Record Payment, Add Credit, and Add Adjustment to manage the financial records associated with the matter.
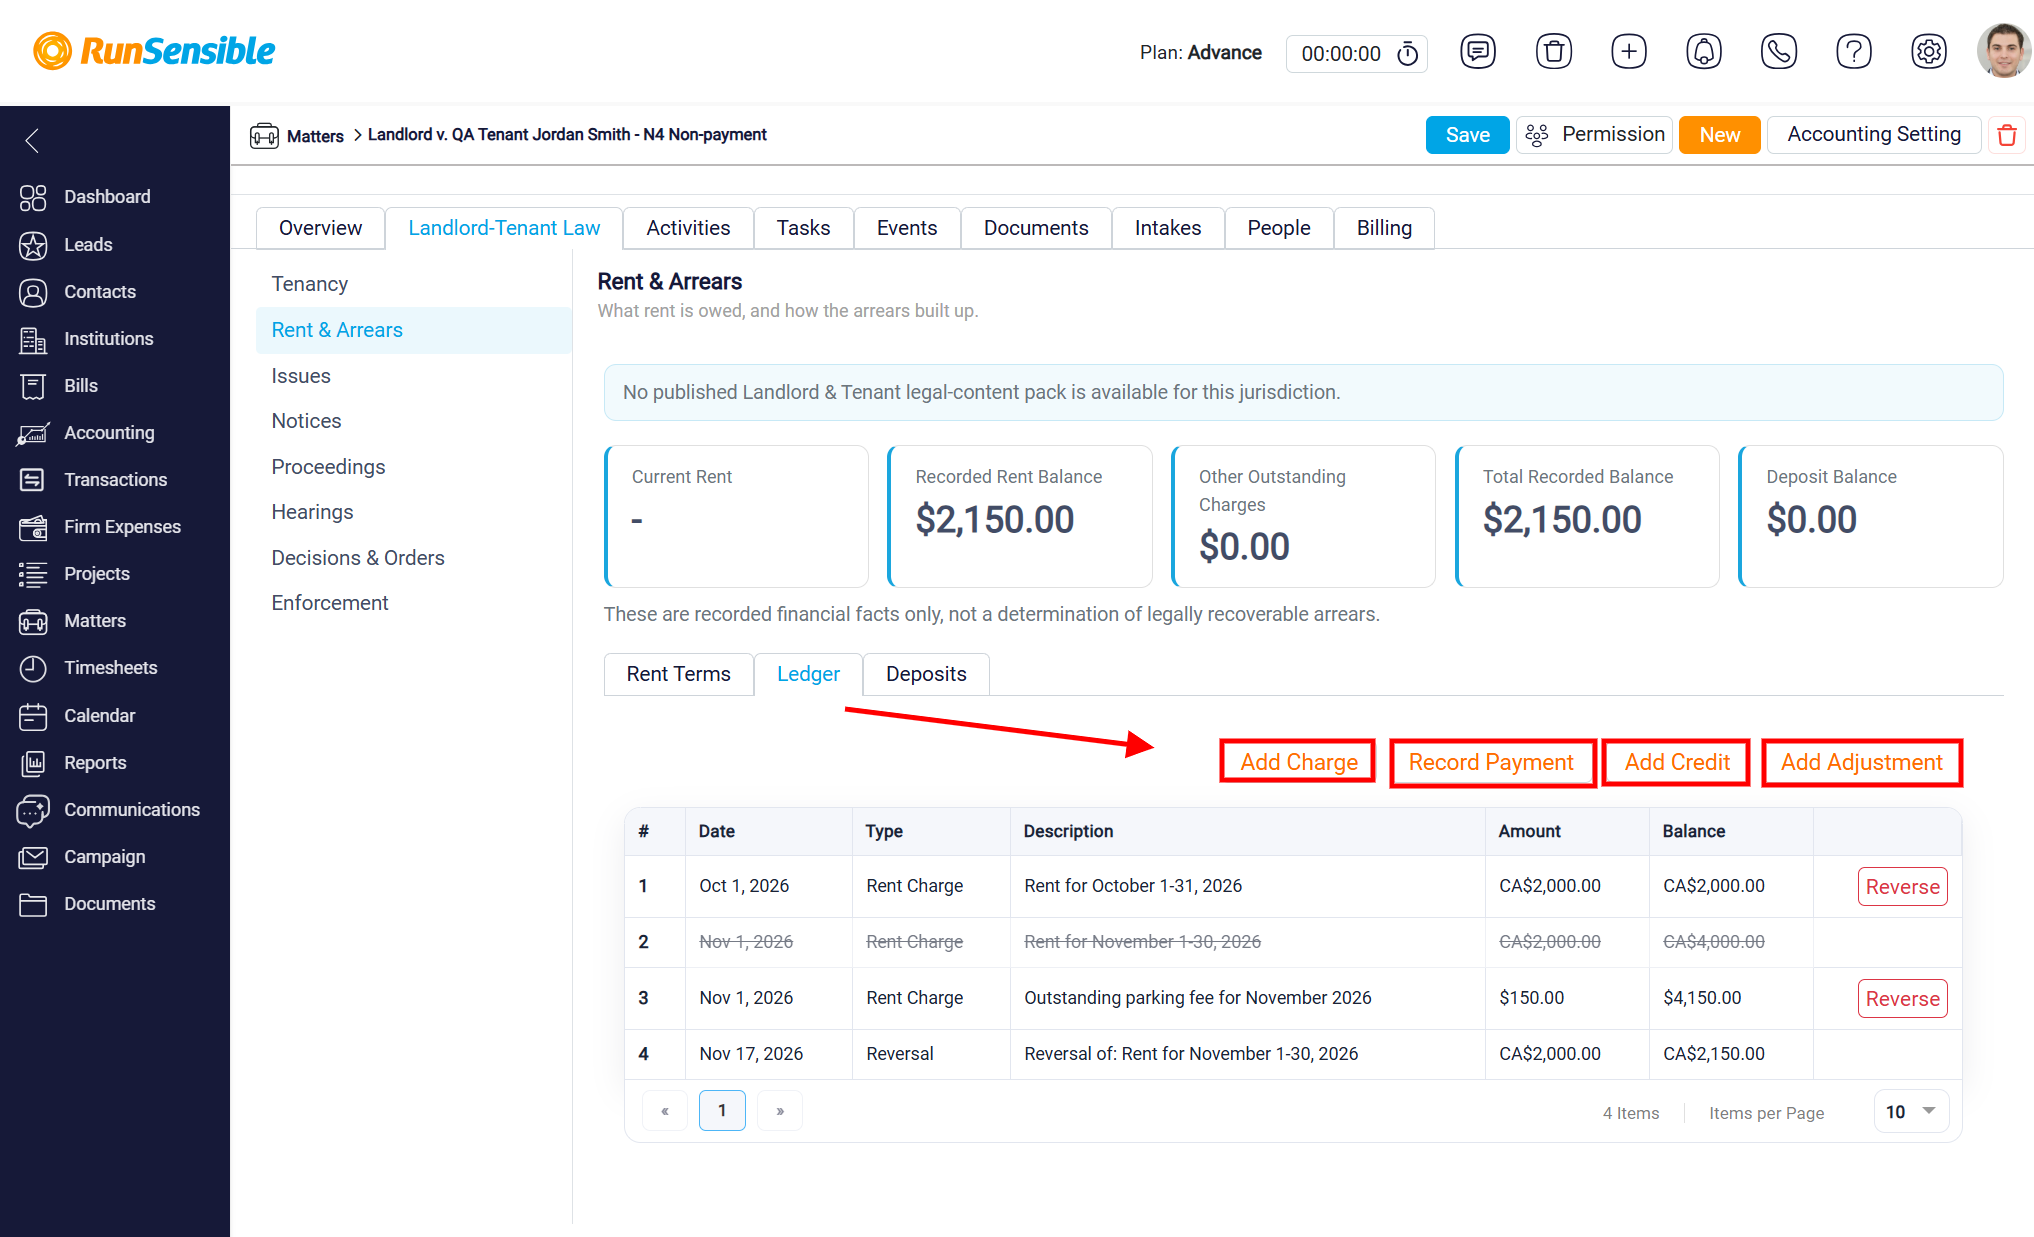
Adding a New Charge
To record a new rental charge or other outstanding amount, click the Add Charge button.
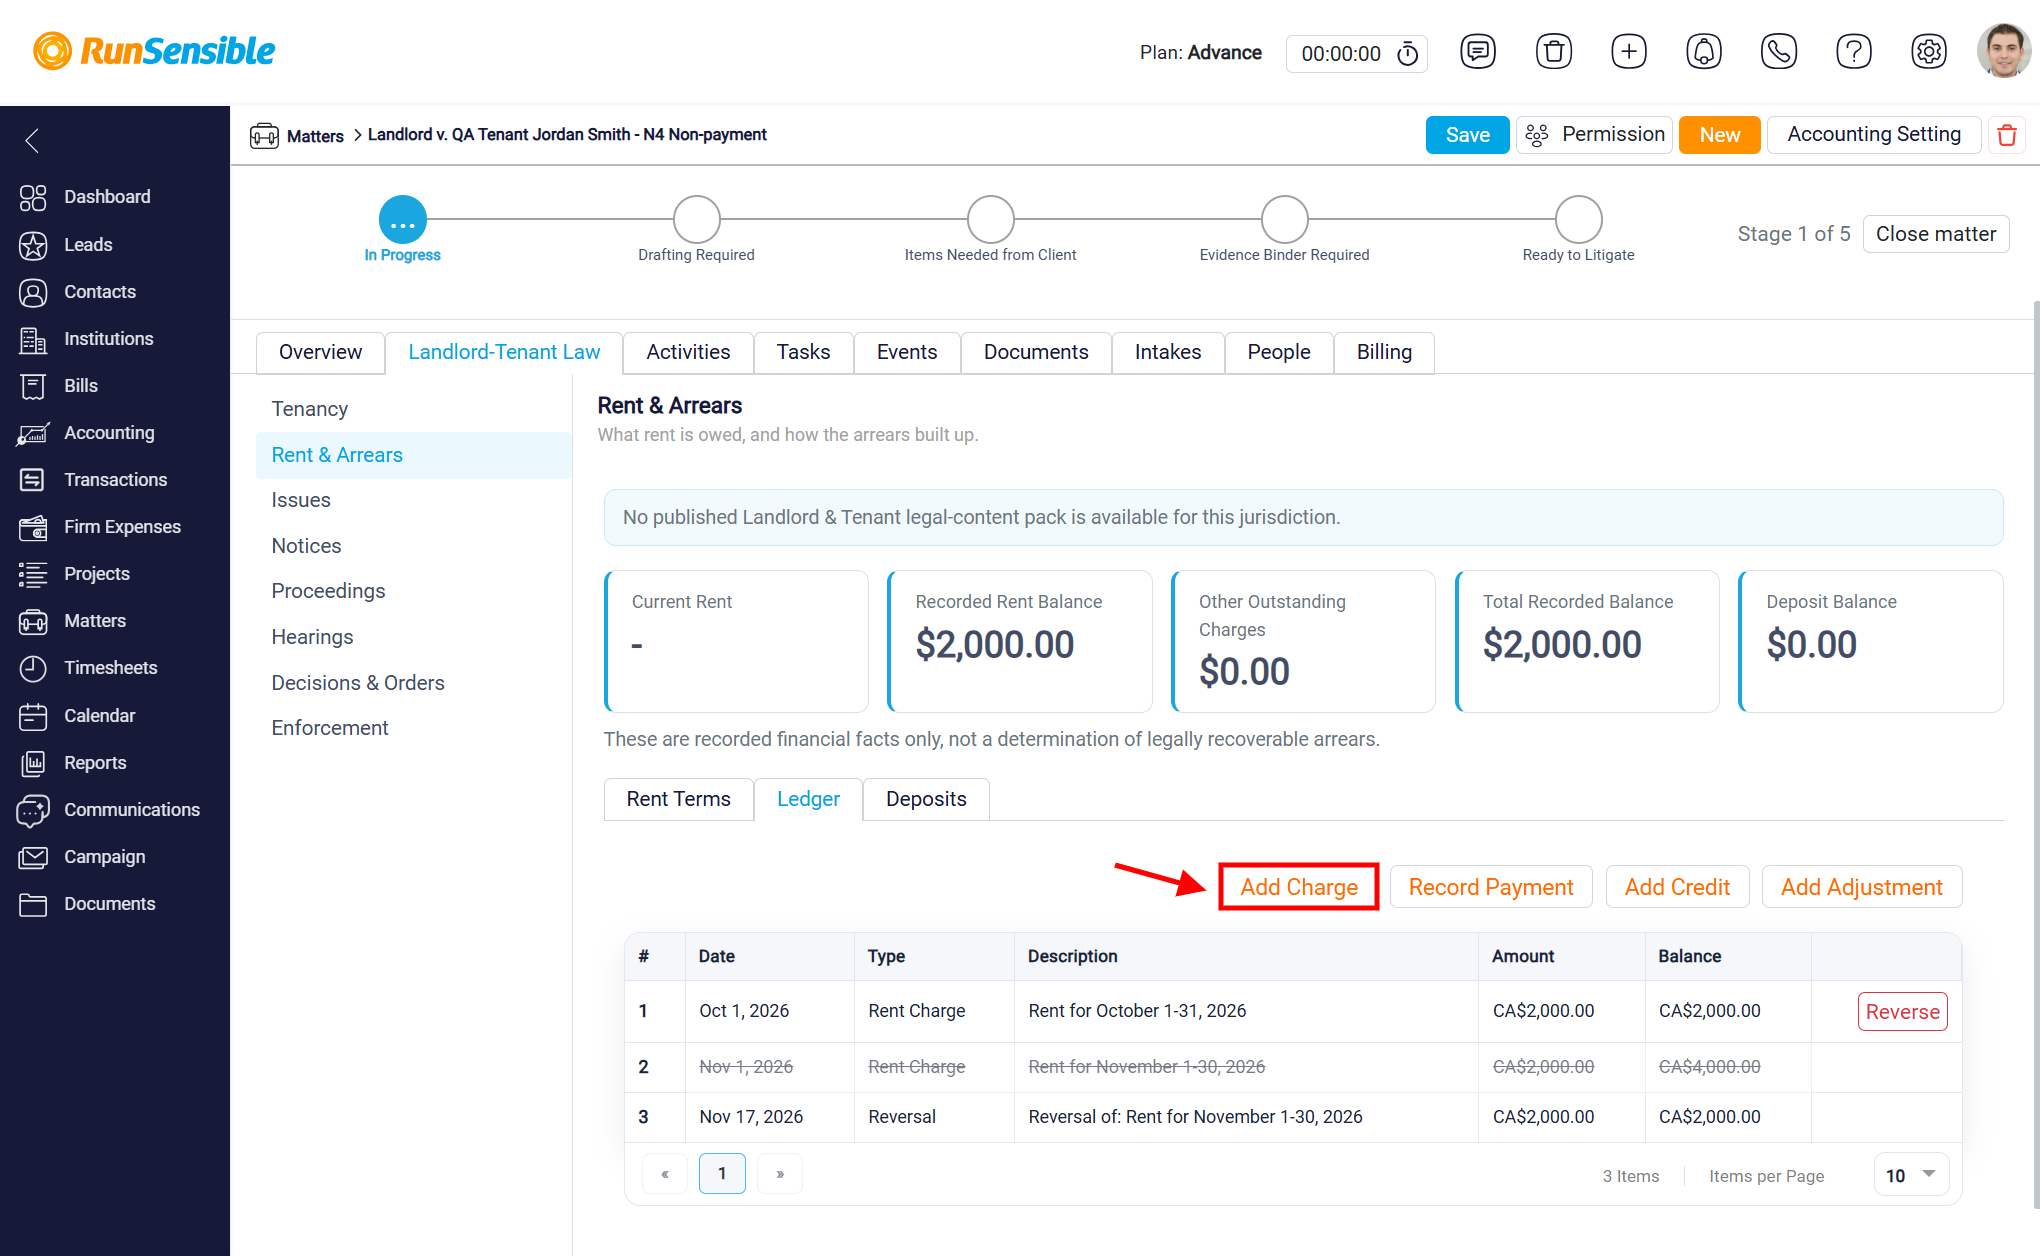
The Add Charge window will appear, allowing you to enter the charge details. In the Type field, select the appropriate charge type, such as Rent Charge or Other Charge. Next, enter the Category to identify the nature of the charge, such as a parking fee, and provide a brief Description explaining the charge. In the Amount field, enter the amount being charged, and use the Date field to specify when the charge applies. Once all the necessary information has been entered, click Save to record the charge or Cancel to close the window without saving.
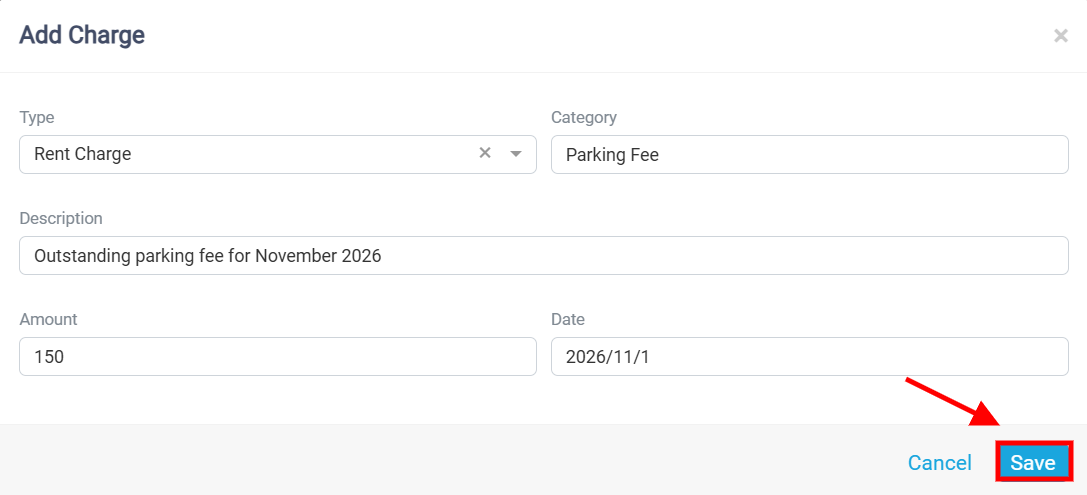
After saving, the recorded charge will appear in the Ledger table, where you can review its details and the associated balance. To reverse an existing transaction, click the Reverse button next to the relevant entry. The reversed transaction will remain visible in the ledger with a strikethrough, and a corresponding reversal entry will be recorded to reflect the change in the balance.
Recording Rent Payments
The Record Payment option in the Ledger tab allows you to record payments received from tenants and maintain an accurate record of rental transactions associated with a Landlord and Tenant matter.
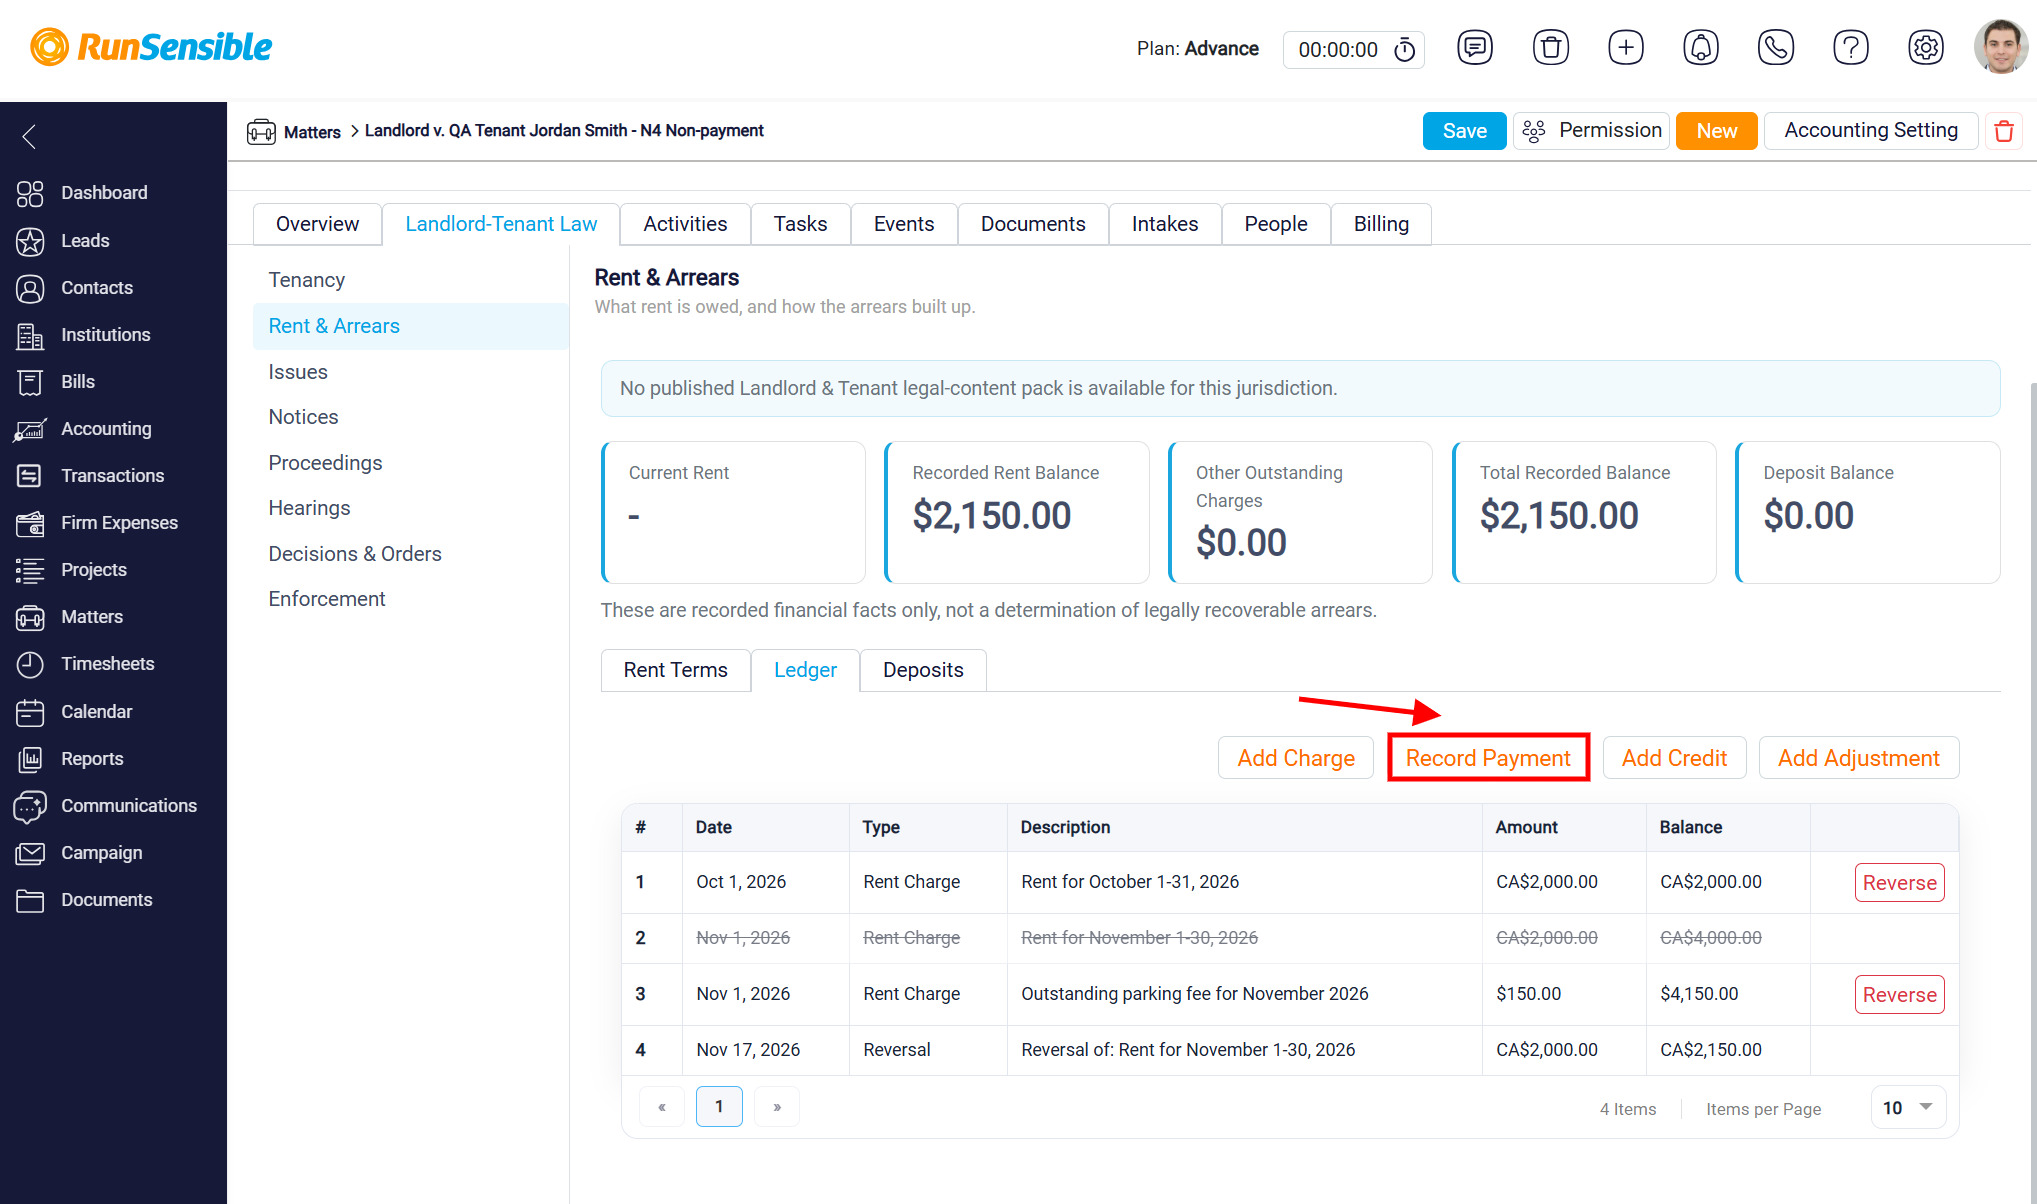
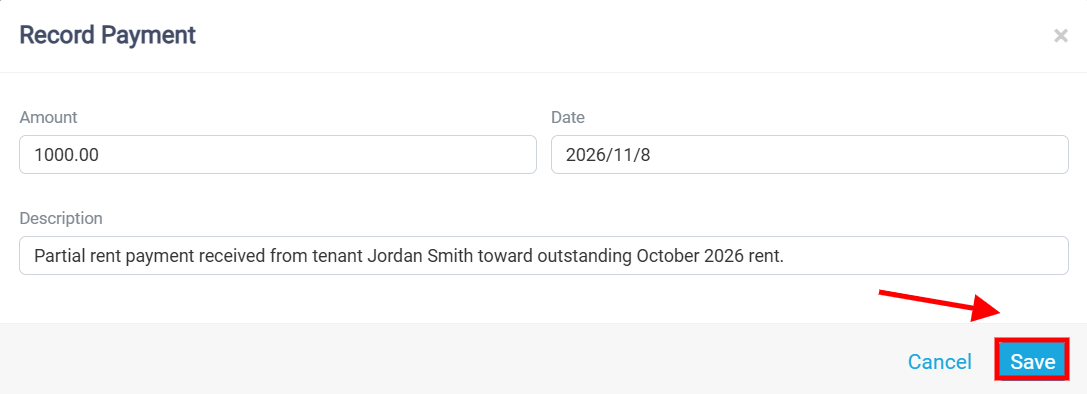
The Record Payment window will appear, allowing you to enter the payment details. In the Amount field, enter the amount received from the tenant, whether it is a full or partial payment toward the outstanding balance. Next, use the Date field to specify when the payment was received. In the Description field, provide a brief explanation of the payment, such as the tenant’s name, the rental period, or the outstanding rent to which the payment relates. Once all the necessary information has been entered, click Save to record the payment or Cancel to close the window without saving.
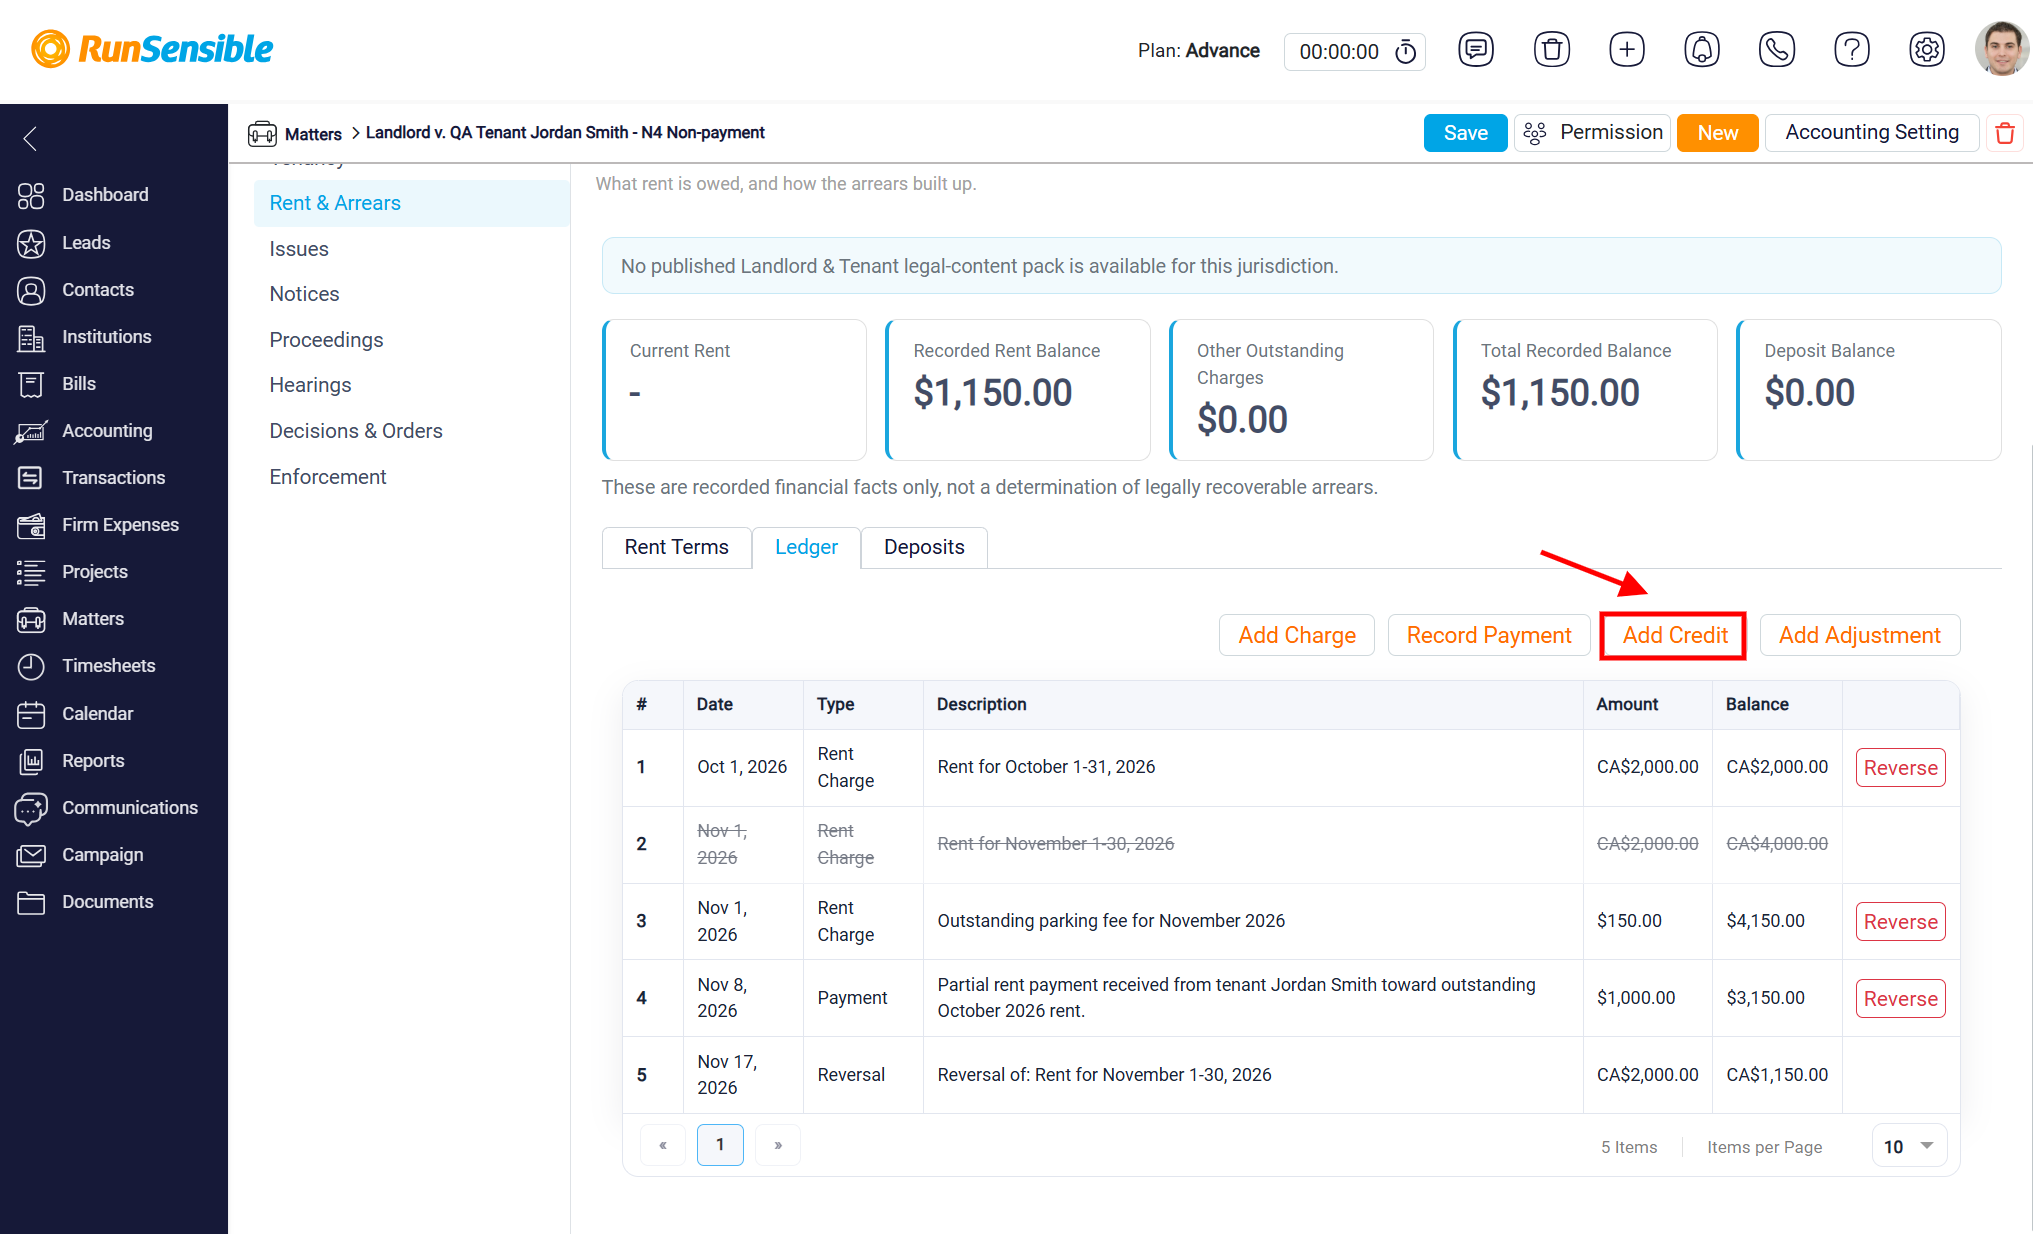
After saving, the payment will be recorded in the Ledger table, allowing you to track the transaction and review the updated outstanding balance. The ledger maintains a record of charges, payments, and other financial adjustments, helping you monitor rent arrears and keep the matter’s financial information organized and up to date.
Adding a Credit to the Ledger
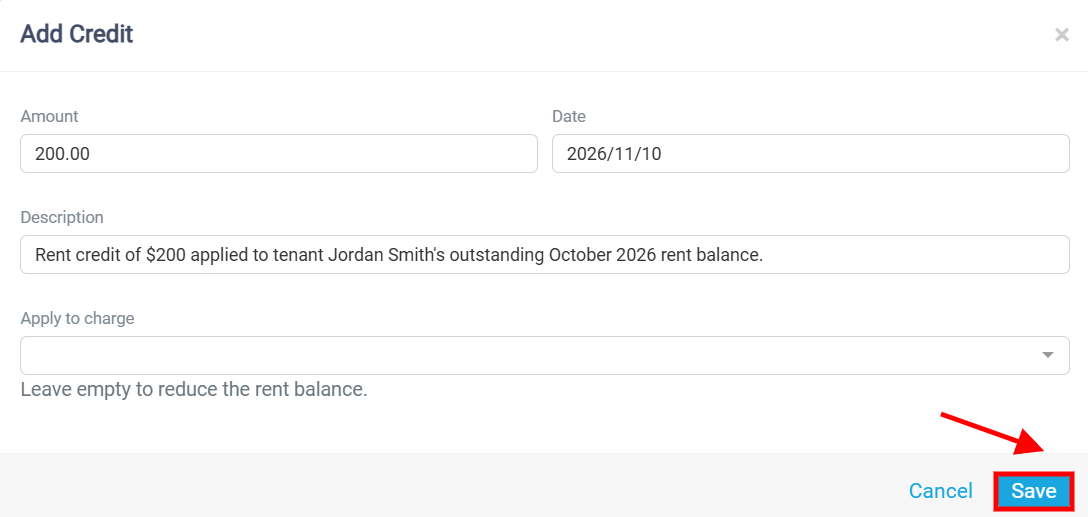
The Add Credit option in the Ledger tab allows you to record credits that reduce a tenant’s outstanding rent balance or apply to a specific charge associated with a Landlord and Tenant matter. To add a credit, click the Add Credit button.
The Add Credit window will appear, allowing you to enter the credit details. In the Amount field, enter the credit amount, and use the Date field to specify when the credit applies. Next, enter a brief Description explaining the reason for the credit, such as a rent reduction, correction, or adjustment to an outstanding amount. The Apply to Charge dropdown allows you to select a specific charge to which the credit should be applied. If you want to reduce the overall rent balance instead, leave this field blank. Once all the necessary information has been entered, click Save to record the credit or Cancel to close the window without saving.
After saving, the credit will be recorded in the Ledger table, allowing you to review the transaction and track changes to the outstanding balance. This feature helps maintain accurate financial records by documenting credits applied to a tenant’s rental account.
Adding an Adjustment to the Ledger
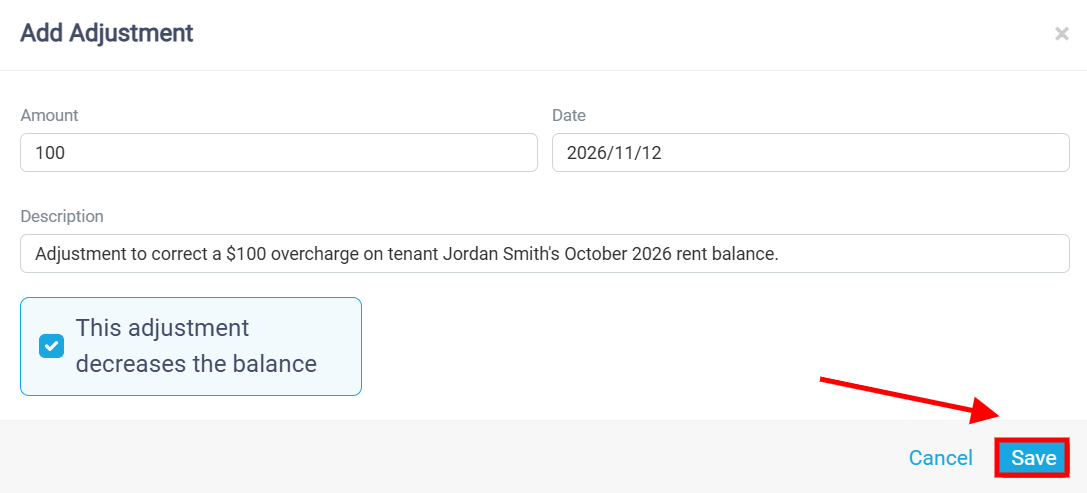
The Add Adjustment option in the Ledger tab allows you to make corrections to a tenant’s outstanding rent balance by recording adjustments that either increase or decrease the amount owed. This feature helps maintain accurate financial records when changes are required due to billing errors, overcharges, or other financial corrections associated with a Landlord and Tenant matter. To add an adjustment, click the Add Adjustment button.
The Add Adjustment window will appear, allowing you to enter the adjustment details. In the Amount field, enter the amount you want to adjust, and use the Date field to specify when the adjustment applies. Next, provide a brief explanation in the Description field, such as correcting an overcharge or updating an outstanding rent balance. If the adjustment is intended to reduce the amount owed by the tenant, select the This adjustment decreases the balance checkbox. Otherwise, leave the checkbox unchecked to increase the outstanding balance. Once all the necessary information has been entered, click Save to record the adjustment or Cancel to close the window without saving.
After saving, the adjustment will be recorded in the Ledger table, and the outstanding balance will be updated accordingly. You can review the transaction details, including the adjustment date, description, amount, and resulting balance. This feature helps ensure that financial corrections are properly documented and that the tenant’s recorded rent balance remains accurate and up to date.
Viewing and Managing Recorded Deposits
The Deposits tab in the Rent & Arrears section allows you to record and track deposits associated with a Landlord and Tenant matter. This feature helps you maintain organized records of deposits received from tenants, monitor deposit balances, and keep important financial information accessible throughout the tenancy. To access this section, select the Deposits tab to view the deposit information associated with the matter.
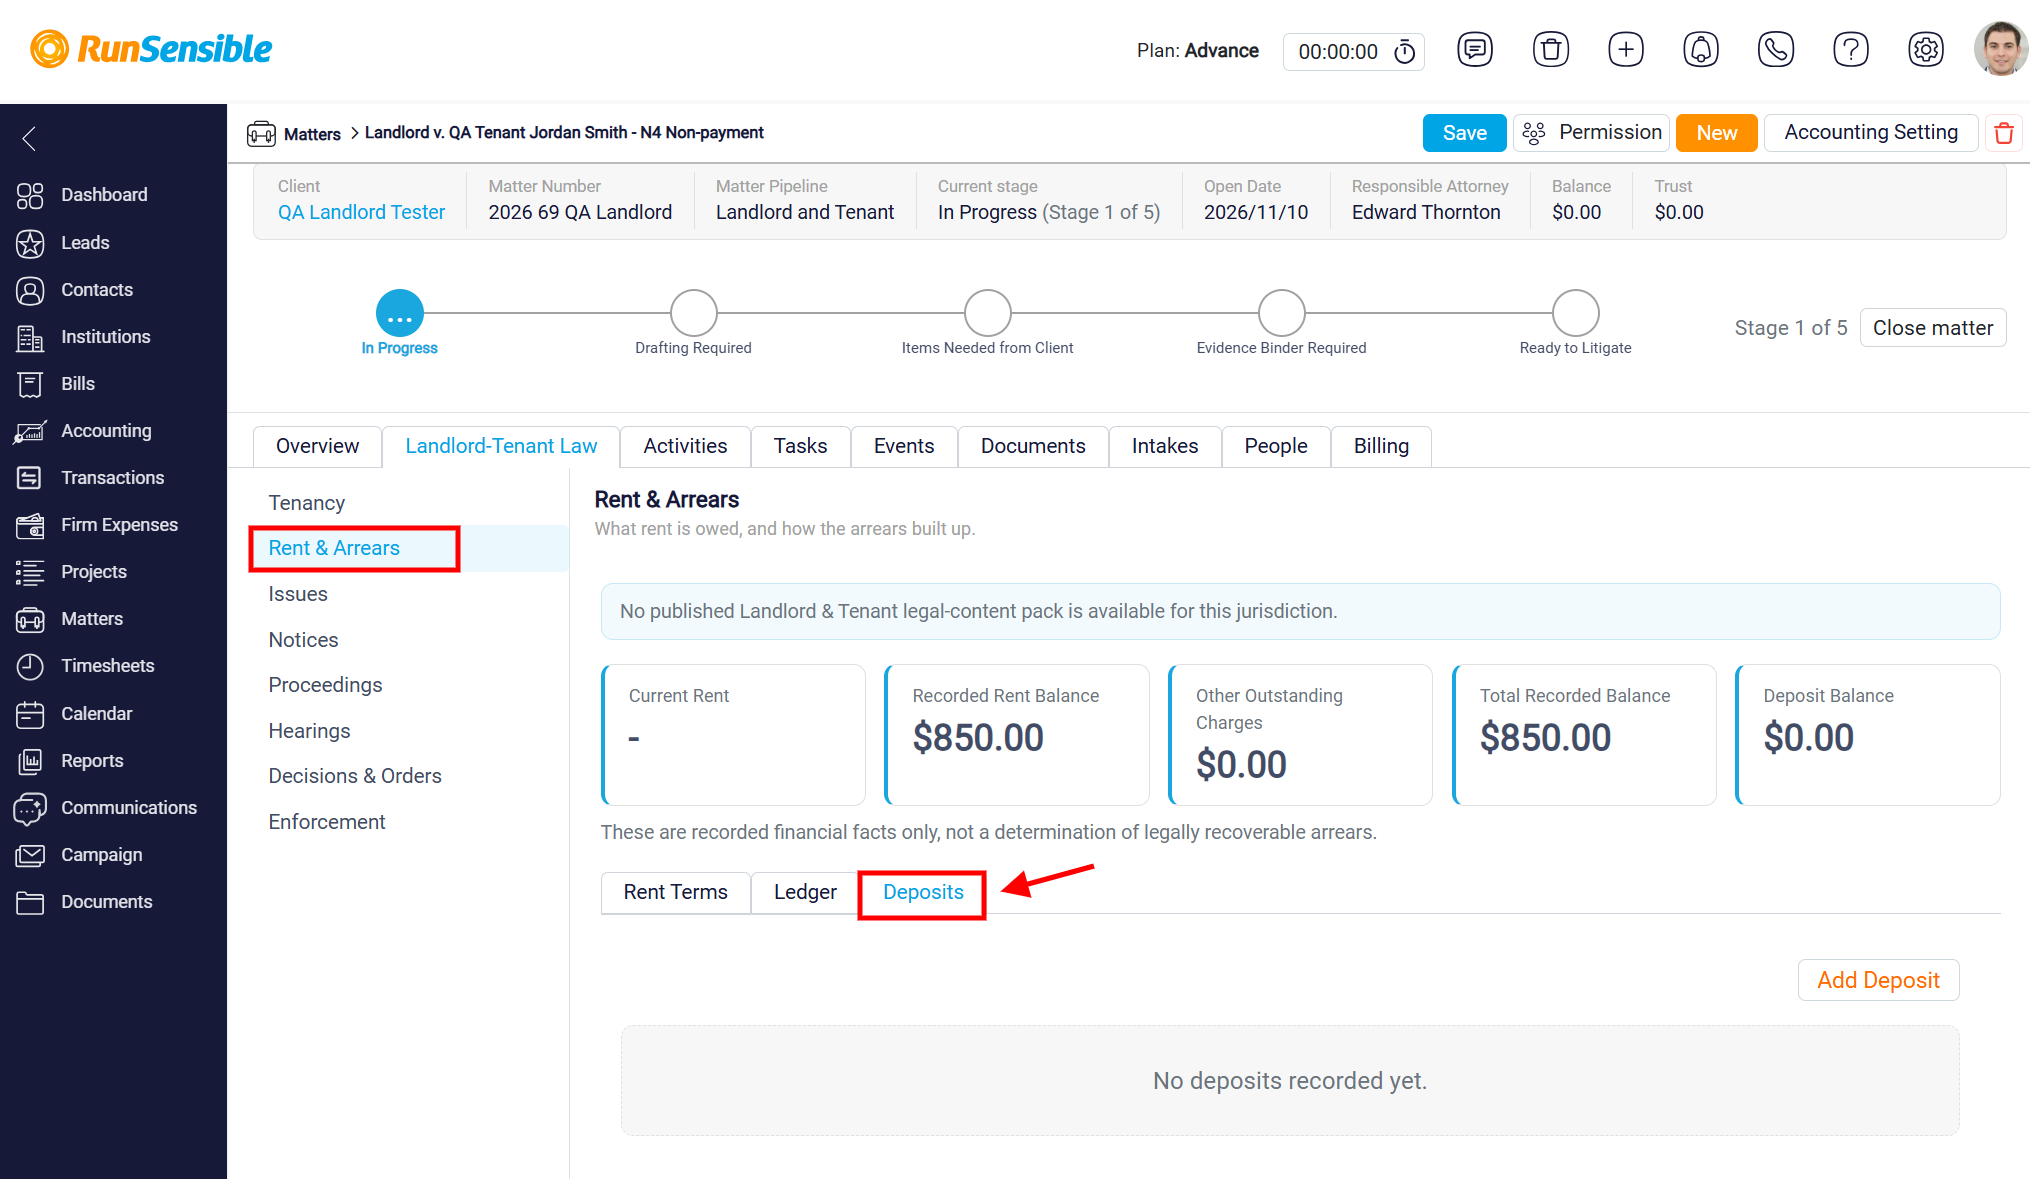
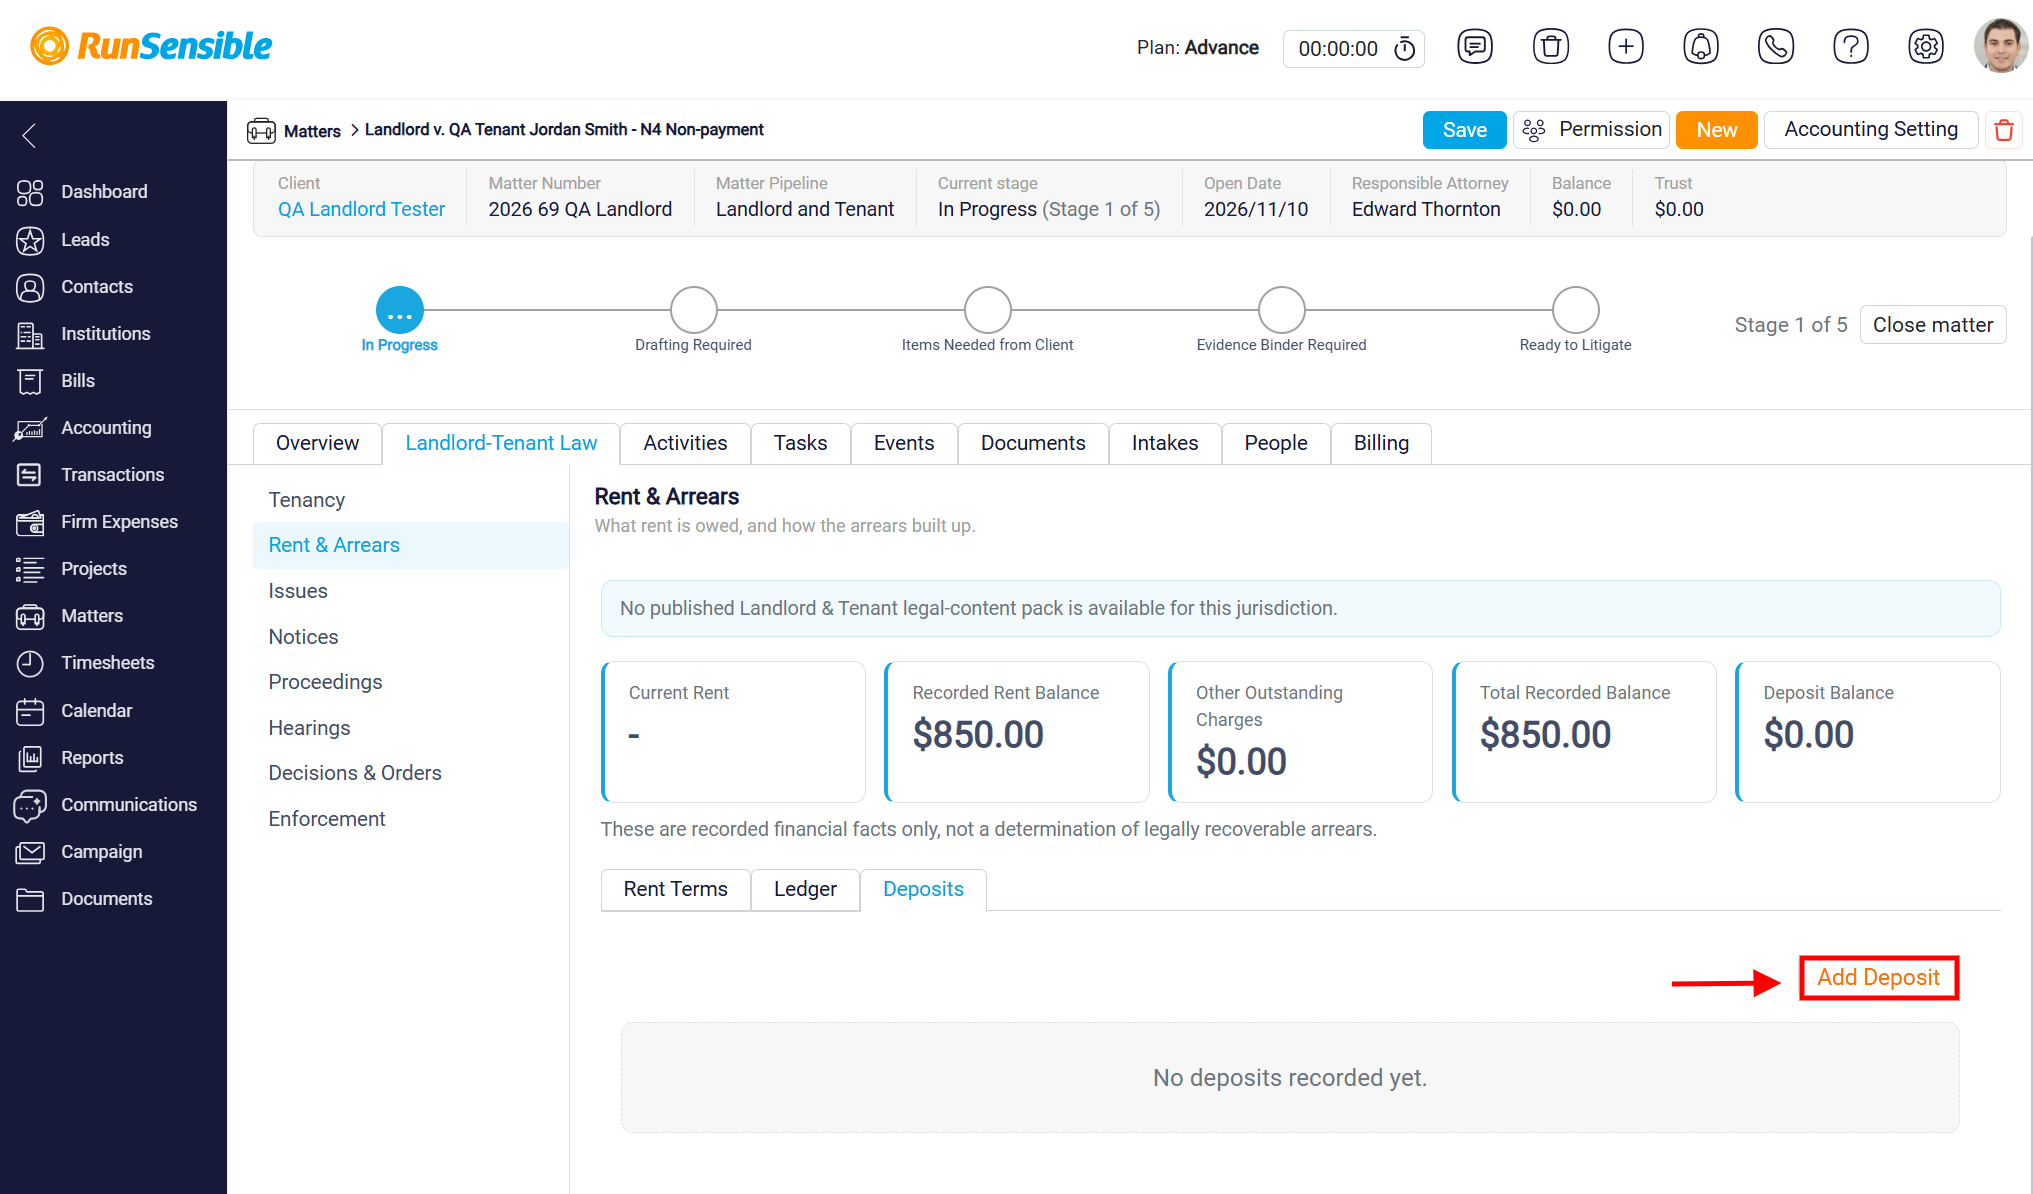
The Deposits tab displays any deposits recorded for the matter, while the Deposit Balance summary at the top of the page shows the current recorded deposit balance. If no deposits have been added, the message No deposits recorded yet will appear.
To record a new deposit, click the Add Deposit button. This allows you to begin entering the deposit information associated with the tenancy. Maintaining accurate deposit records helps you track funds received from tenants and provides a reference when reviewing the financial details of the matter.
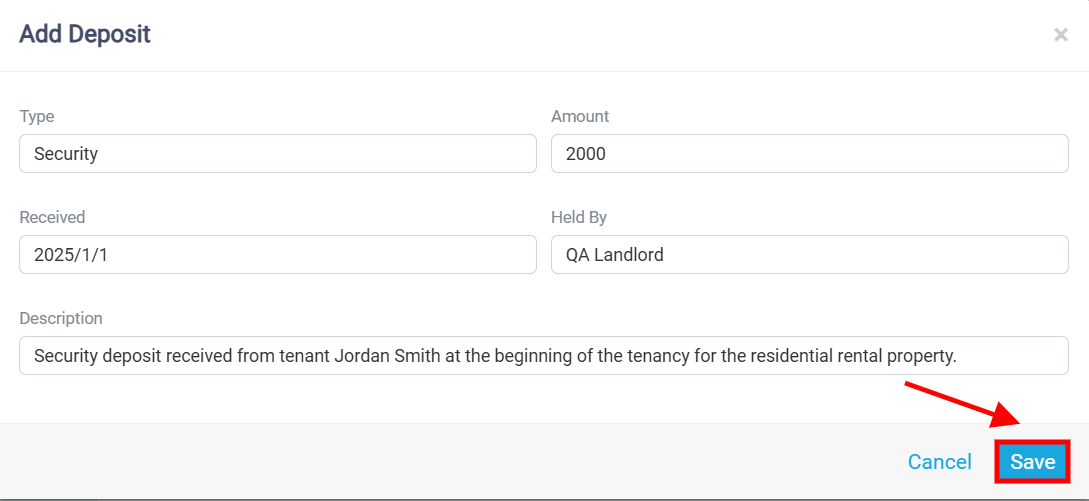
The Add Deposit window will appear, allowing you to enter the deposit details. In the Type field, specify the type of deposit, such as a security deposit, and enter the amount received in the Amount field. Next, use the Received field to indicate the date the deposit was collected from the tenant. In the Held By field, enter the name of the person or organization responsible for holding the deposit, such as the landlord or property management company. In the Description field, provide a brief explanation of the deposit, including its purpose and any relevant details about the tenancy. Once all the necessary information has been entered, click Save to record the deposit or Cancel to close the window without saving.
After saving, the deposit will be recorded in the Deposits tab, allowing you to review the deposit information and maintain an organized record of funds received from the tenant. The Deposit Balance summary provides an overview of the recorded deposit balance associated with the matter.
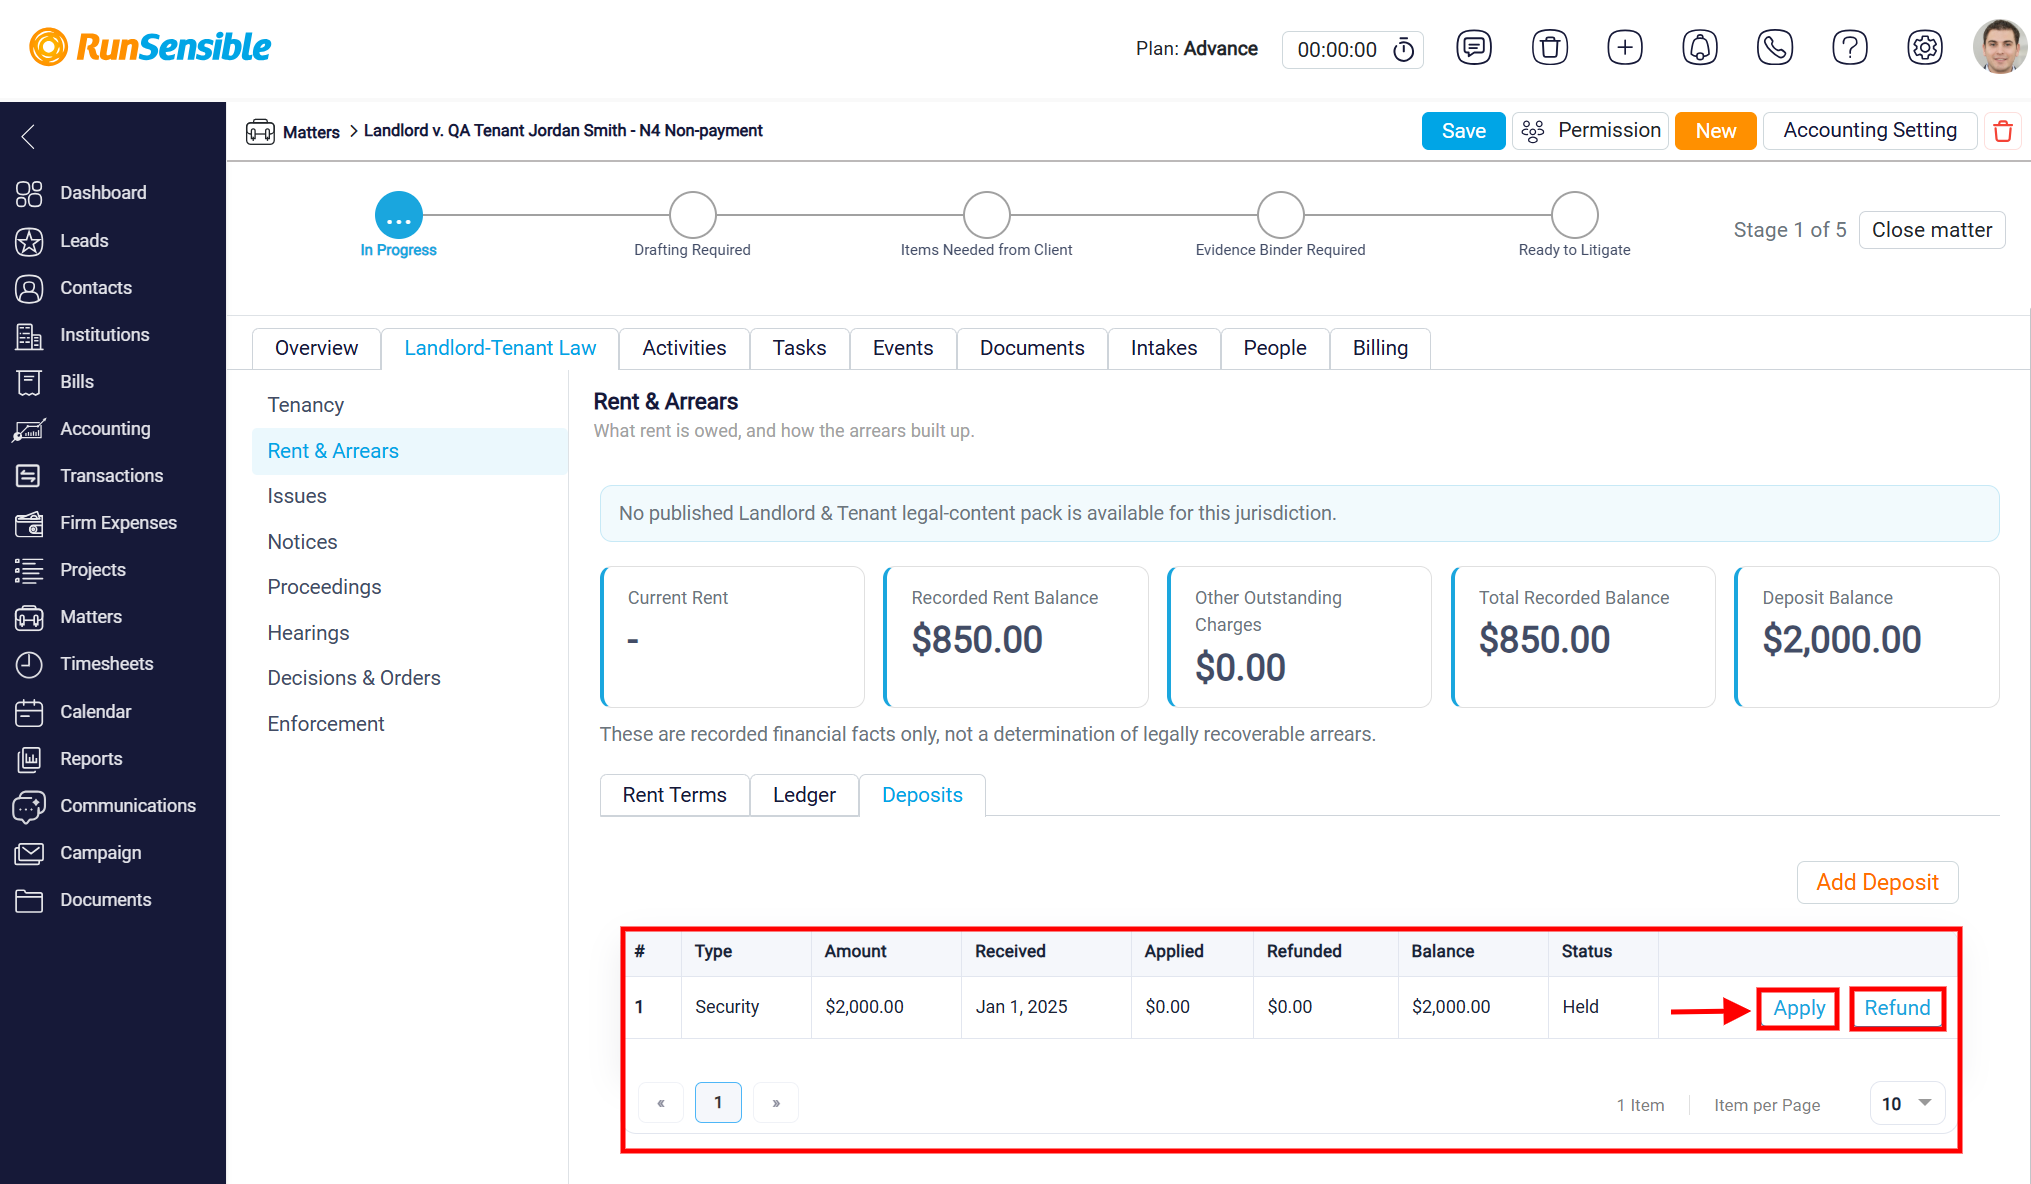
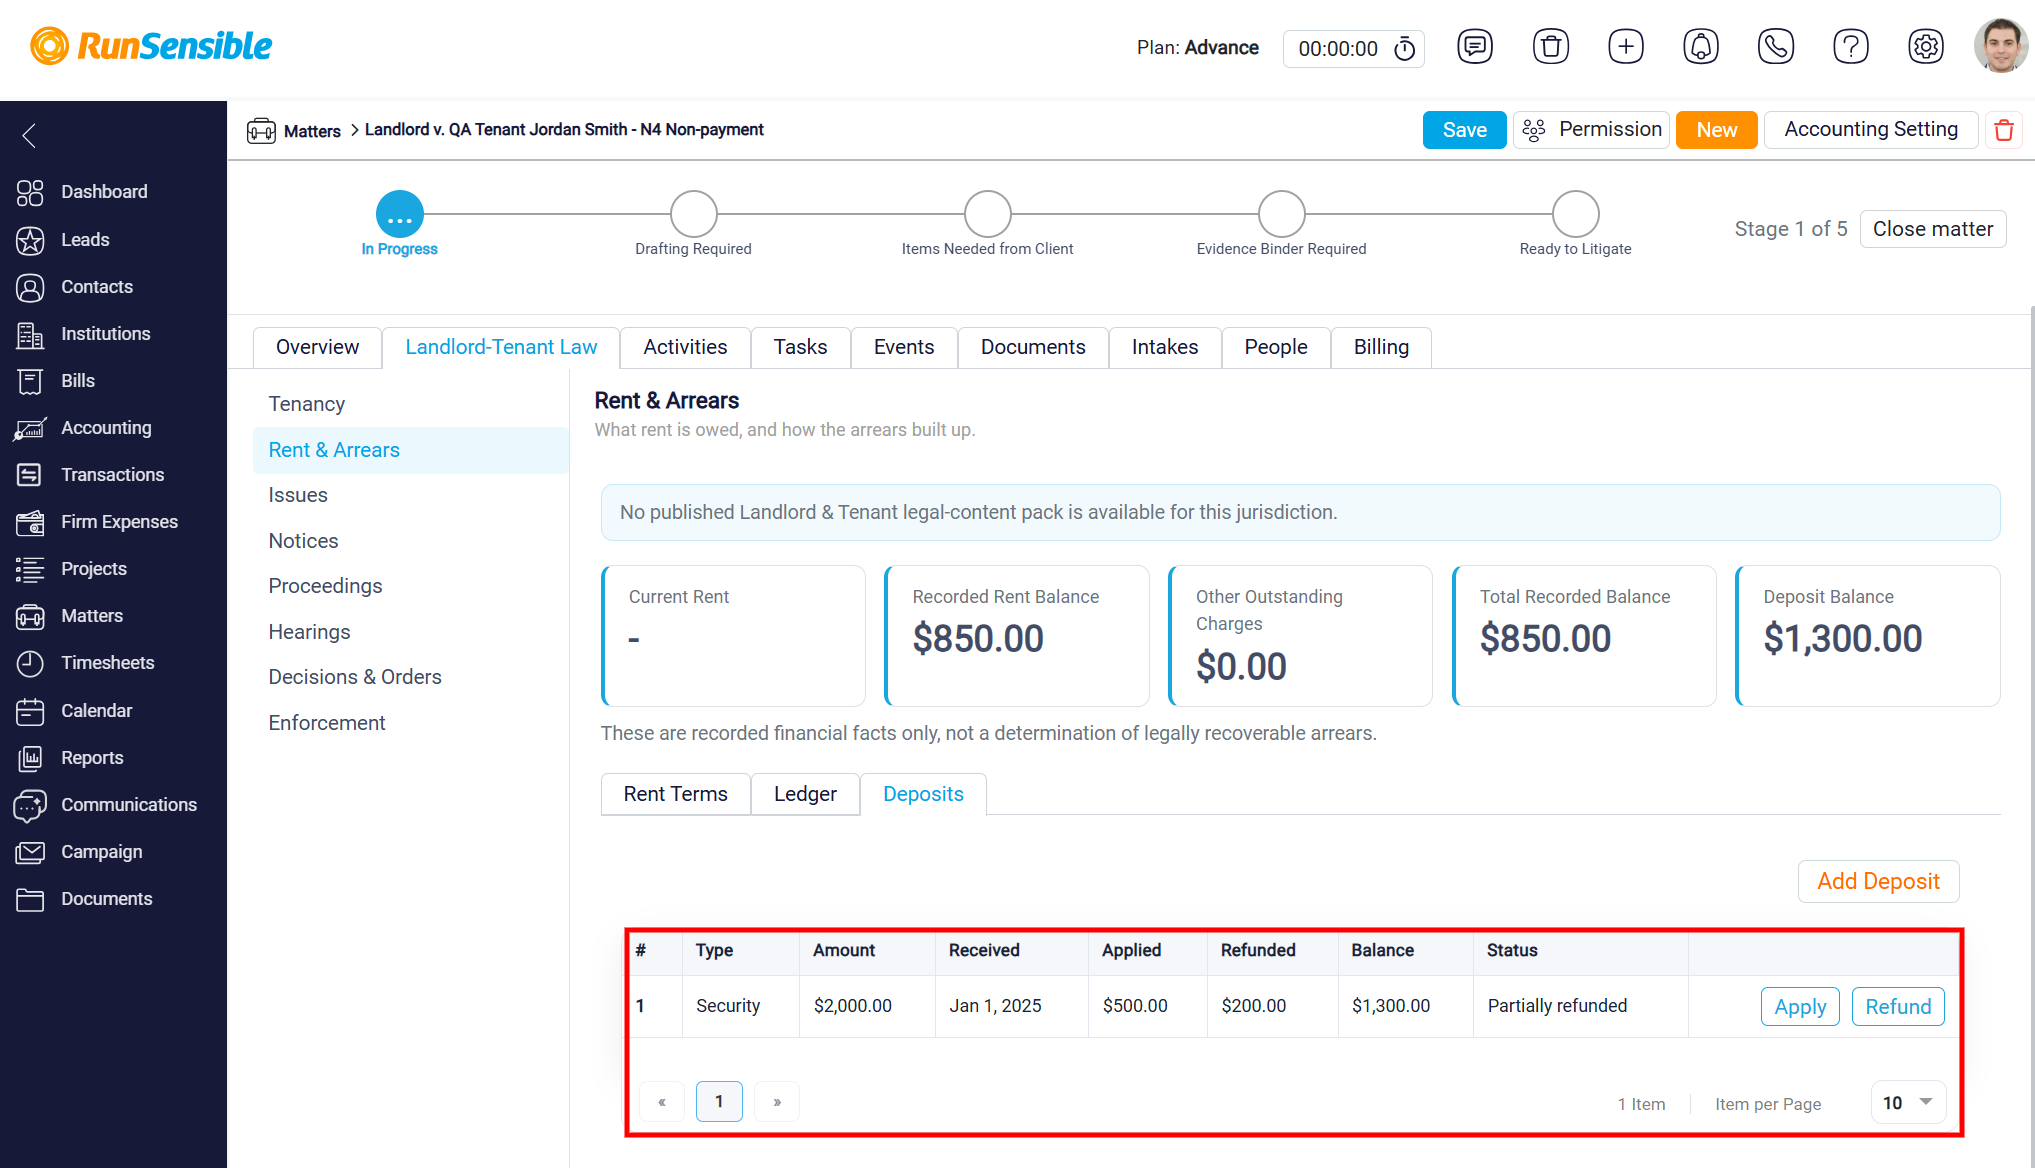
Once a deposit has been saved, it will appear in the Deposits table under the Rent & Arrears section. The table displays important information, including the deposit Type, Amount, Received date, Applied amount, Refunded amount, remaining Balance, and Status. These details allow you to review deposits received from tenants, monitor how the funds have been used, and track any outstanding deposit balances.
The Status column indicates the current status of each deposit, such as Held, showing that the deposit is still being held. To manage an existing deposit, click Apply to apply an amount from the deposit toward an applicable charge or balance, or click Refund to record funds returned to the tenant. The Applied and Refunded columns help you track these transactions, while the Balance column displays the remaining deposit amount.
You can also click Add Deposit to record additional deposits associated with the matter. The Deposit Balance summary at the top of the page provides an overview of the remaining recorded deposit funds. Keeping these records up to date helps maintain accurate financial information and provides a clear history of deposits, applications, and refunds throughout the tenancy.
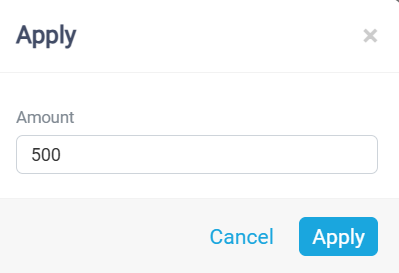
To apply an existing deposit, locate the relevant entry in the Deposits table and click the Apply button. The Apply window will appear, allowing you to enter the amount you want to apply from the available deposit balance. In the Amount field, enter the amount to be applied, then click Apply to confirm the transaction or Cancel to close the window without making changes. Once the amount has been applied, the Applied column will be updated, and the remaining Balance will decrease accordingly.
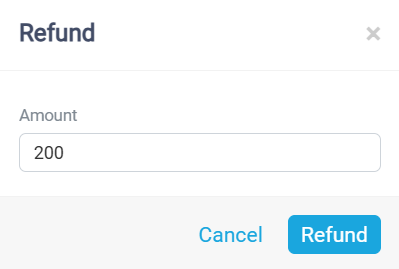
To record a deposit refund, locate the relevant deposit and click the Refund button. The Refund window will appear, allowing you to enter the amount being returned to the tenant. In the Amount field, enter the refund amount, whether it is a partial or full refund. Click Refund to record the transaction or Cancel to close the window without saving. After recording the refund, the Refunded column will reflect the amount returned, and the remaining deposit balance will be updated automatically.
The Deposits table displays the Type, Amount, Received date, Applied amount, Refunded amount, remaining Balance, and Status of each deposit. For example, when part of a deposit has been returned to the tenant, the status may change to Partially refunded. The Deposit Balance summary at the top of the page also reflects the remaining recorded deposit funds.
These features help you maintain a clear record of deposit applications and refunds, monitor remaining balances, and ensure that all deposit-related transactions are properly documented within the Landlord and Tenant matter.