Bank Reconciliation
RunSensible allows you to perform detailed bank account reconciliations by comparing your internal accounting records with the balances shown on your official bank statements. To start, you select the account you want to reconcile and enter the ending balance from your bank report. The system then automatically compares your records with the bank’s balance and highlights any discrepancies. You can review each highlighted transaction individually, checking it against your bank statement to confirm whether it has cleared or is still pending, helping you quickly identify and resolve any differences.
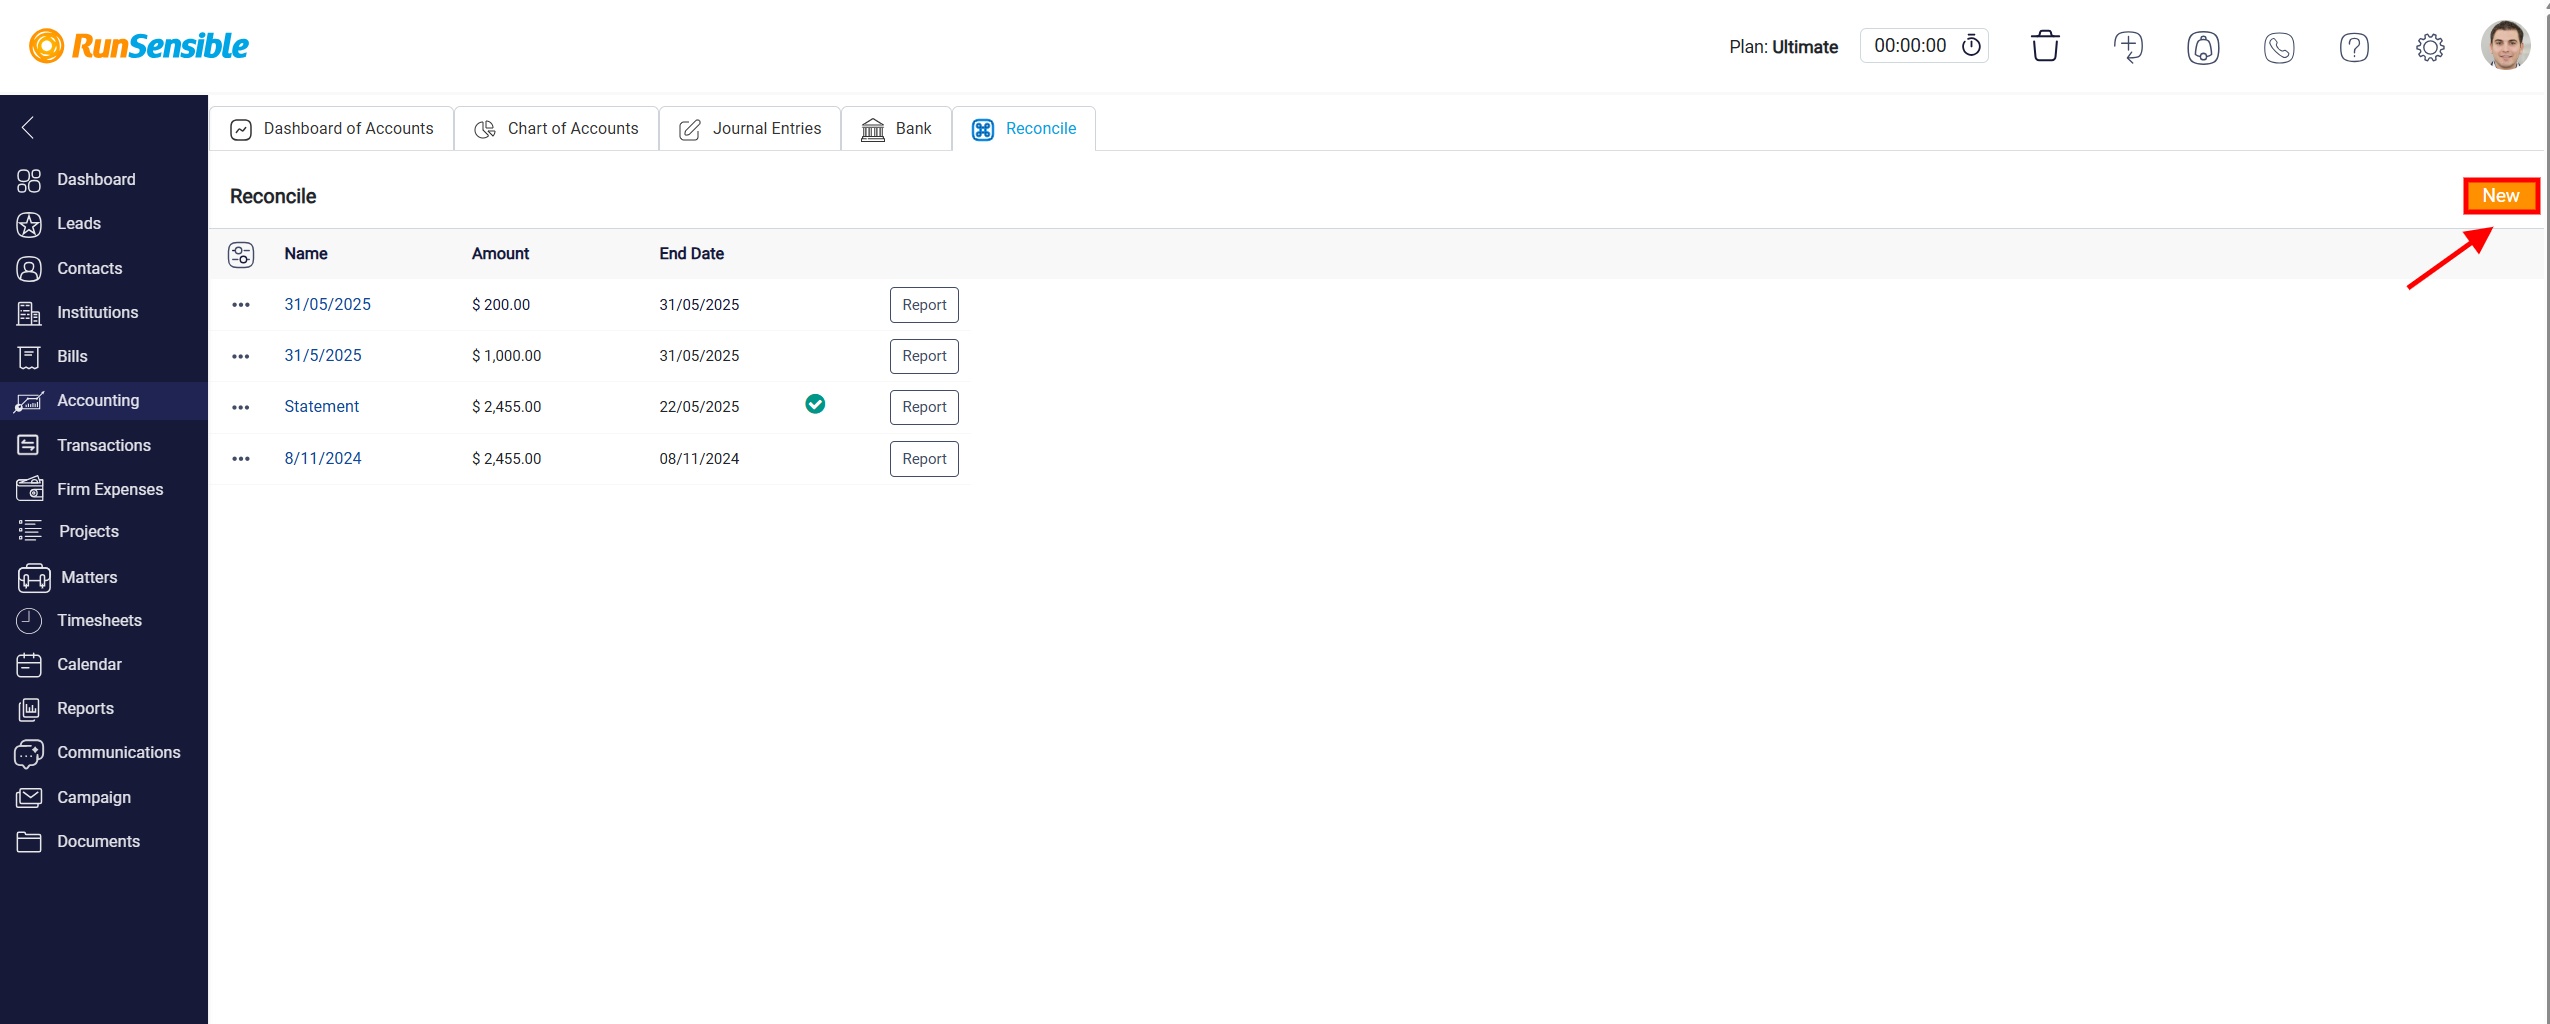
To access the reconciliation, go to the main navigation menu located on the left side of the RunSensible interface and click on the Accounting. This opens the accounting dashboard, which contains all available financial tools. At the top of this dashboard, there is a tab labeled Reconcile.
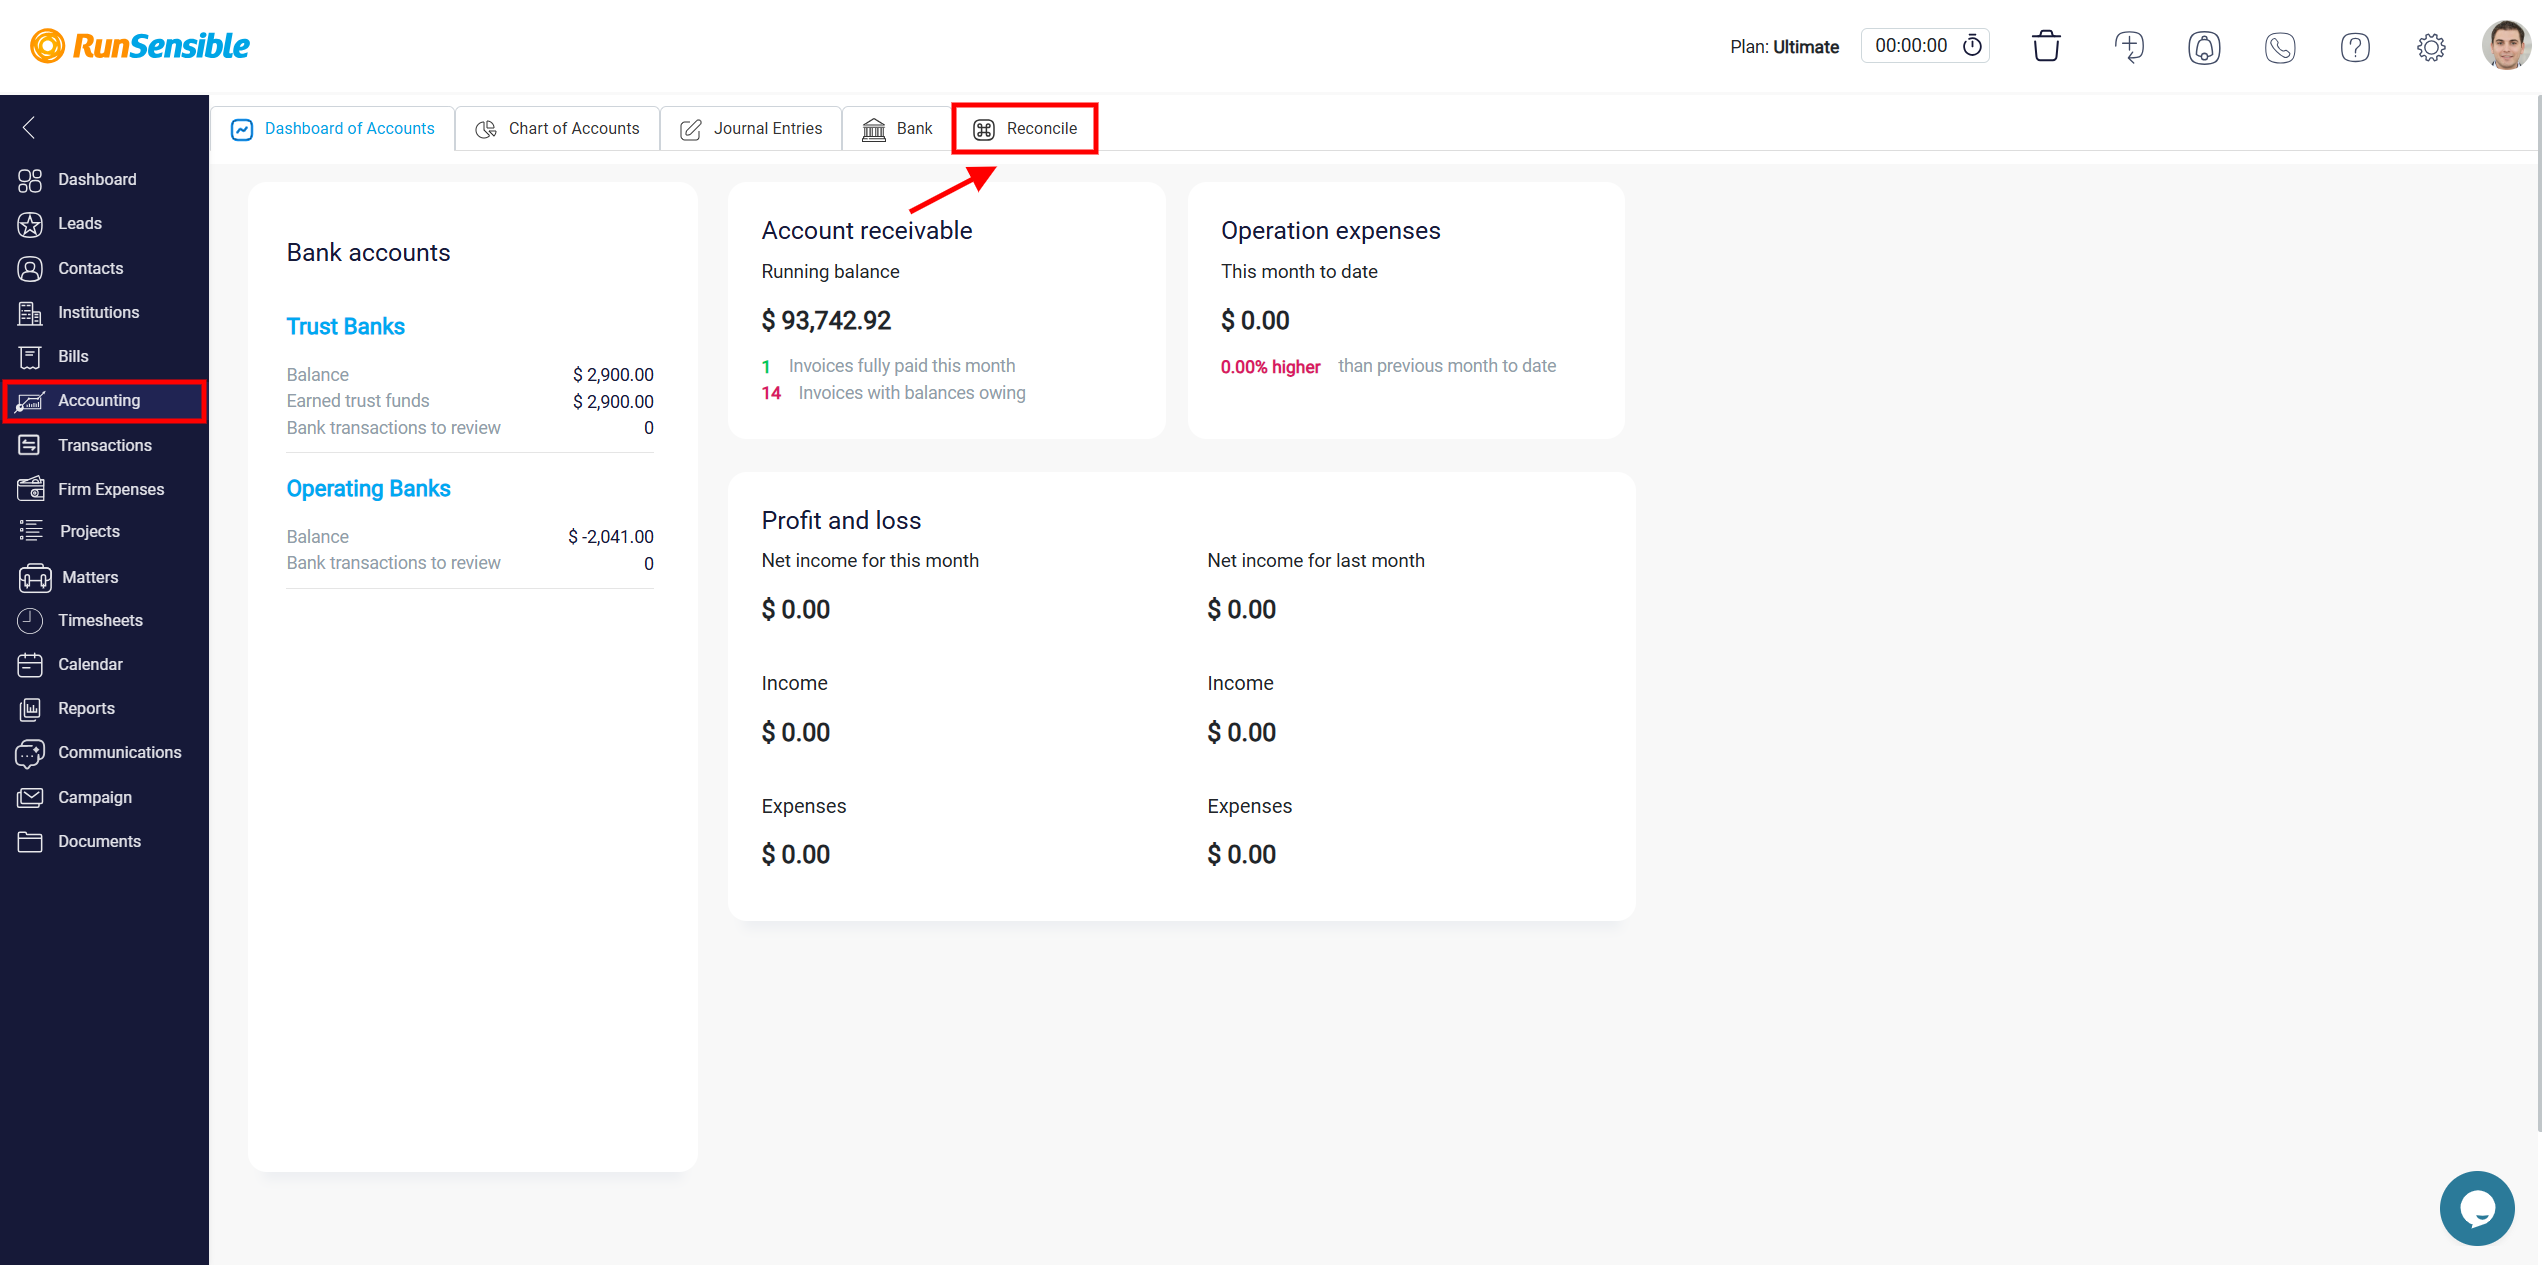
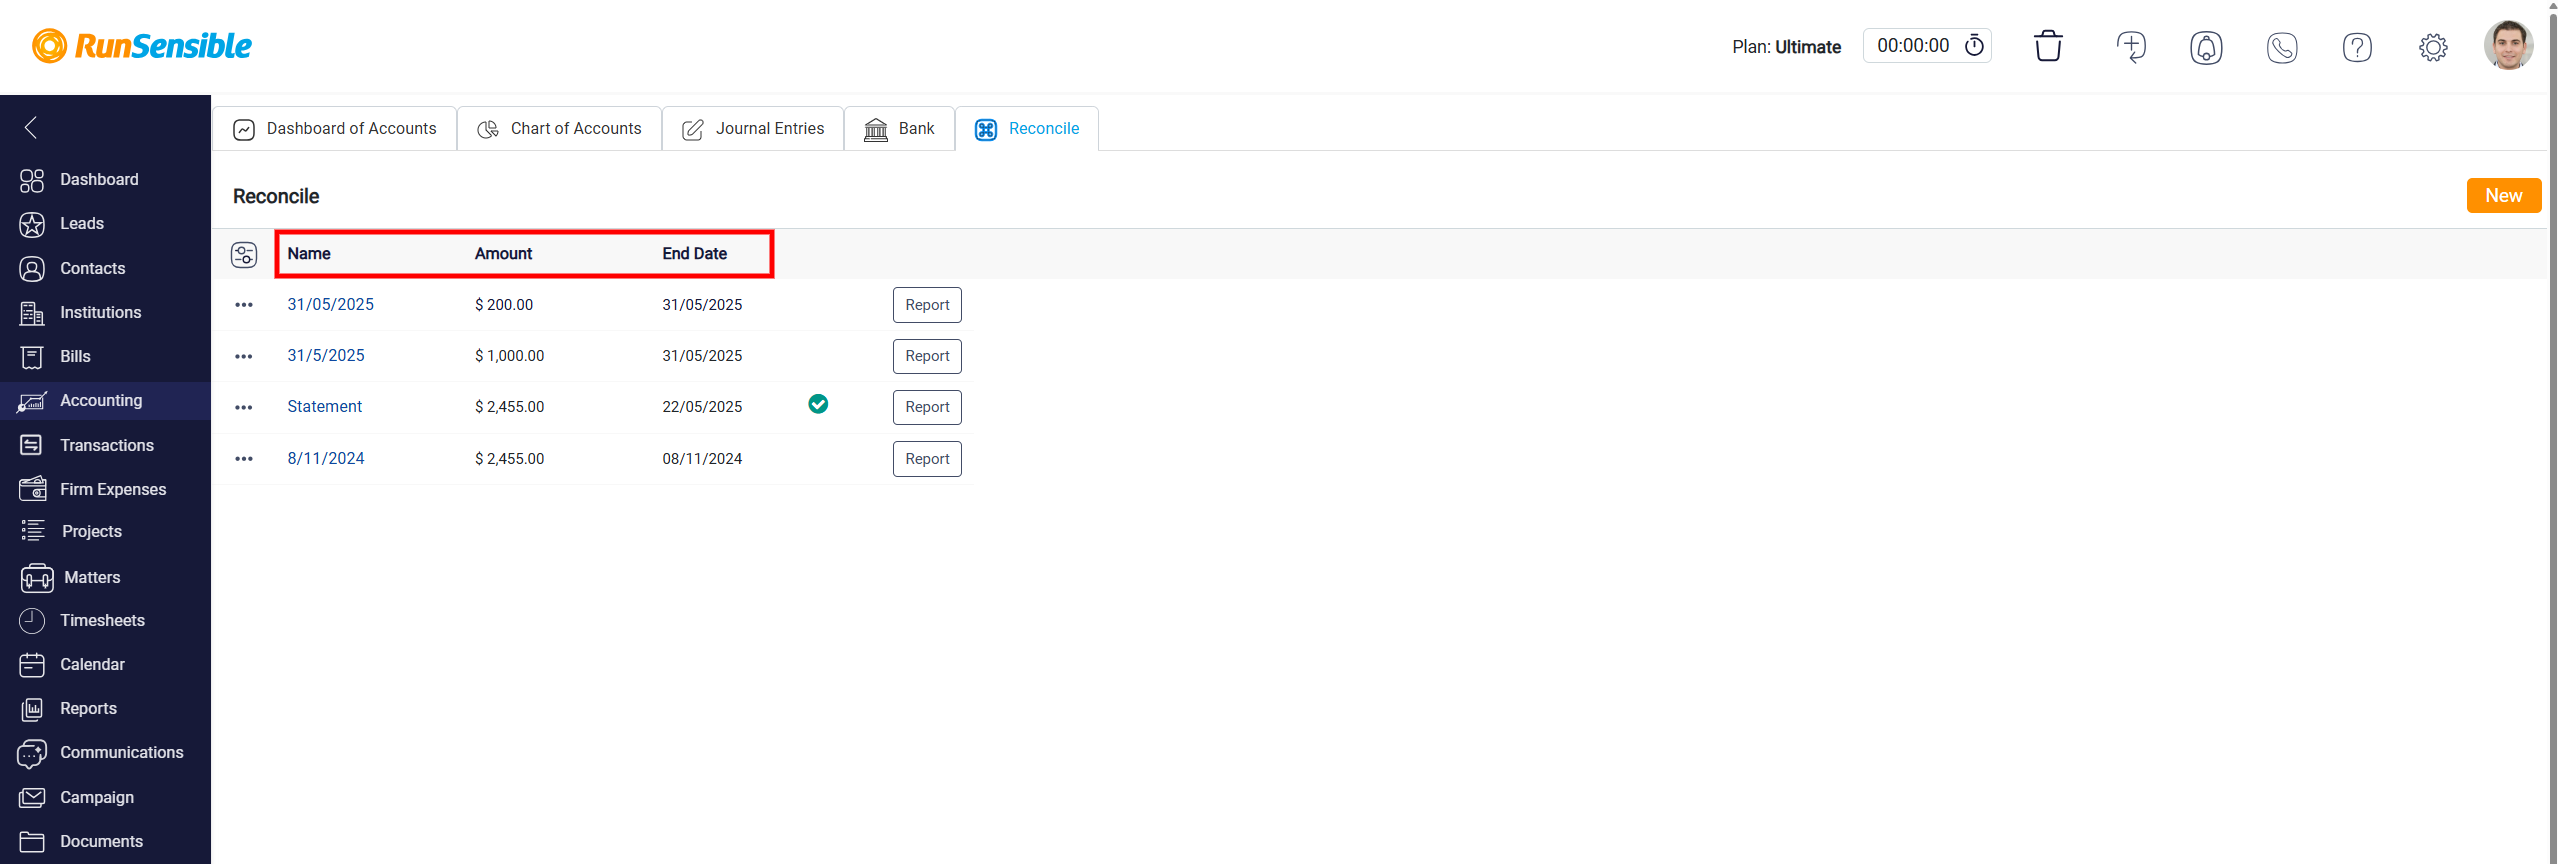
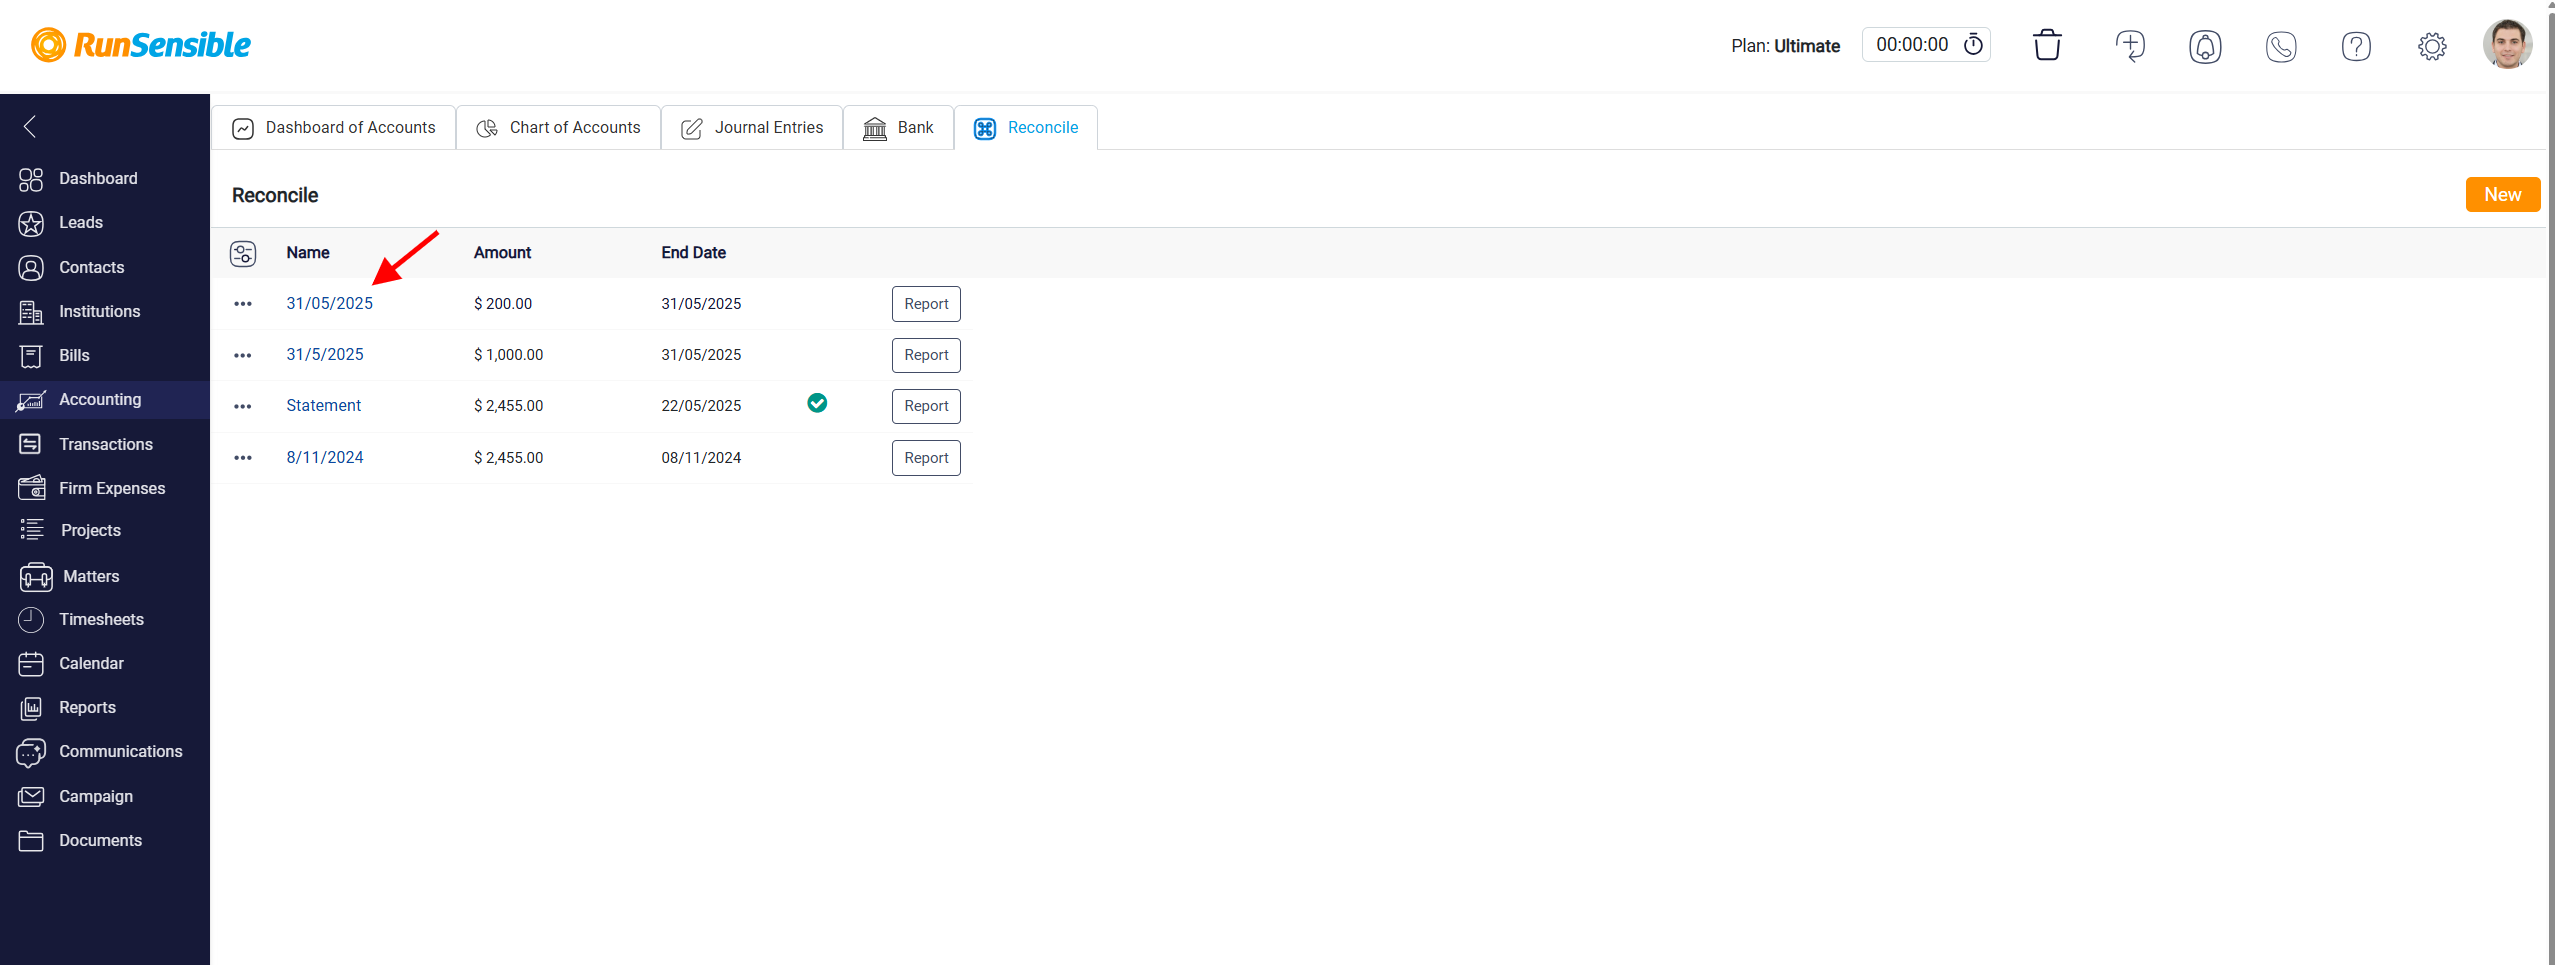
Clicking on this tab opens the reconciliation overview page, where you can view a complete list of past reconciliations performed in the system. Each item in this list displays key information, including the reconciliation name, the ending balance reported in the bank statement, and the reconciliation end date.
To customize the columns in the Reconcile panel, start by clicking the Grid Customization button. This will open a detailed customization menu, allowing you to adjust the layout according to your specific needs.
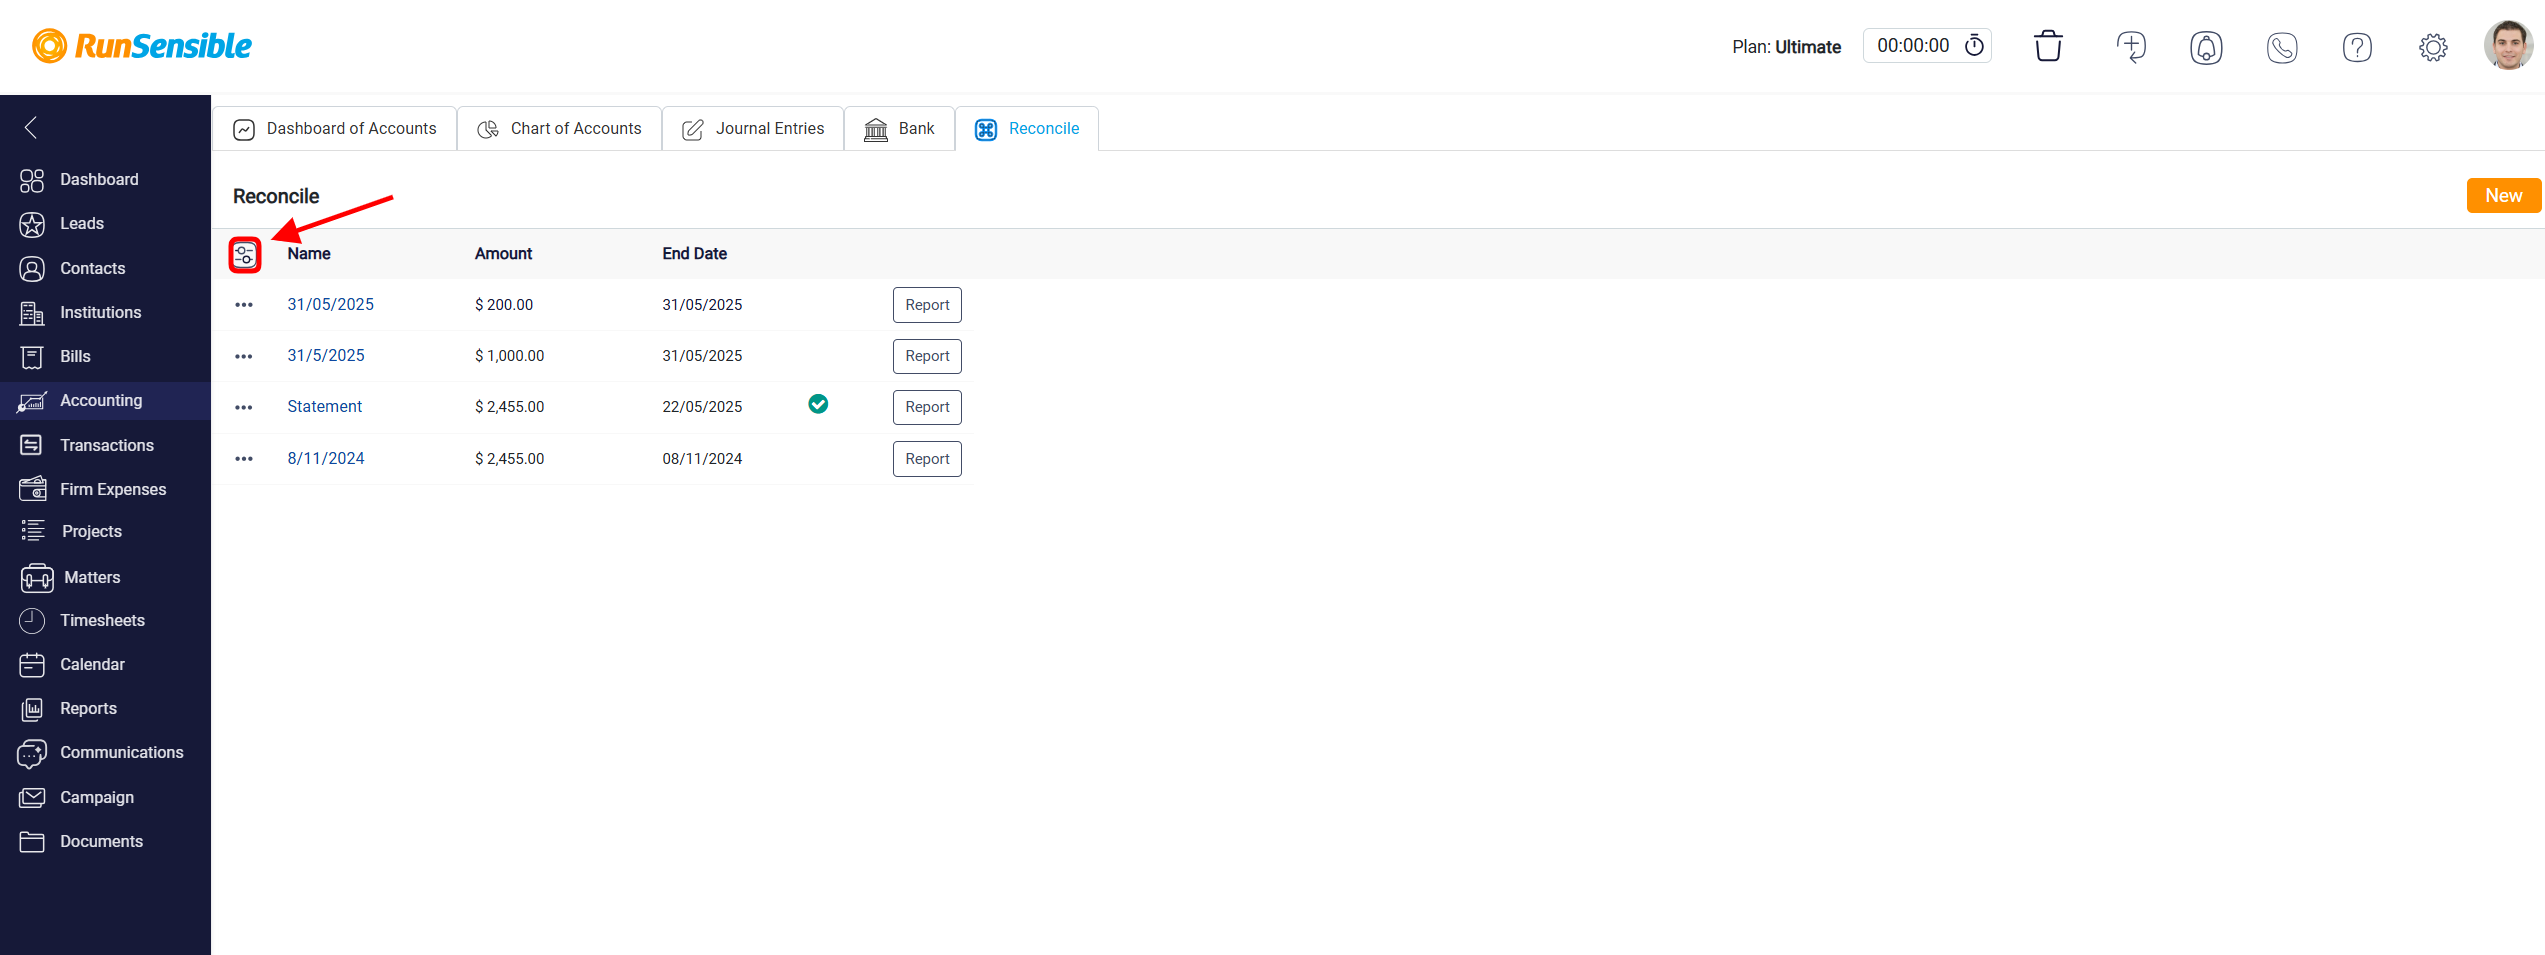
To change the order of the columns, click the Reorder button, then click and hold the column you want to move. Drag it to your preferred position in the list. This feature allows you to prioritize the information that matters most to your workflow.

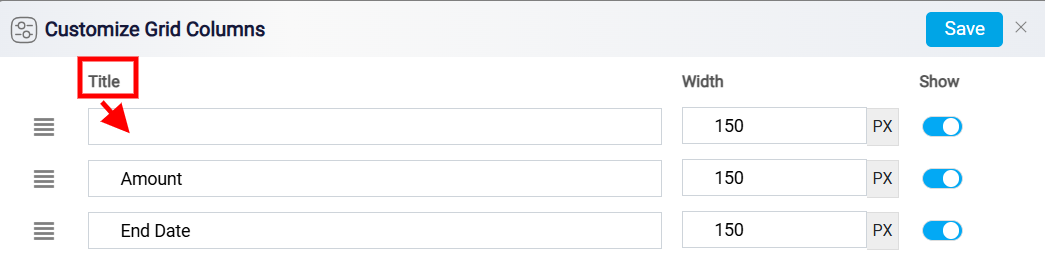
Additionally, should you want to rename a column to better reflect the data it represents, click directly on its current name within the Title column; this will allow you to edit and update the name accordingly.
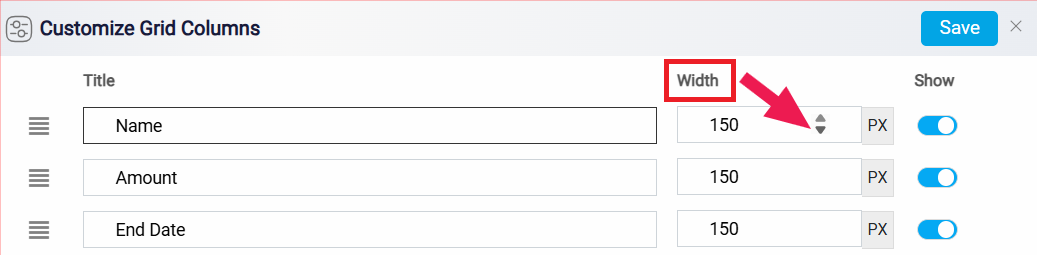
To adjust the visibility of each column, navigate to the Width column within the customization panel, where you can modify the width of individual columns by changing the numerical value, ensuring that each piece of data fits comfortably within your layout. After making changes, click Save to keep them.
Additionally, the reconciliation name is presented as a clickable link. Clicking this name will take you directly into the reconciliation panel, where you can view and manage the associated transactions.
Viewing and Downloading Reconciliation Reports
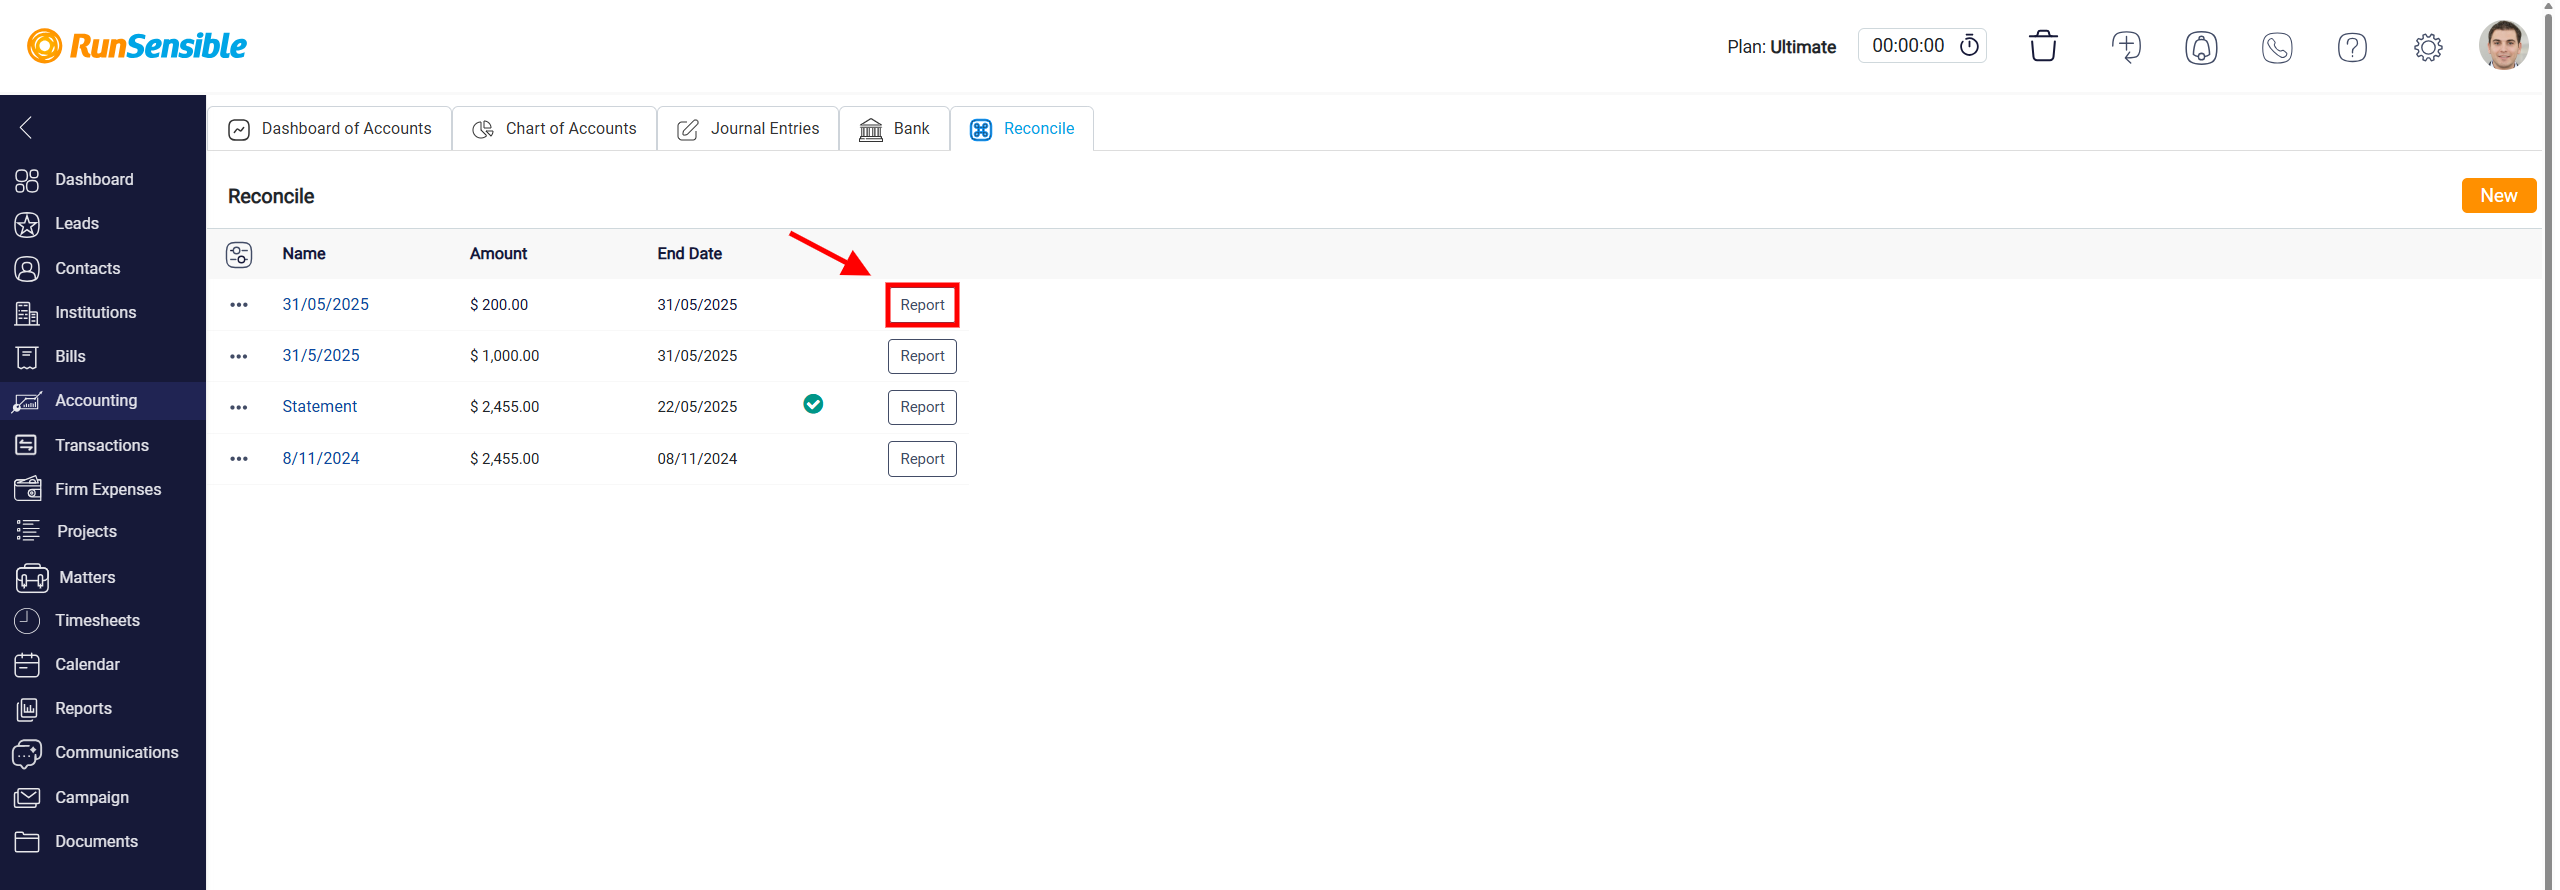
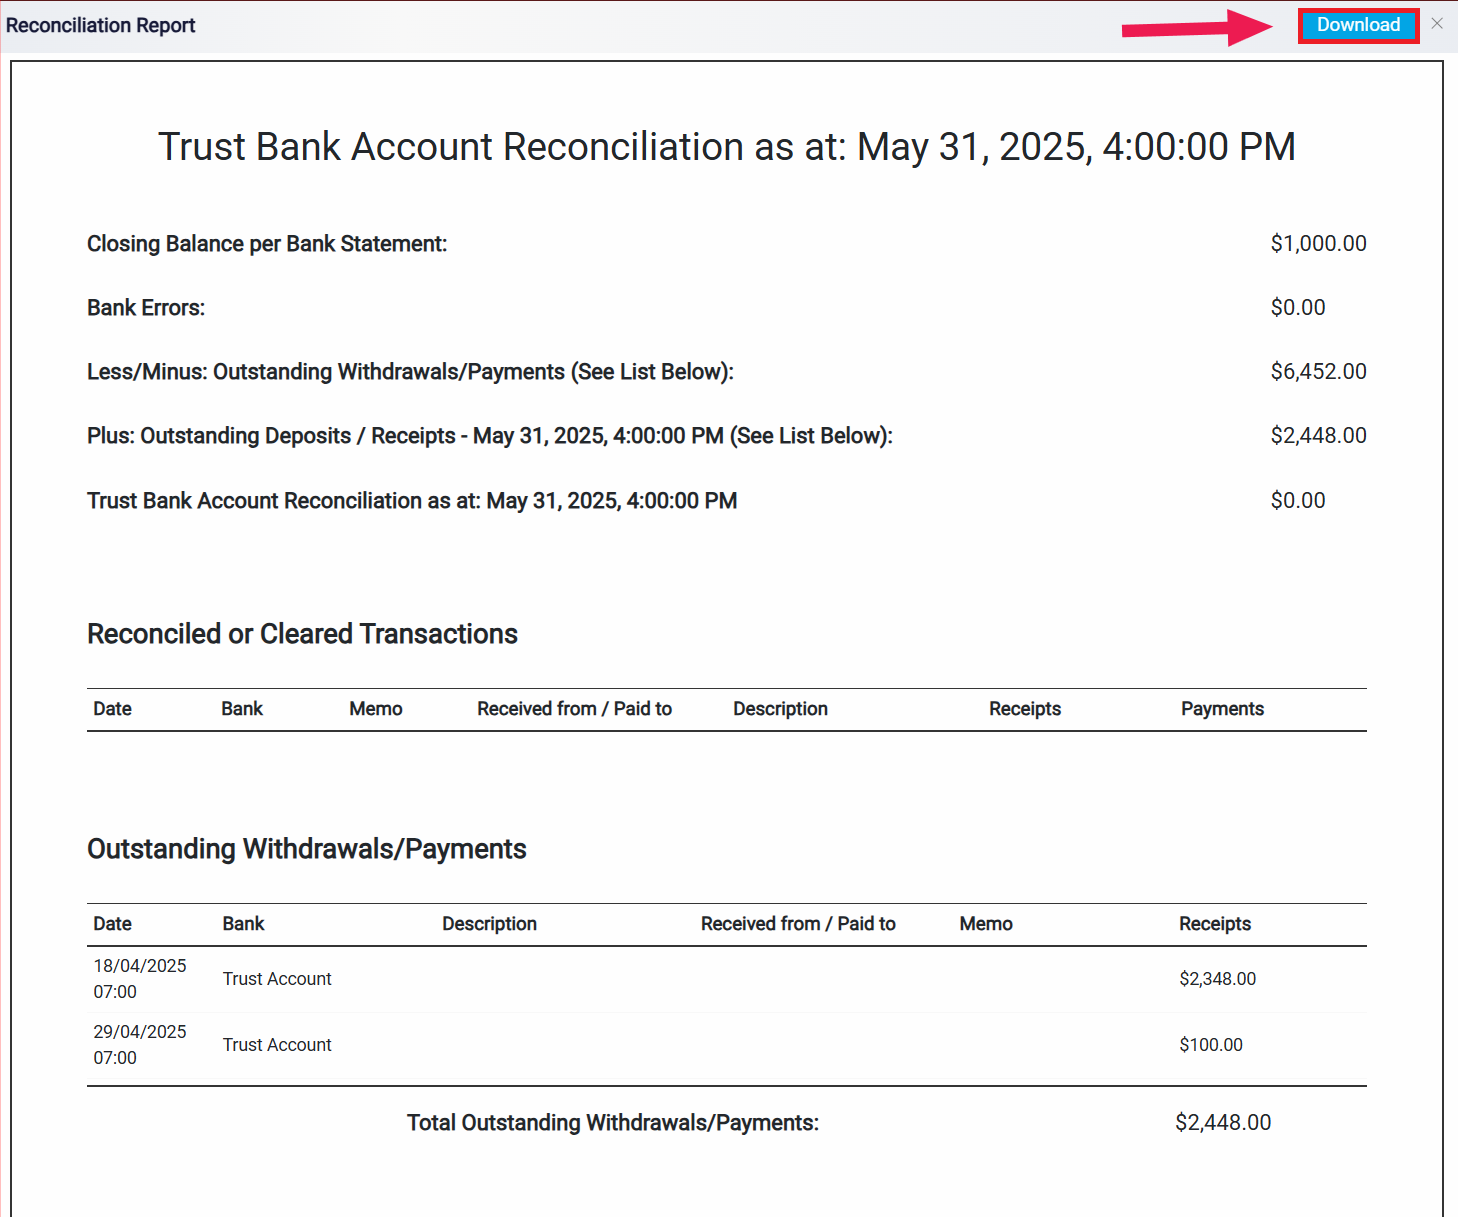
On the far right of each entry, there is a Report button. Clicking this button opens a panel that displays a detailed report document for that specific reconciliation.
At the top right of the report panel, a Download icon is available that allows you to save or print the reconciliation report.
Creating a New Reconciliation Record
To create a new reconciliation, click the New button located at the top right corner of the Reconcile tab.
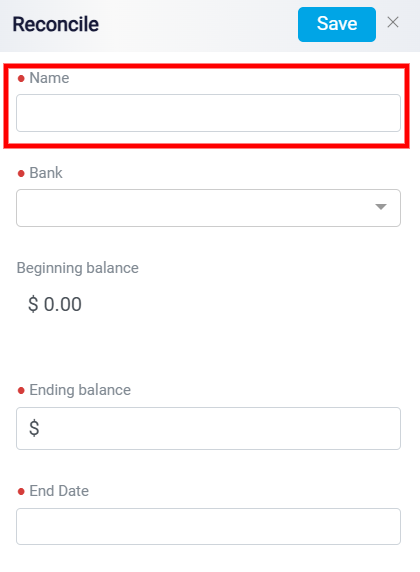
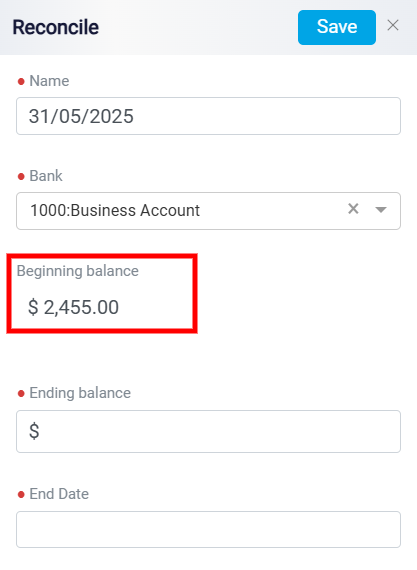
This opens a data entry panel where you can configure the details of the new reconciliation. The first required input is the reconciliation name. Enter a specific and descriptive title in the Name field to ensure the record is easy to identify in future reference.
Once the reconciliation has been named, the next step is to select the bank account that will be reconciled. Click on the Bank drop-down menu to reveal a list of all bank accounts that have been previously added to the system. From this list, choose the appropriate account to match with the bank statement you are using.
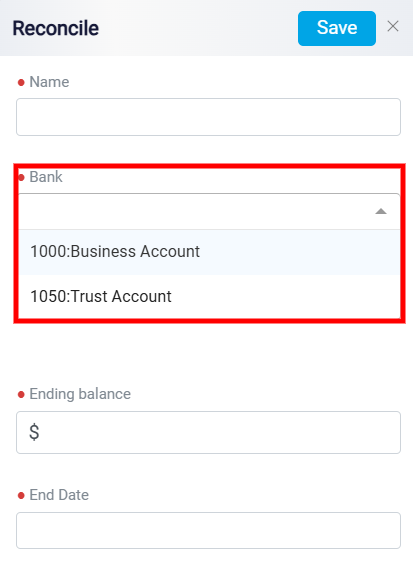
After selecting the account, a summary field below the drop-down will display the system’s current balance for that account. This helps you verify that the correct account has been selected.
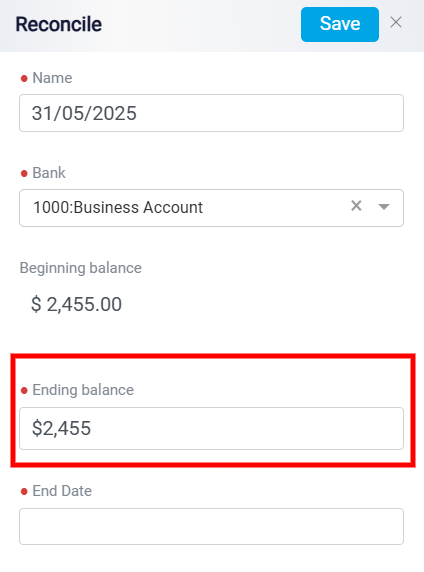
After selecting a bank account for reconciliation, the next step is to enter the key financial details that define the reconciliation period. Start by inputting the ending balance from the official bank statement into the field labeled Ending Balance, ensuring it matches the final balance reported by the bank for the selected period.
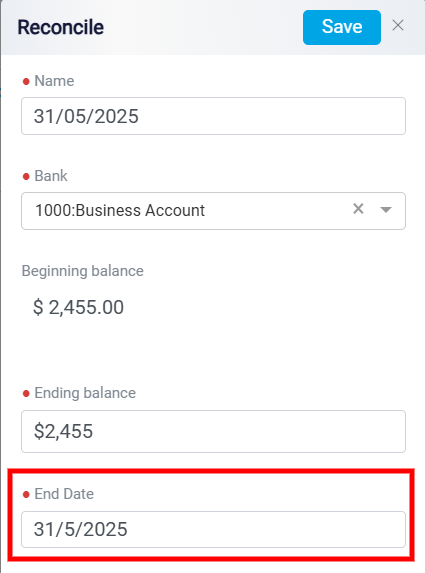
Next, specify the reconciliation end date, which determines the cutoff point for reviewing transactions. To do this, click on the End Date box located at the bottom; a calendar will appear where you can select the appropriate date.
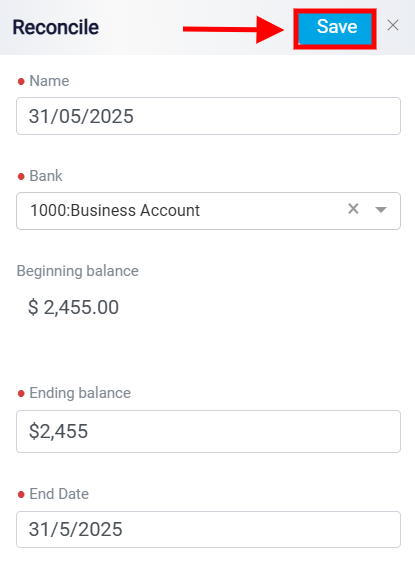
Once both the ending balance and end date have been entered, click the Save button located at the top right corner to finalize and save the reconciliation record.
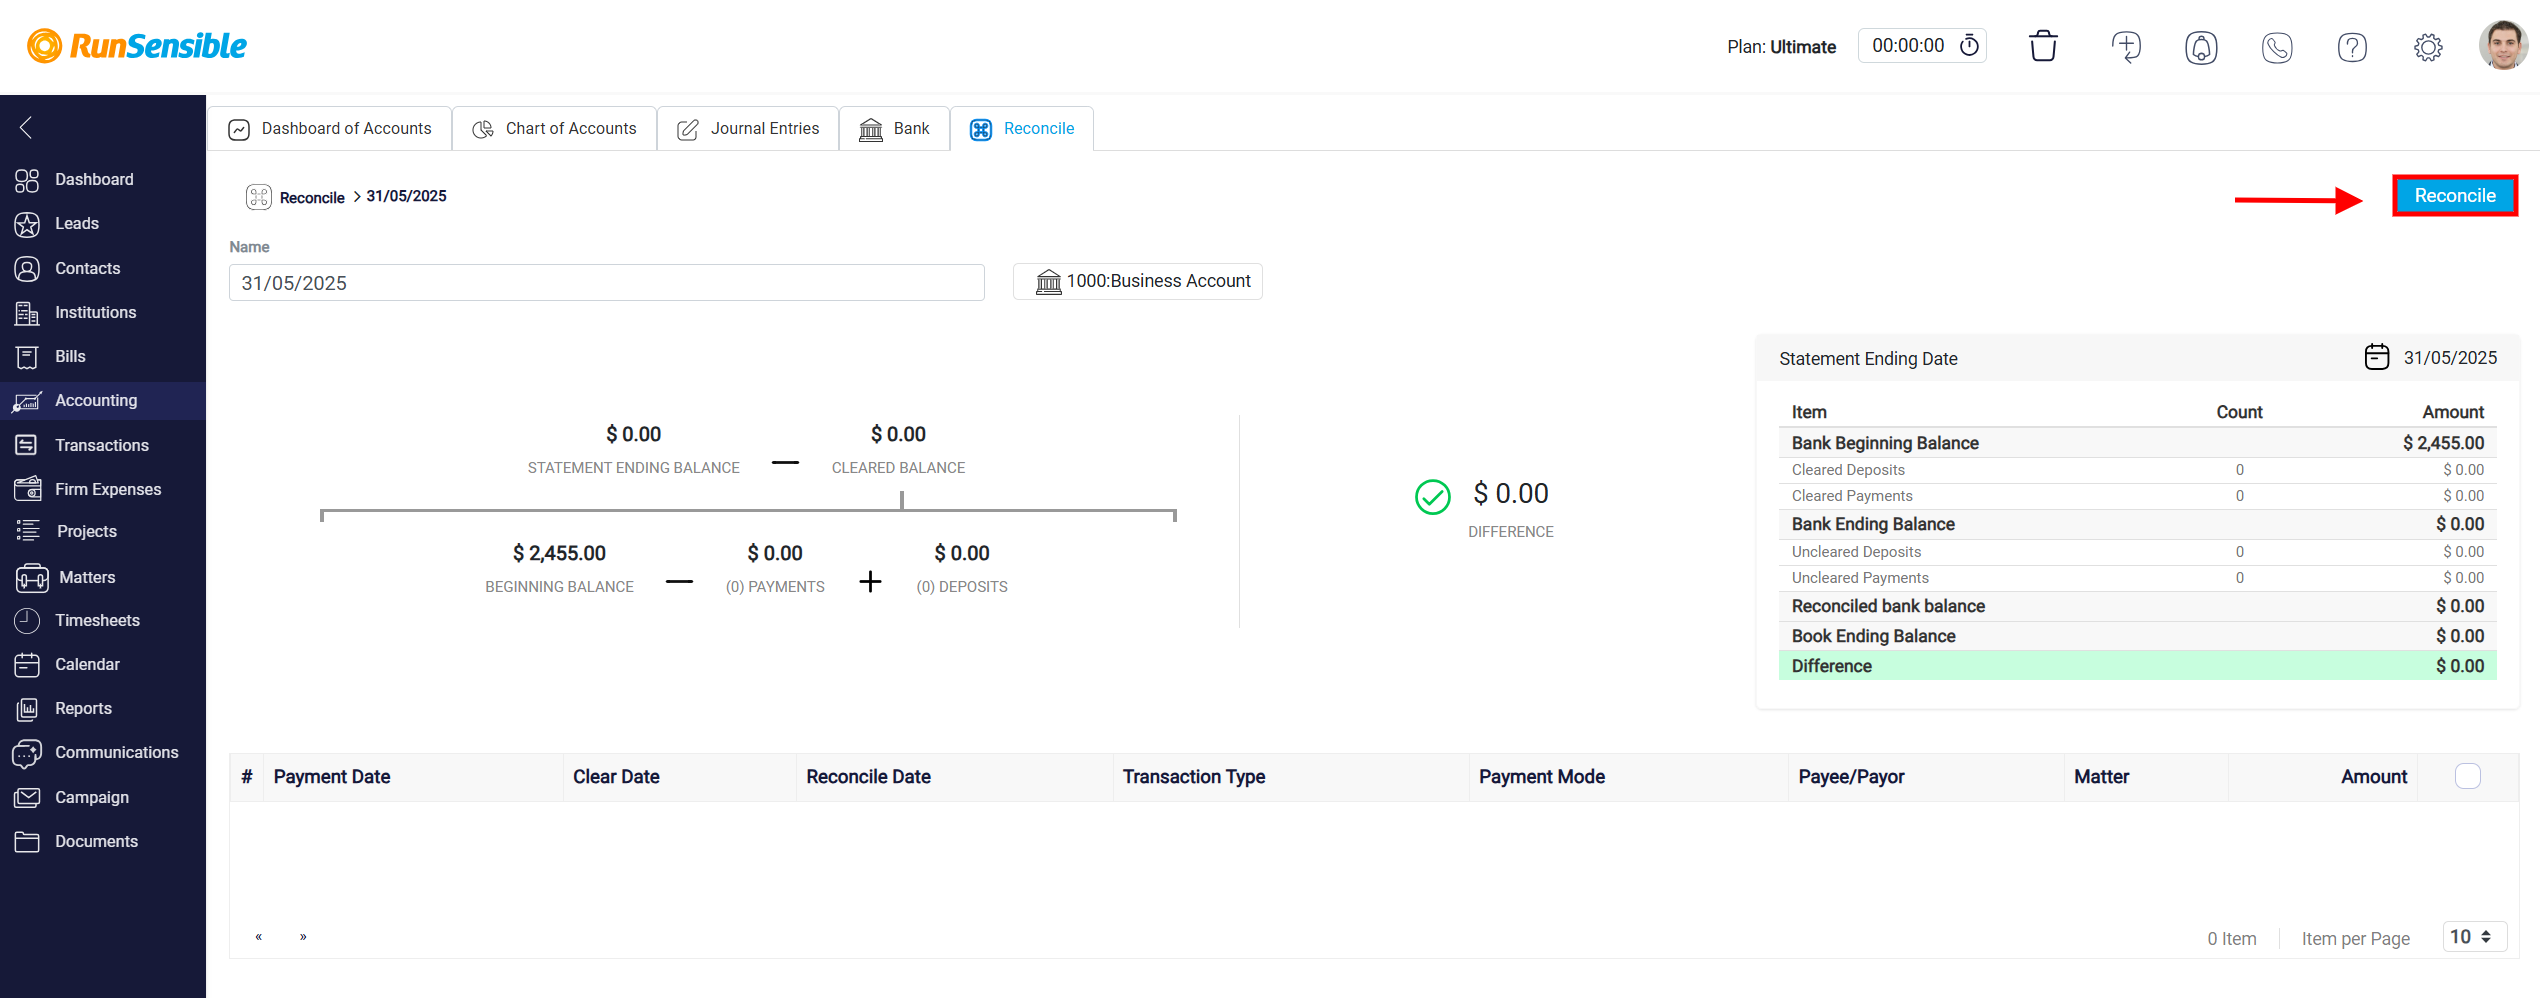
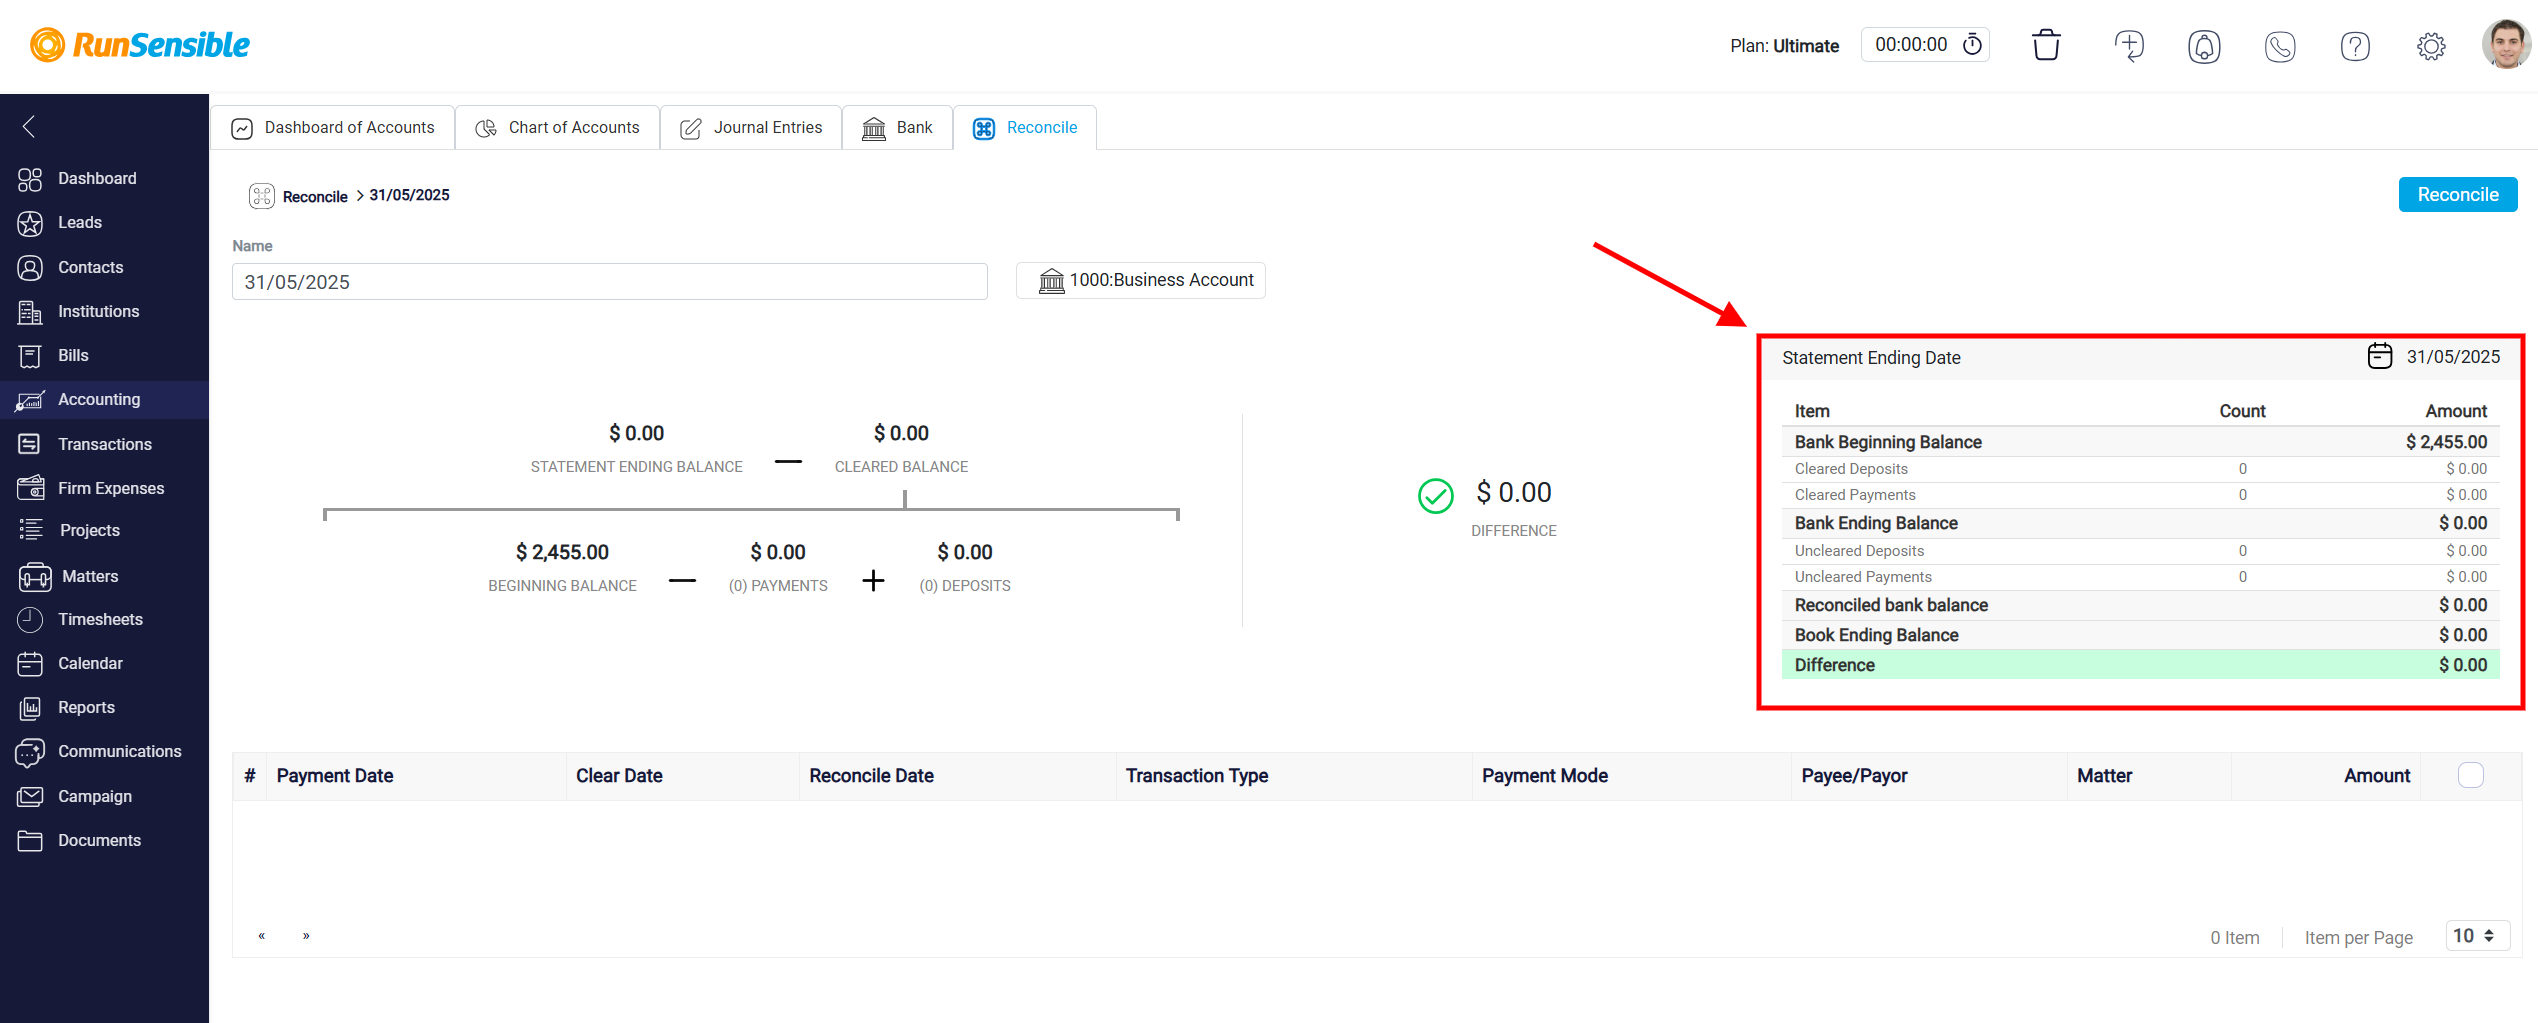
After saving, the system will automatically redirect you to the reconciliation panel for the newly created record. The reconciliation panel is the main workspace for reviewing and verifying account activity. It helps ensure that the ending balance from the bank statement matches the balance calculated from your internal records. If there’s a mismatch, the system highlights the difference and provides tools to review, clear, or adjust transactions as needed. The panel combines visual diagrams and tables to present both high-level summaries and detailed data side by side, making it easier to identify and resolve discrepancies.
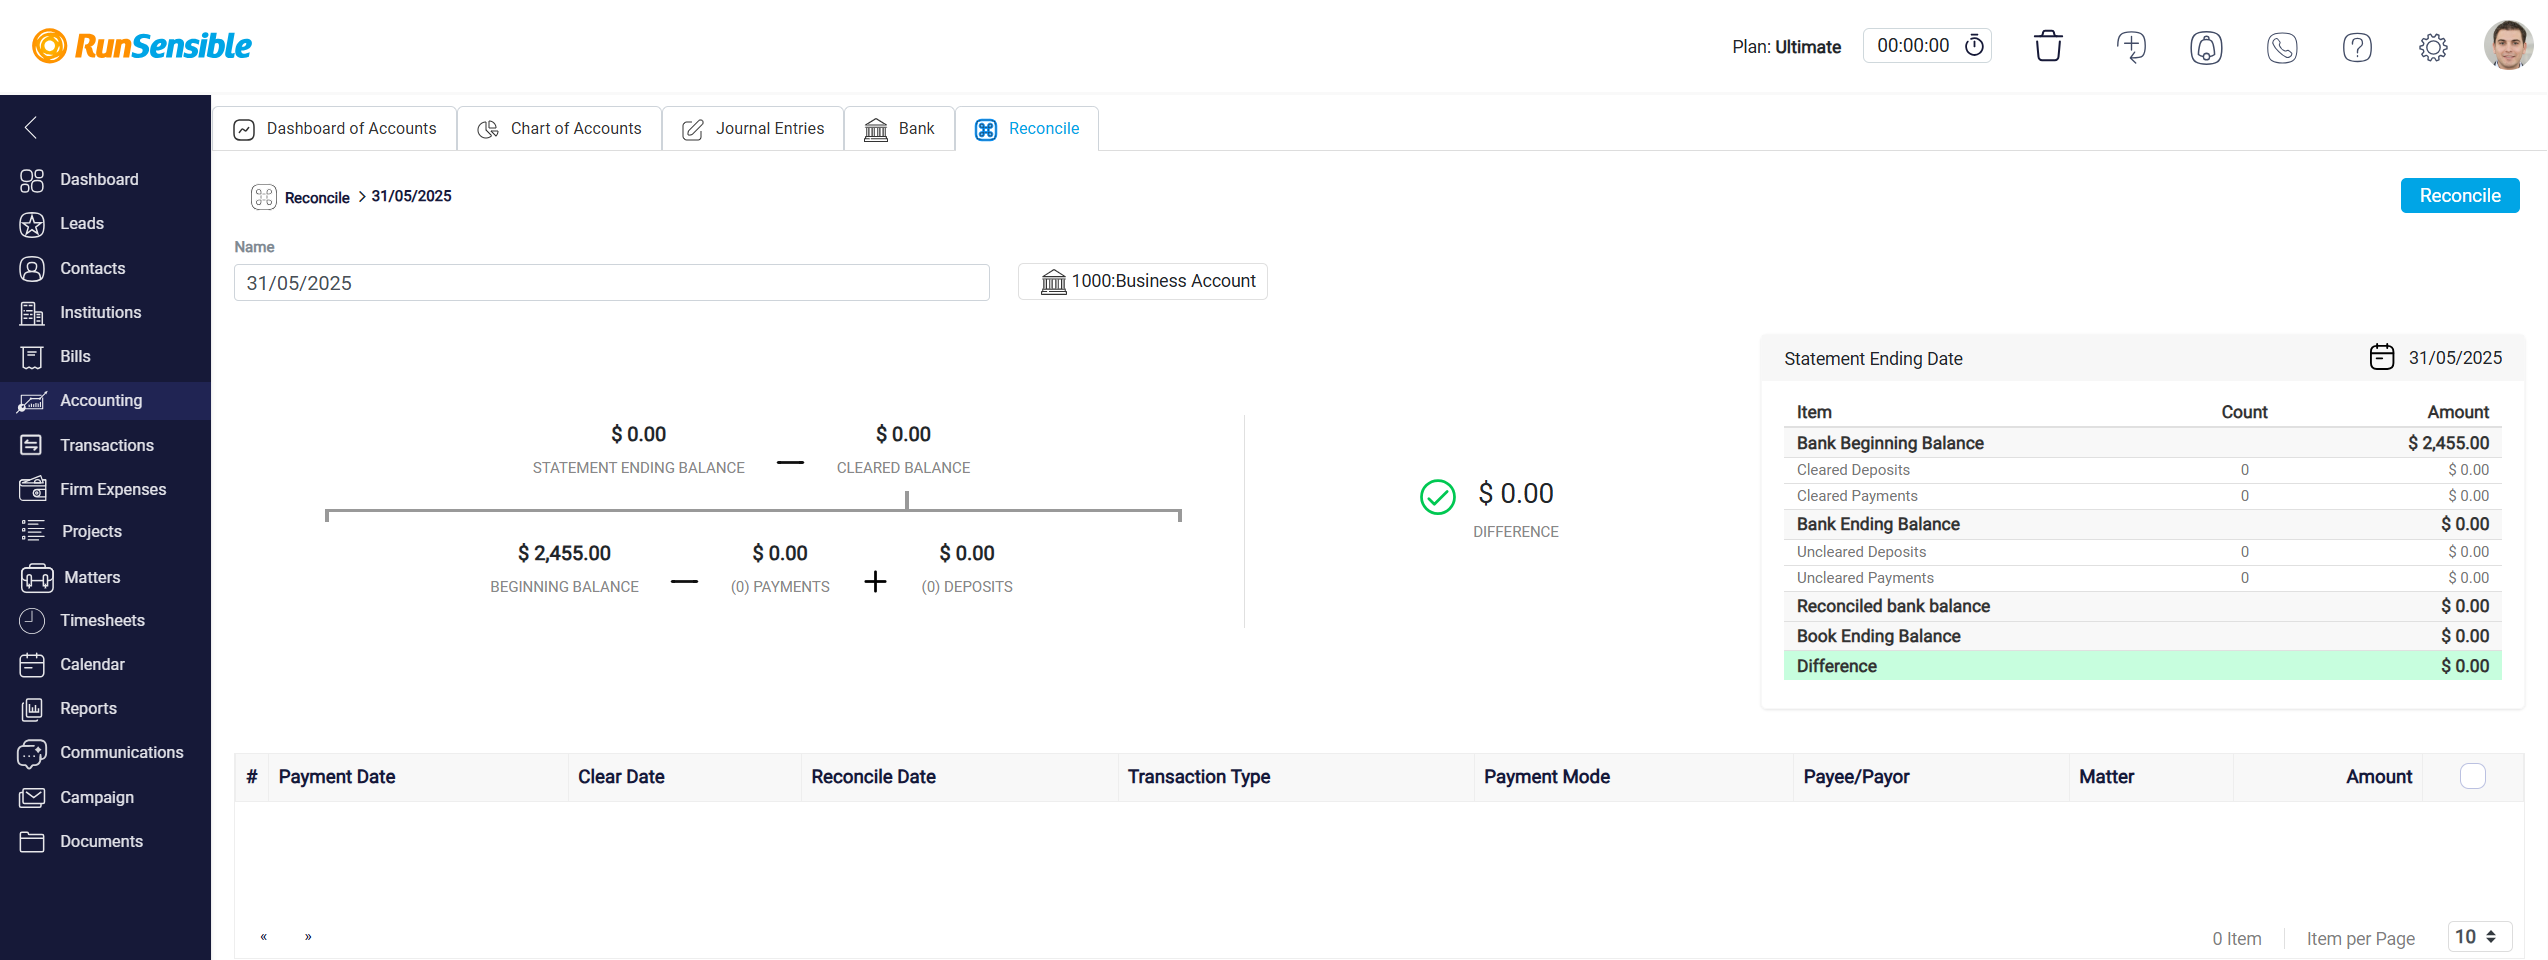
Reconciliation Diagram Functionality
The visual diagram within the reconciliation panel and the left side of the panel is split into two functional sections: a summary comparison at the top and a detailed breakdown below. These two sections work together to explain where differences originate and how the system arrived at its internal balance calculation.
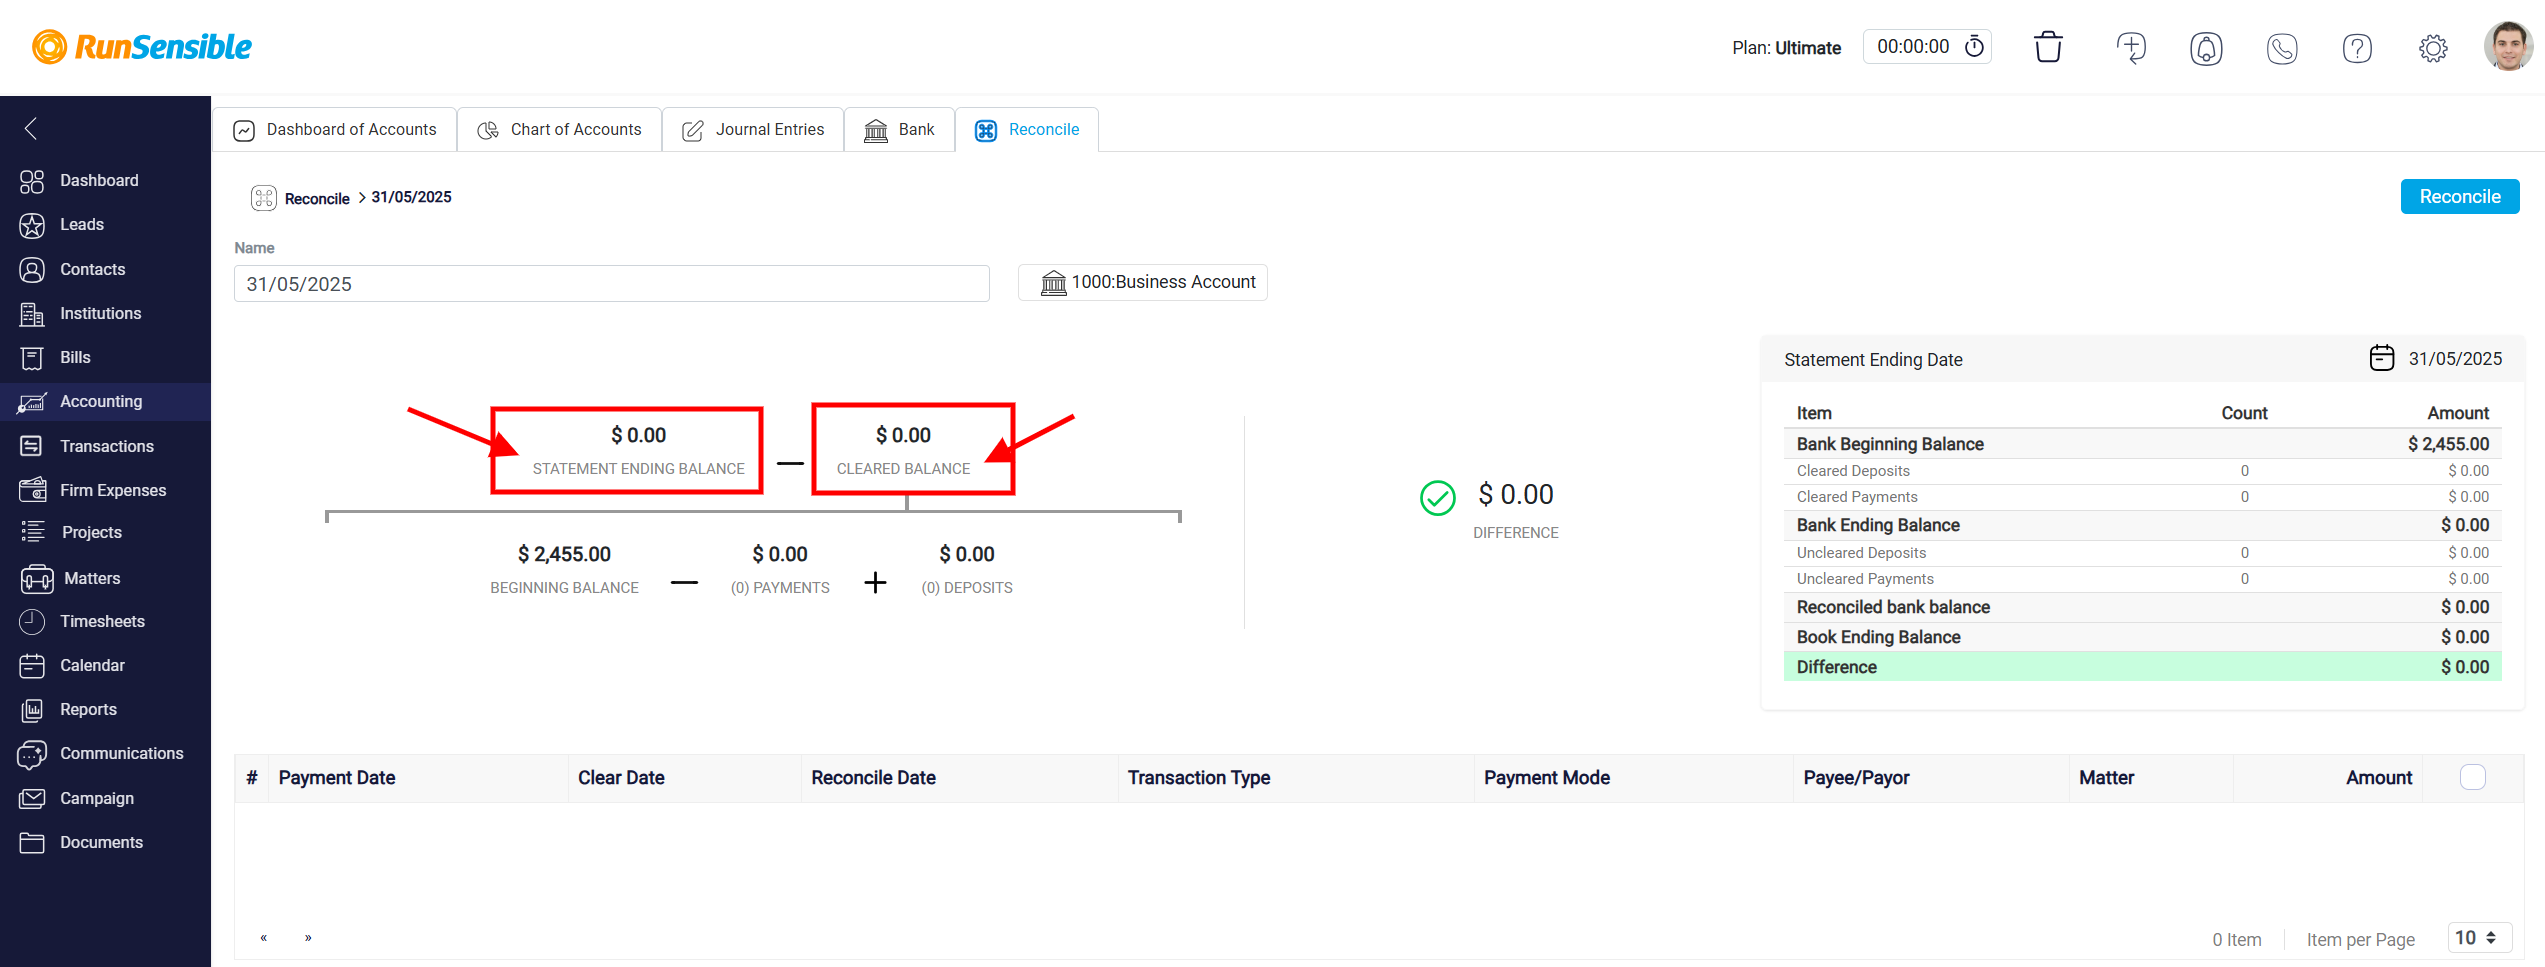
In the top portion, the system displays the bank statement ending balance alongside the cleared balance calculated from system data. The cleared balance reflects the sum of all transactions that have been reviewed and marked as cleared. The purpose of this side-by-side layout is to make it easy to compare these two balances. If they do not match, the system prominently displays the difference, accompanied by a warning indicator. This difference serves as an alert that one or more transactions may be missing, incorrect, or not yet cleared.
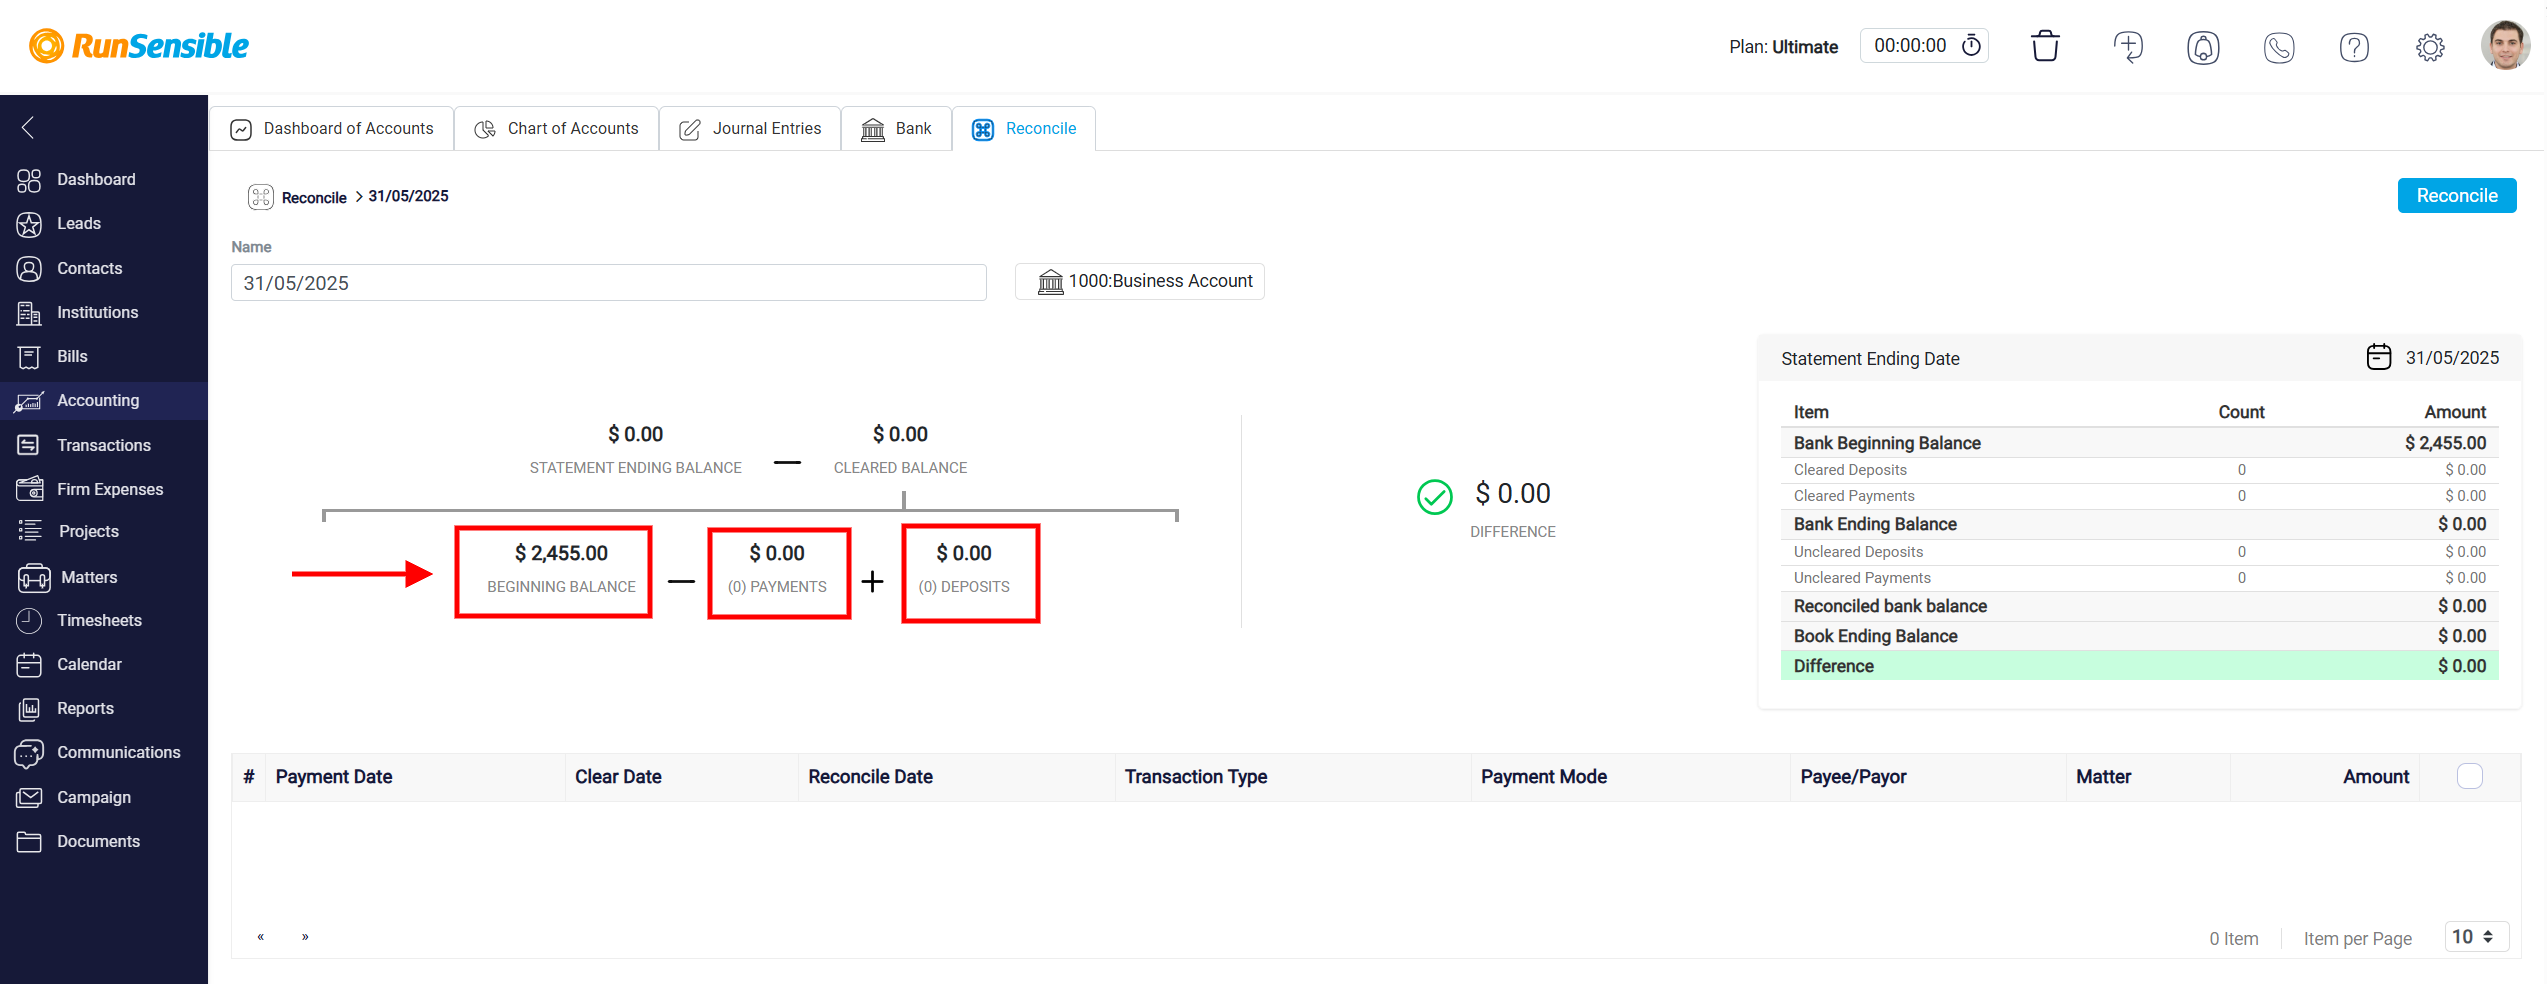
In the lower portion of the diagram, the system provides the formula it used to calculate the cleared balance. It begins with the account’s beginning balance at the start of the reconciliation period. From there, it subtracts the total of cleared payments—representing outgoing transactions that have been verified—and adds the total of cleared deposits, which are verified incoming transactions. The resulting cleared balance is then compared to the bank’s ending balance to assess accuracy.
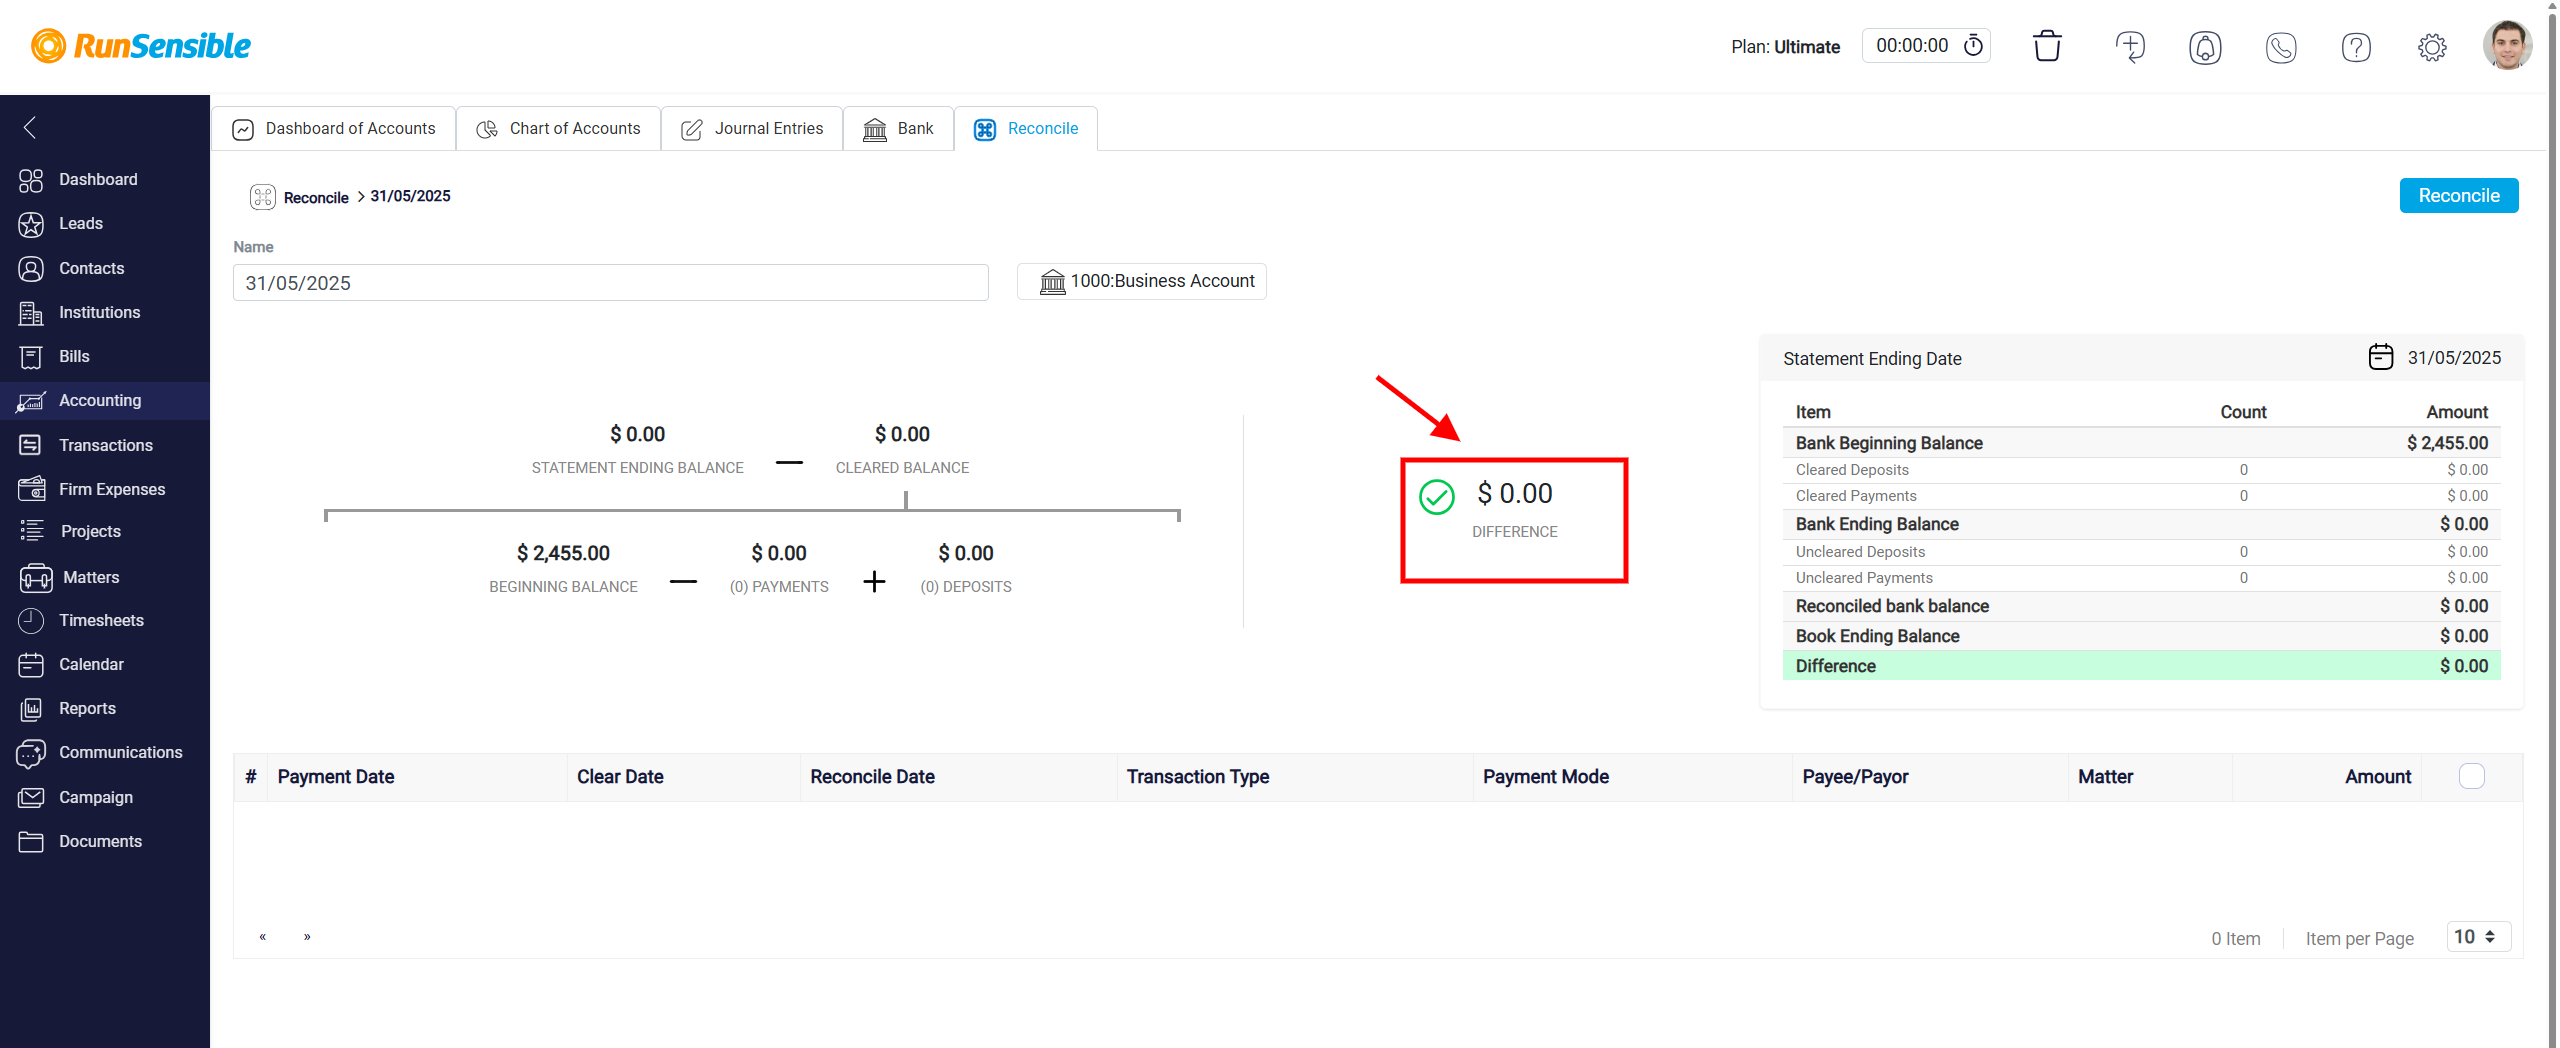
In order for you to be able to save this reconciliation the difference section on the middle of the interface should show zero.
Reconciliation Summary Table
Located on the right side of the panel, the reconciliation summary table presents a detailed list of values and counts that provide a comprehensive snapshot of the reconciliation’s components. It is divided into three main categories: bank data, system data, and the calculated difference.
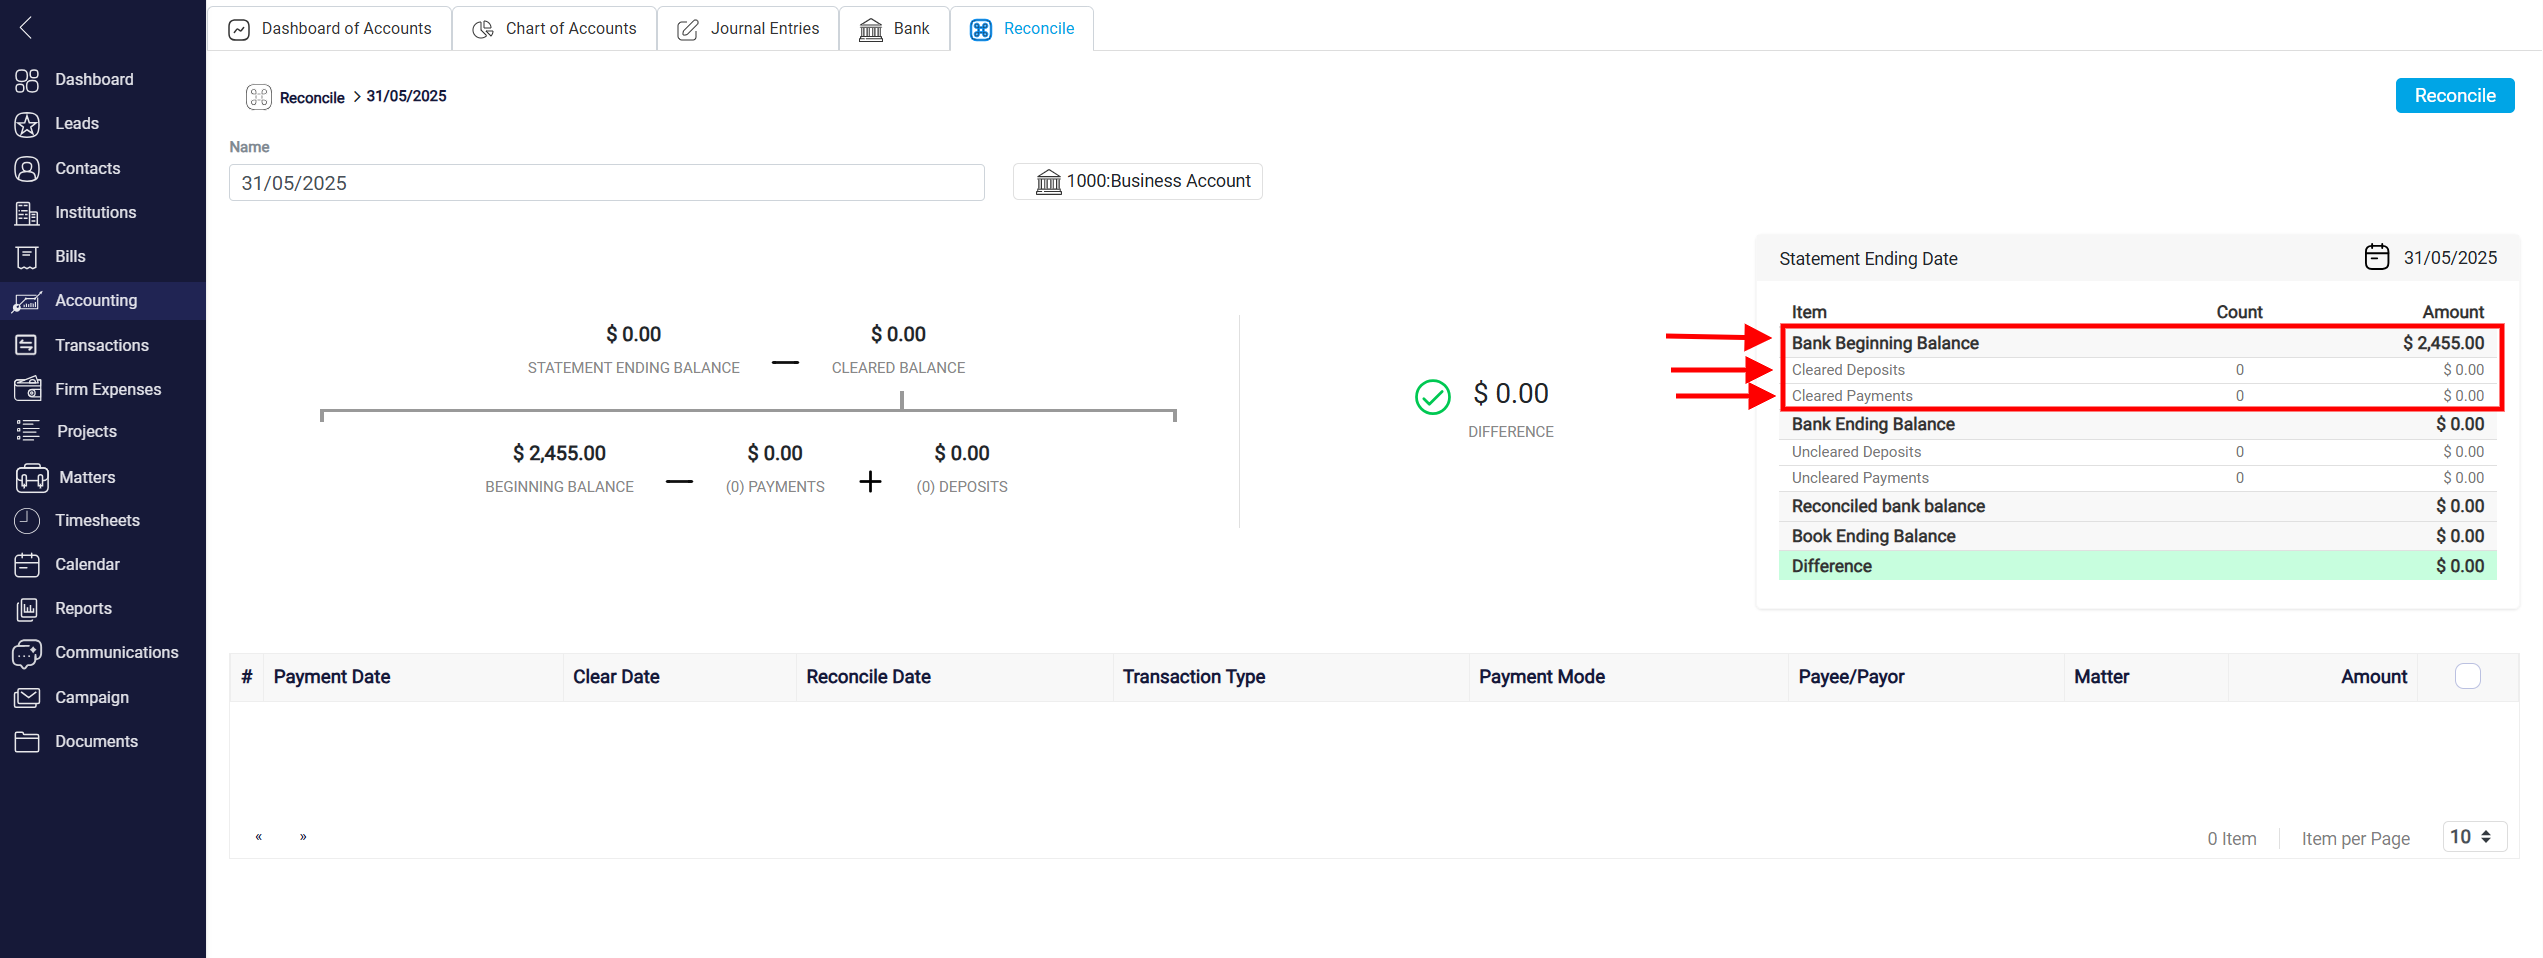
In the bank data section, the table displays the Bank Beginning Balance from the start of the period, along with the total number and amount of cleared deposits and payments. These figures represent transactions that the system has identified as matching the bank’s records.
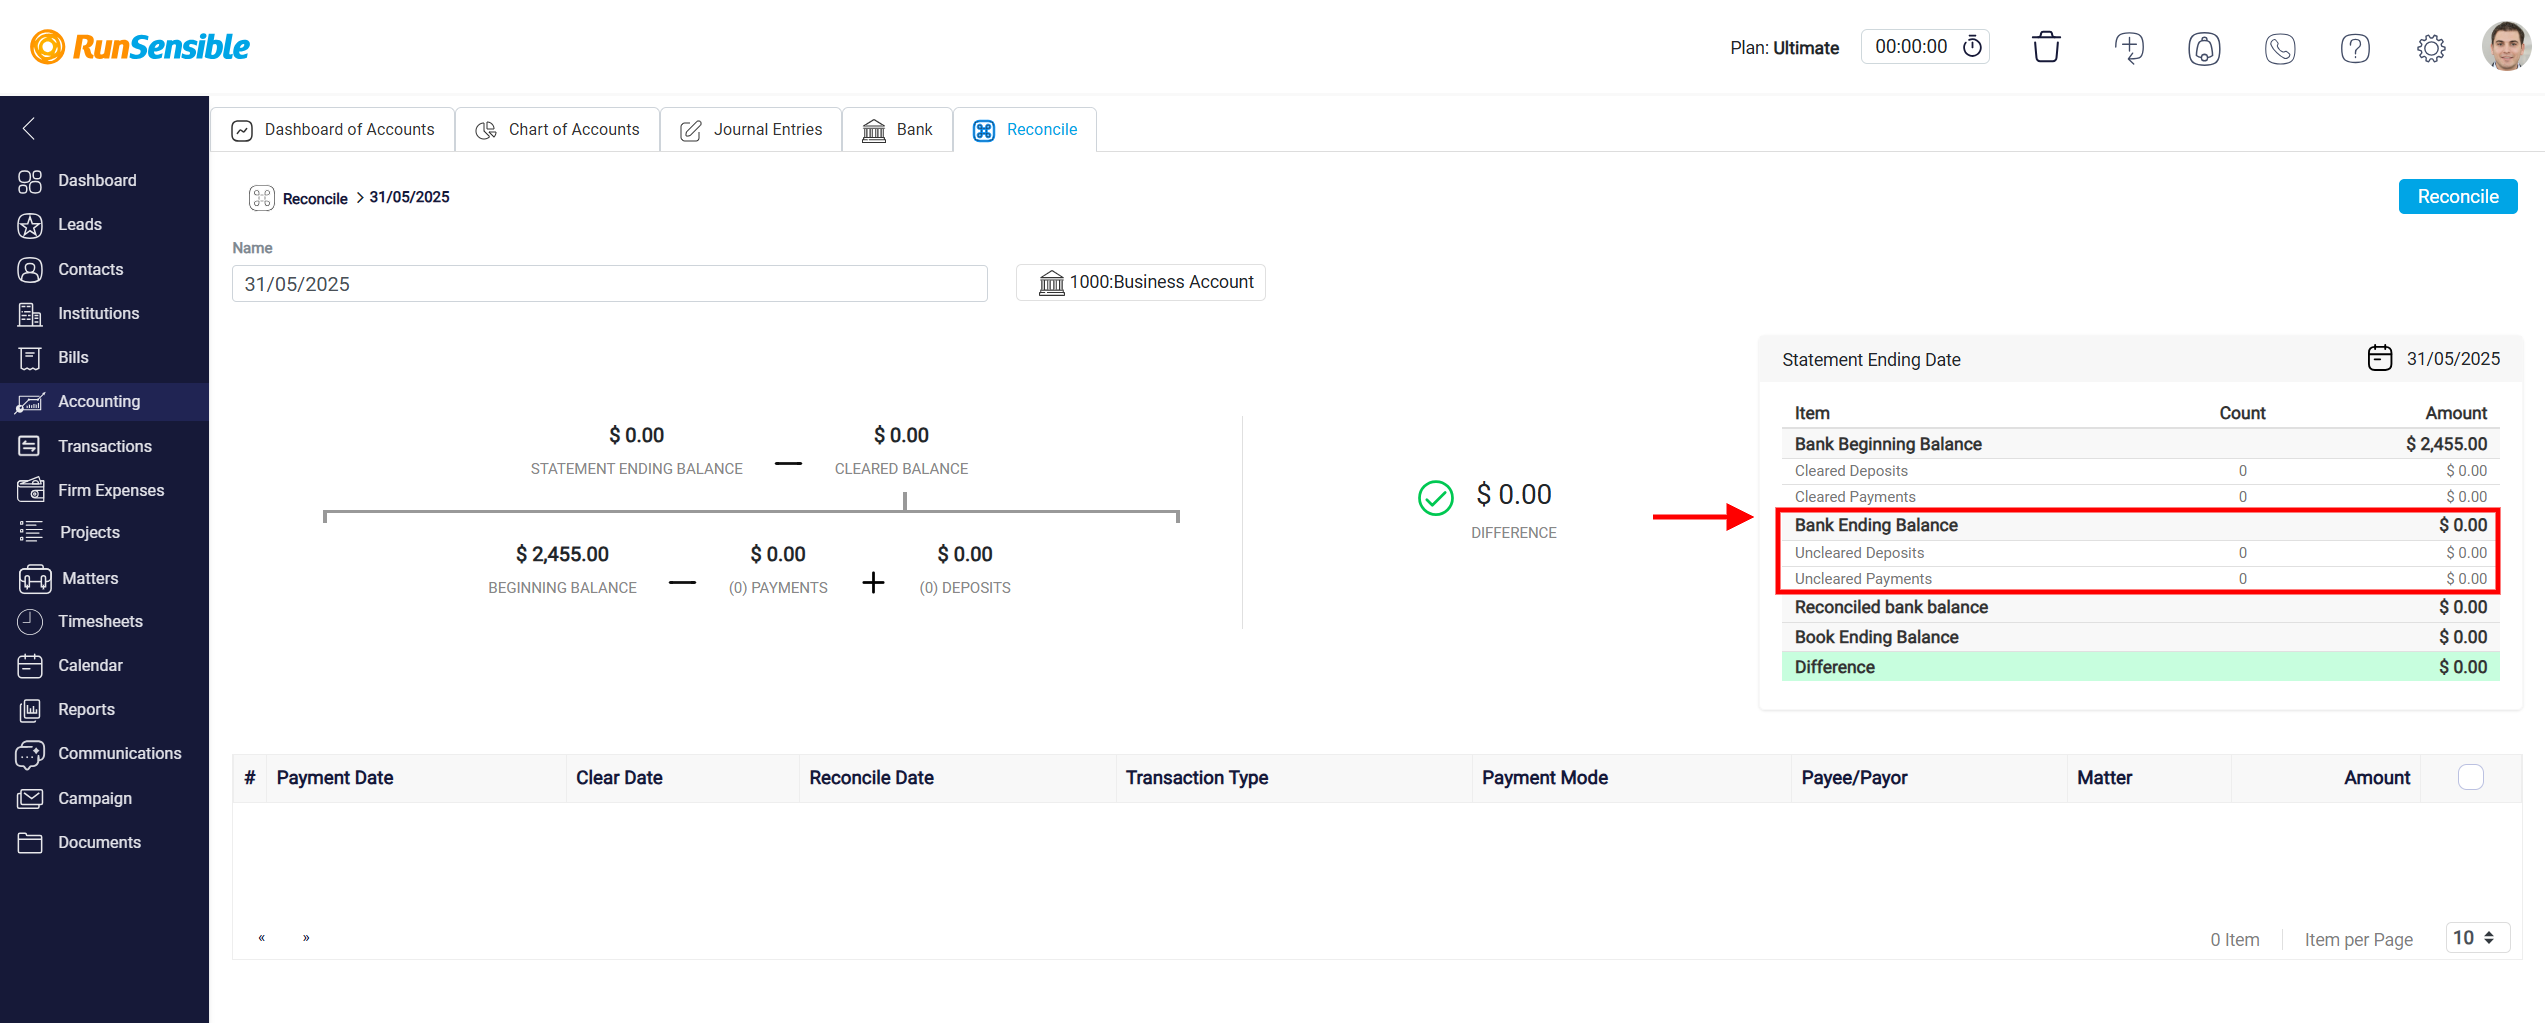
Additionally, the Bank Ending Balance reported by the bank is shown here. If there are any deposits or payments in the system that have not yet been matched to bank activity, they are shown in the uncleared transactions section.
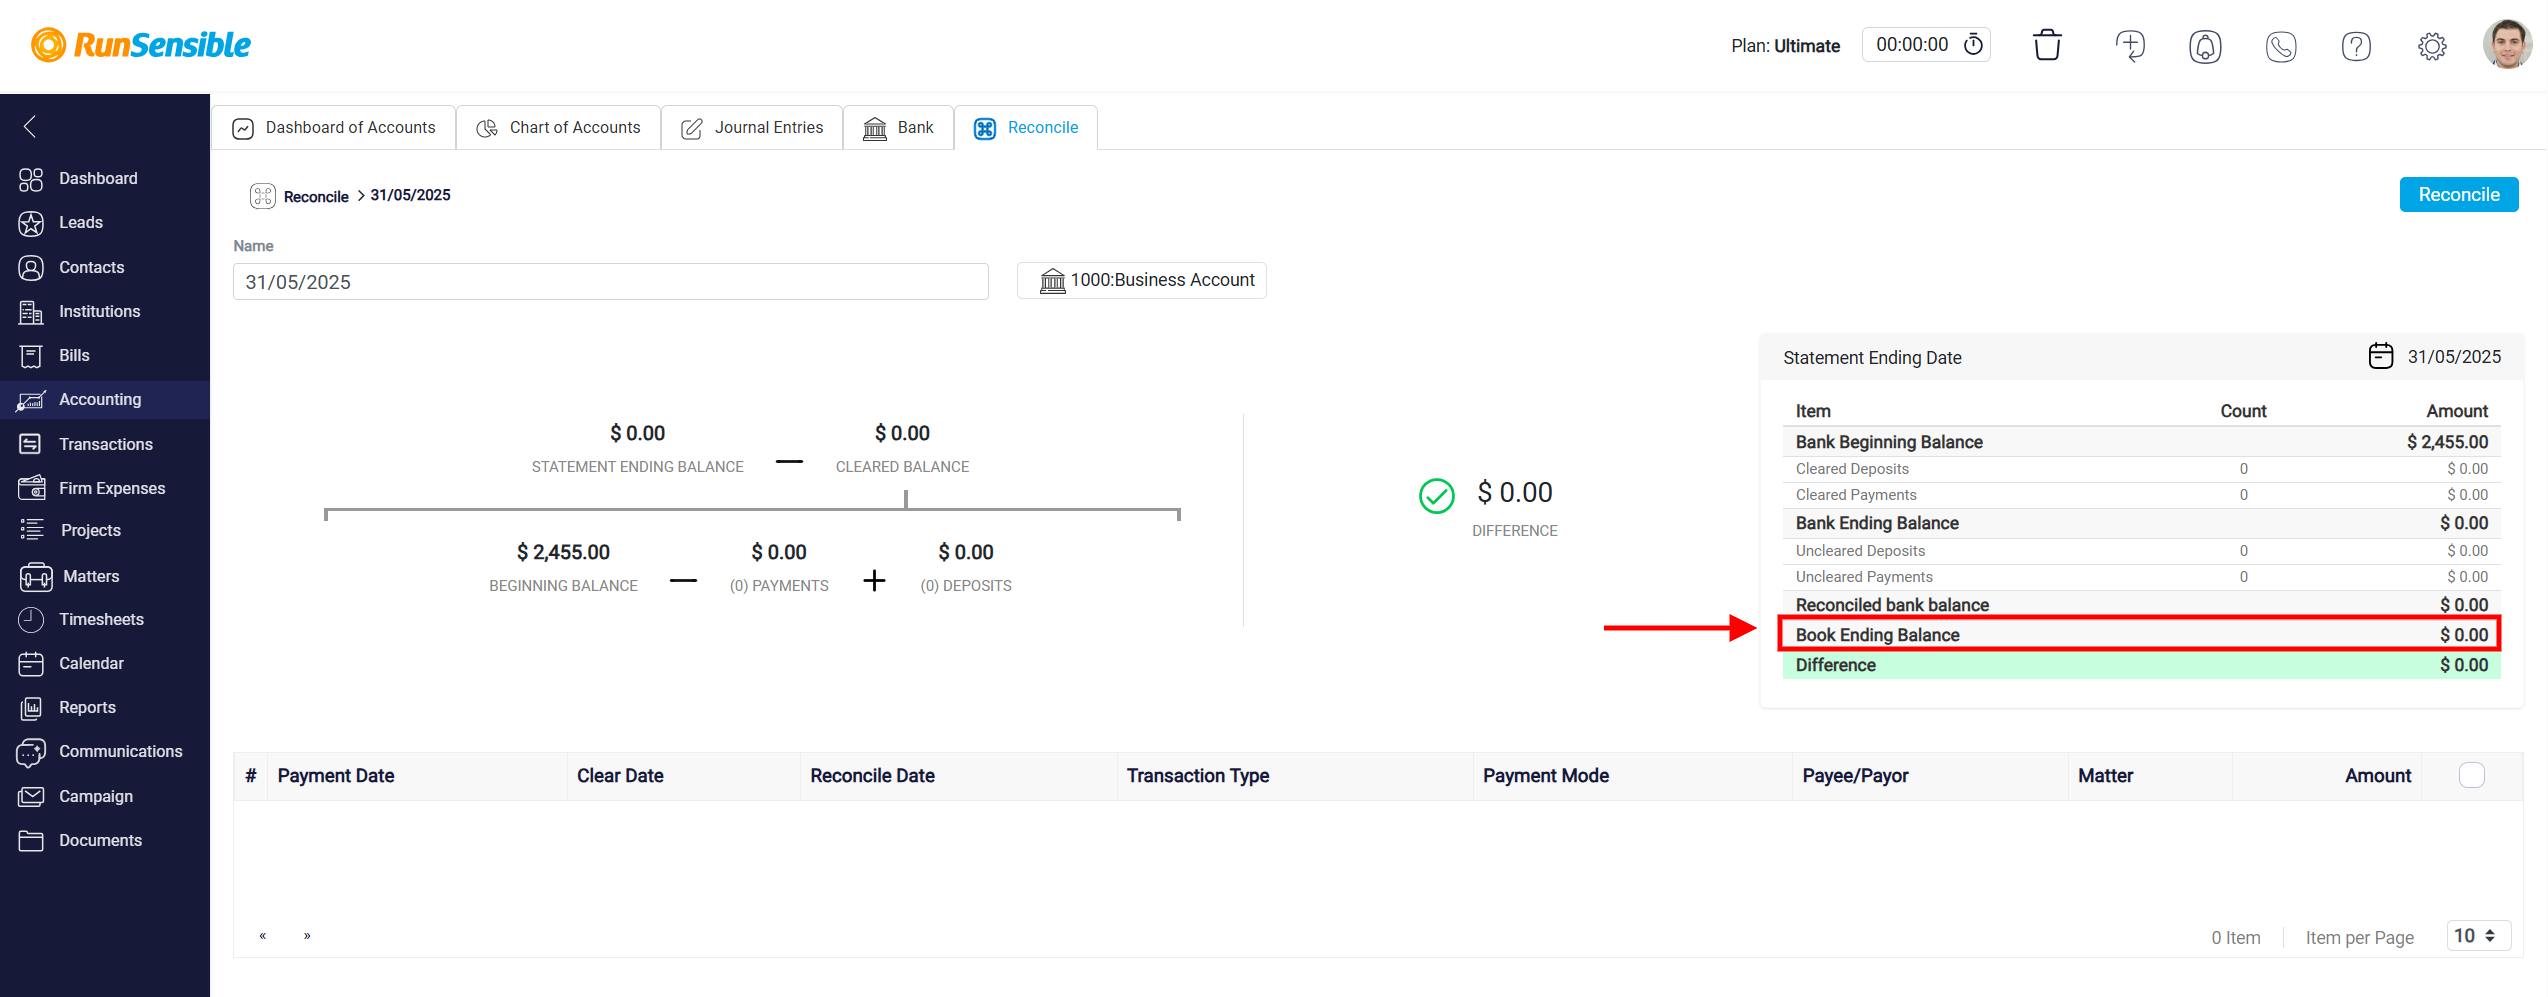
The system data section includes the Reconciled Bank Balance, which is calculated internally based on the beginning balance, cleared deposits, and cleared payments. This figure is the system’s best estimate of what the ending balance should be, assuming all transactions are correct and have been cleared.
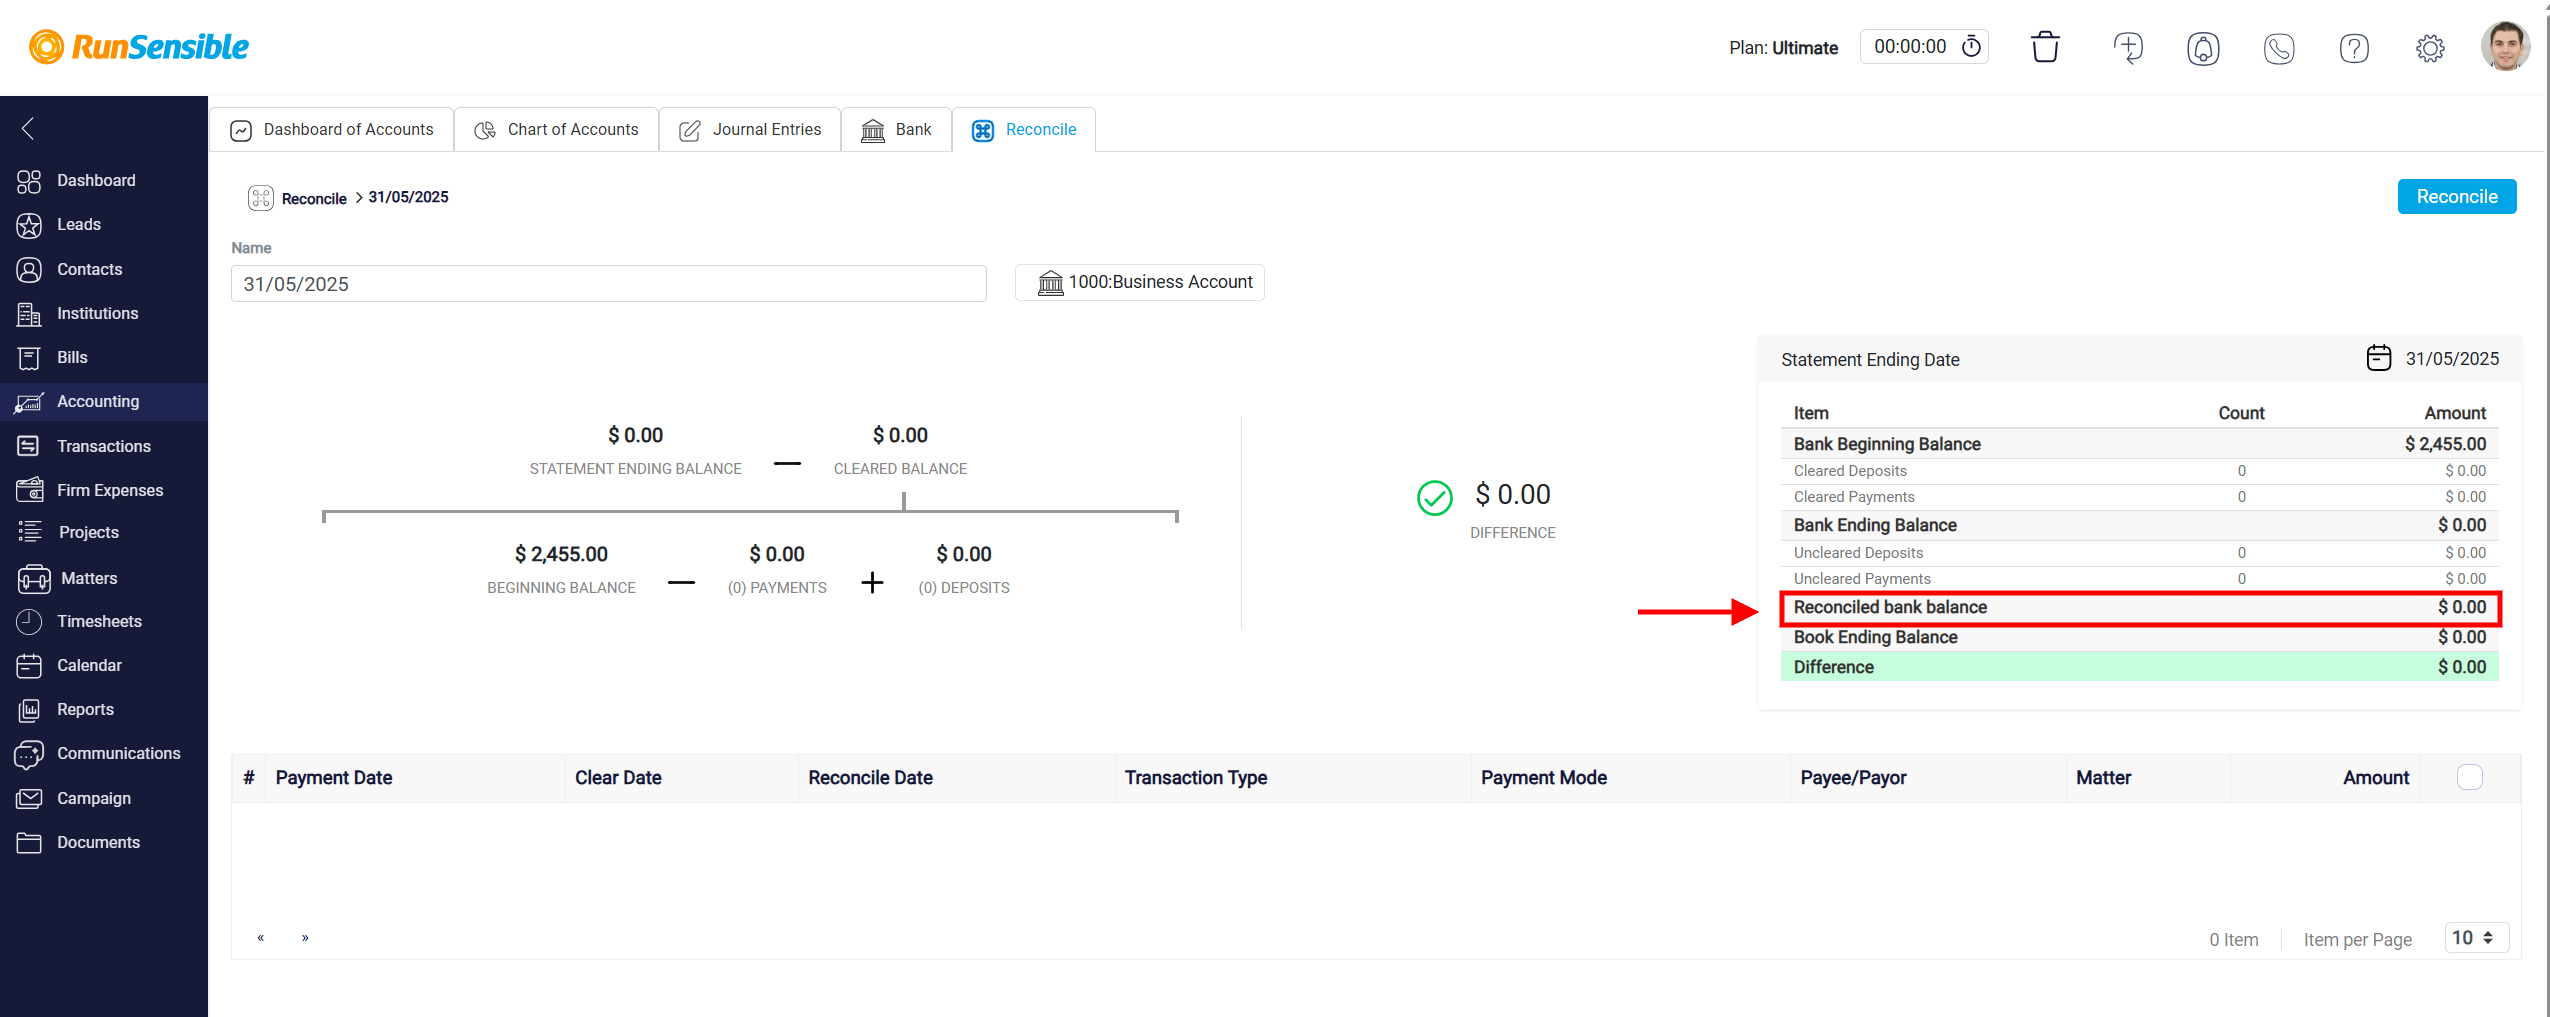
The Book Ending Balance is also shown, representing the total account balance as recorded in the user’s internal ledger as of the reconciliation date, regardless of whether the transactions have cleared.
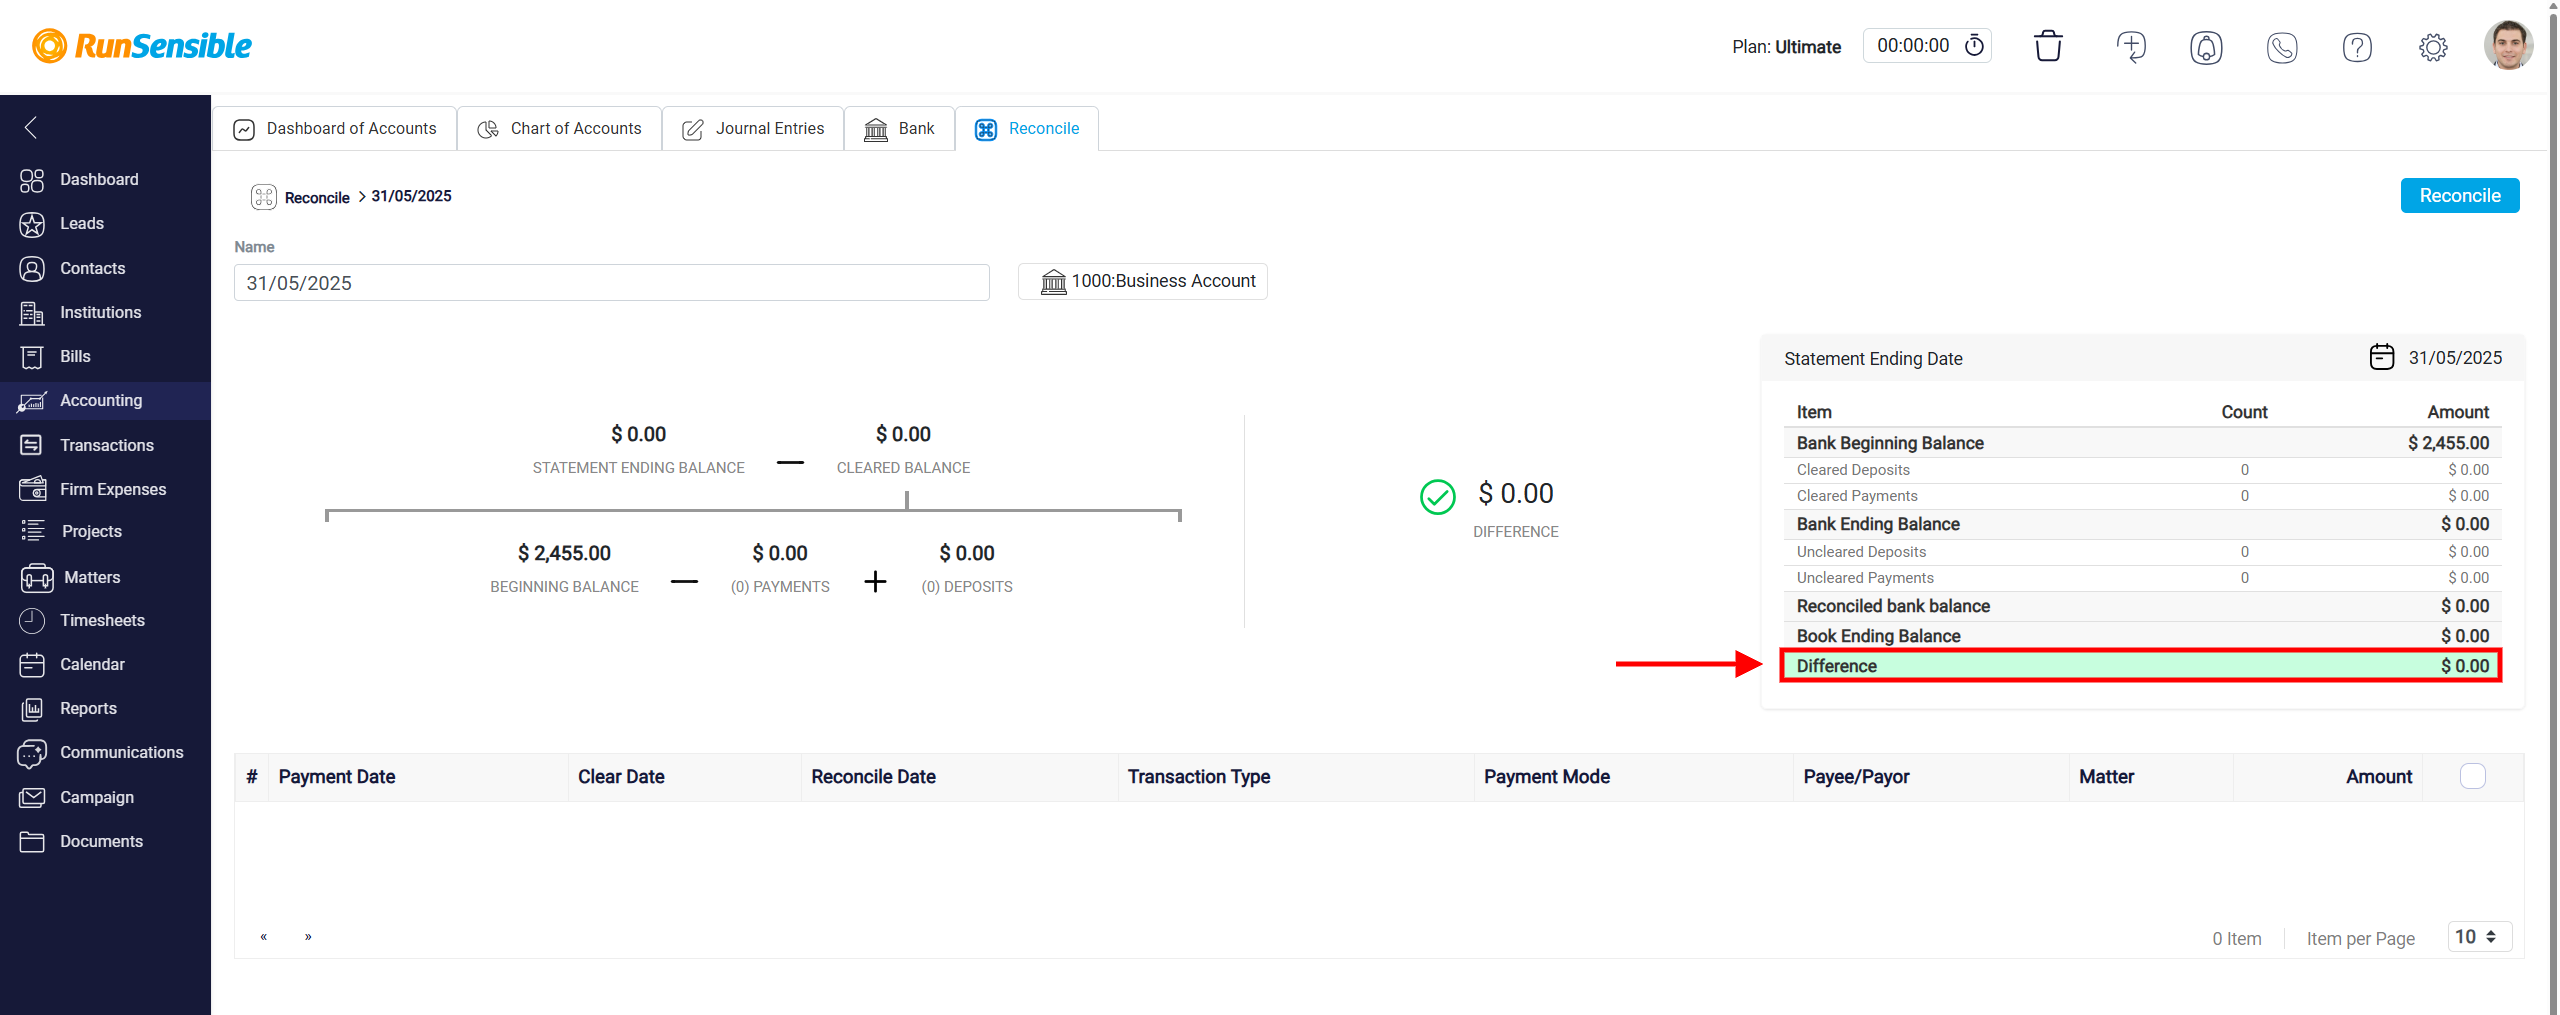
Finally, the system displays the difference between the reconciled bank balance and the book ending balance. This value is crucial, as it indicates how far off the internal records are from the expected reconciled total. Any non-zero value here suggests that additional work is needed to investigate and resolve the mismatch before completing the reconciliation.
Reviewing and Clearing Transactions
At the bottom of the reconciliation interface, there is a list displaying all transactions that are currently marked as uncleared. These are transactions recorded in the system but not yet verified against your bank statement.
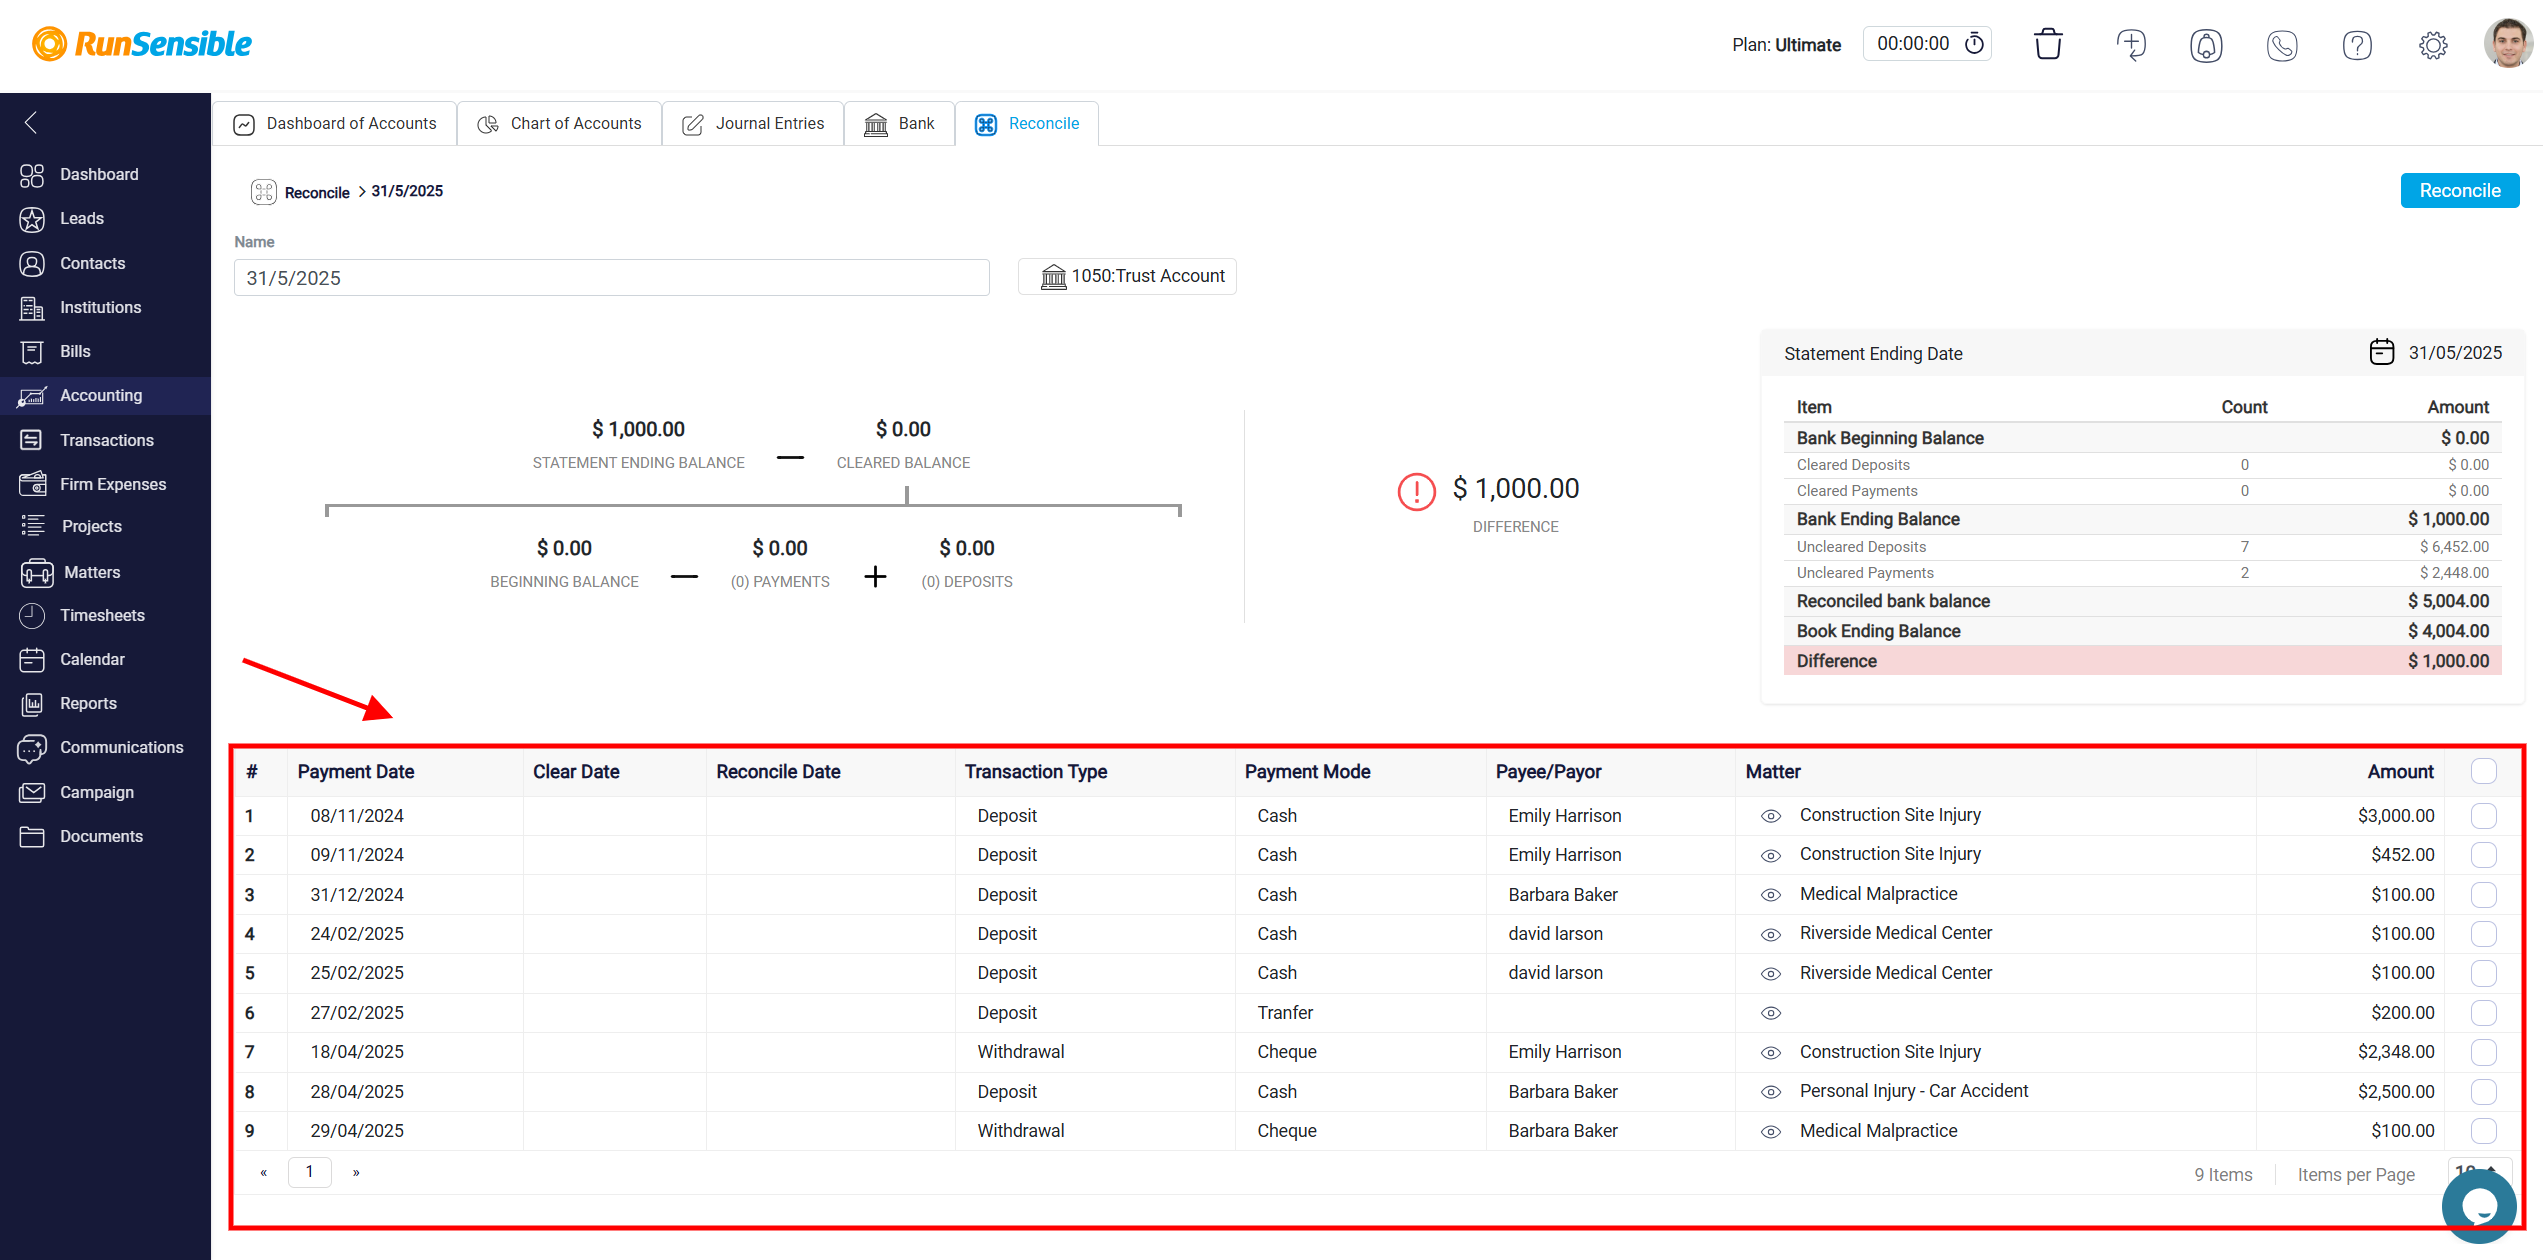
Each item in the list includes a checkbox on the right side, allowing you to mark it as cleared once it has been confirmed.

To begin the clearing process, carefully compare each transaction in this list with the corresponding entries in your bank report. If a transaction matches the bank statement without any discrepancies, select the checkbox next to it to mark it as reviewed and cleared.
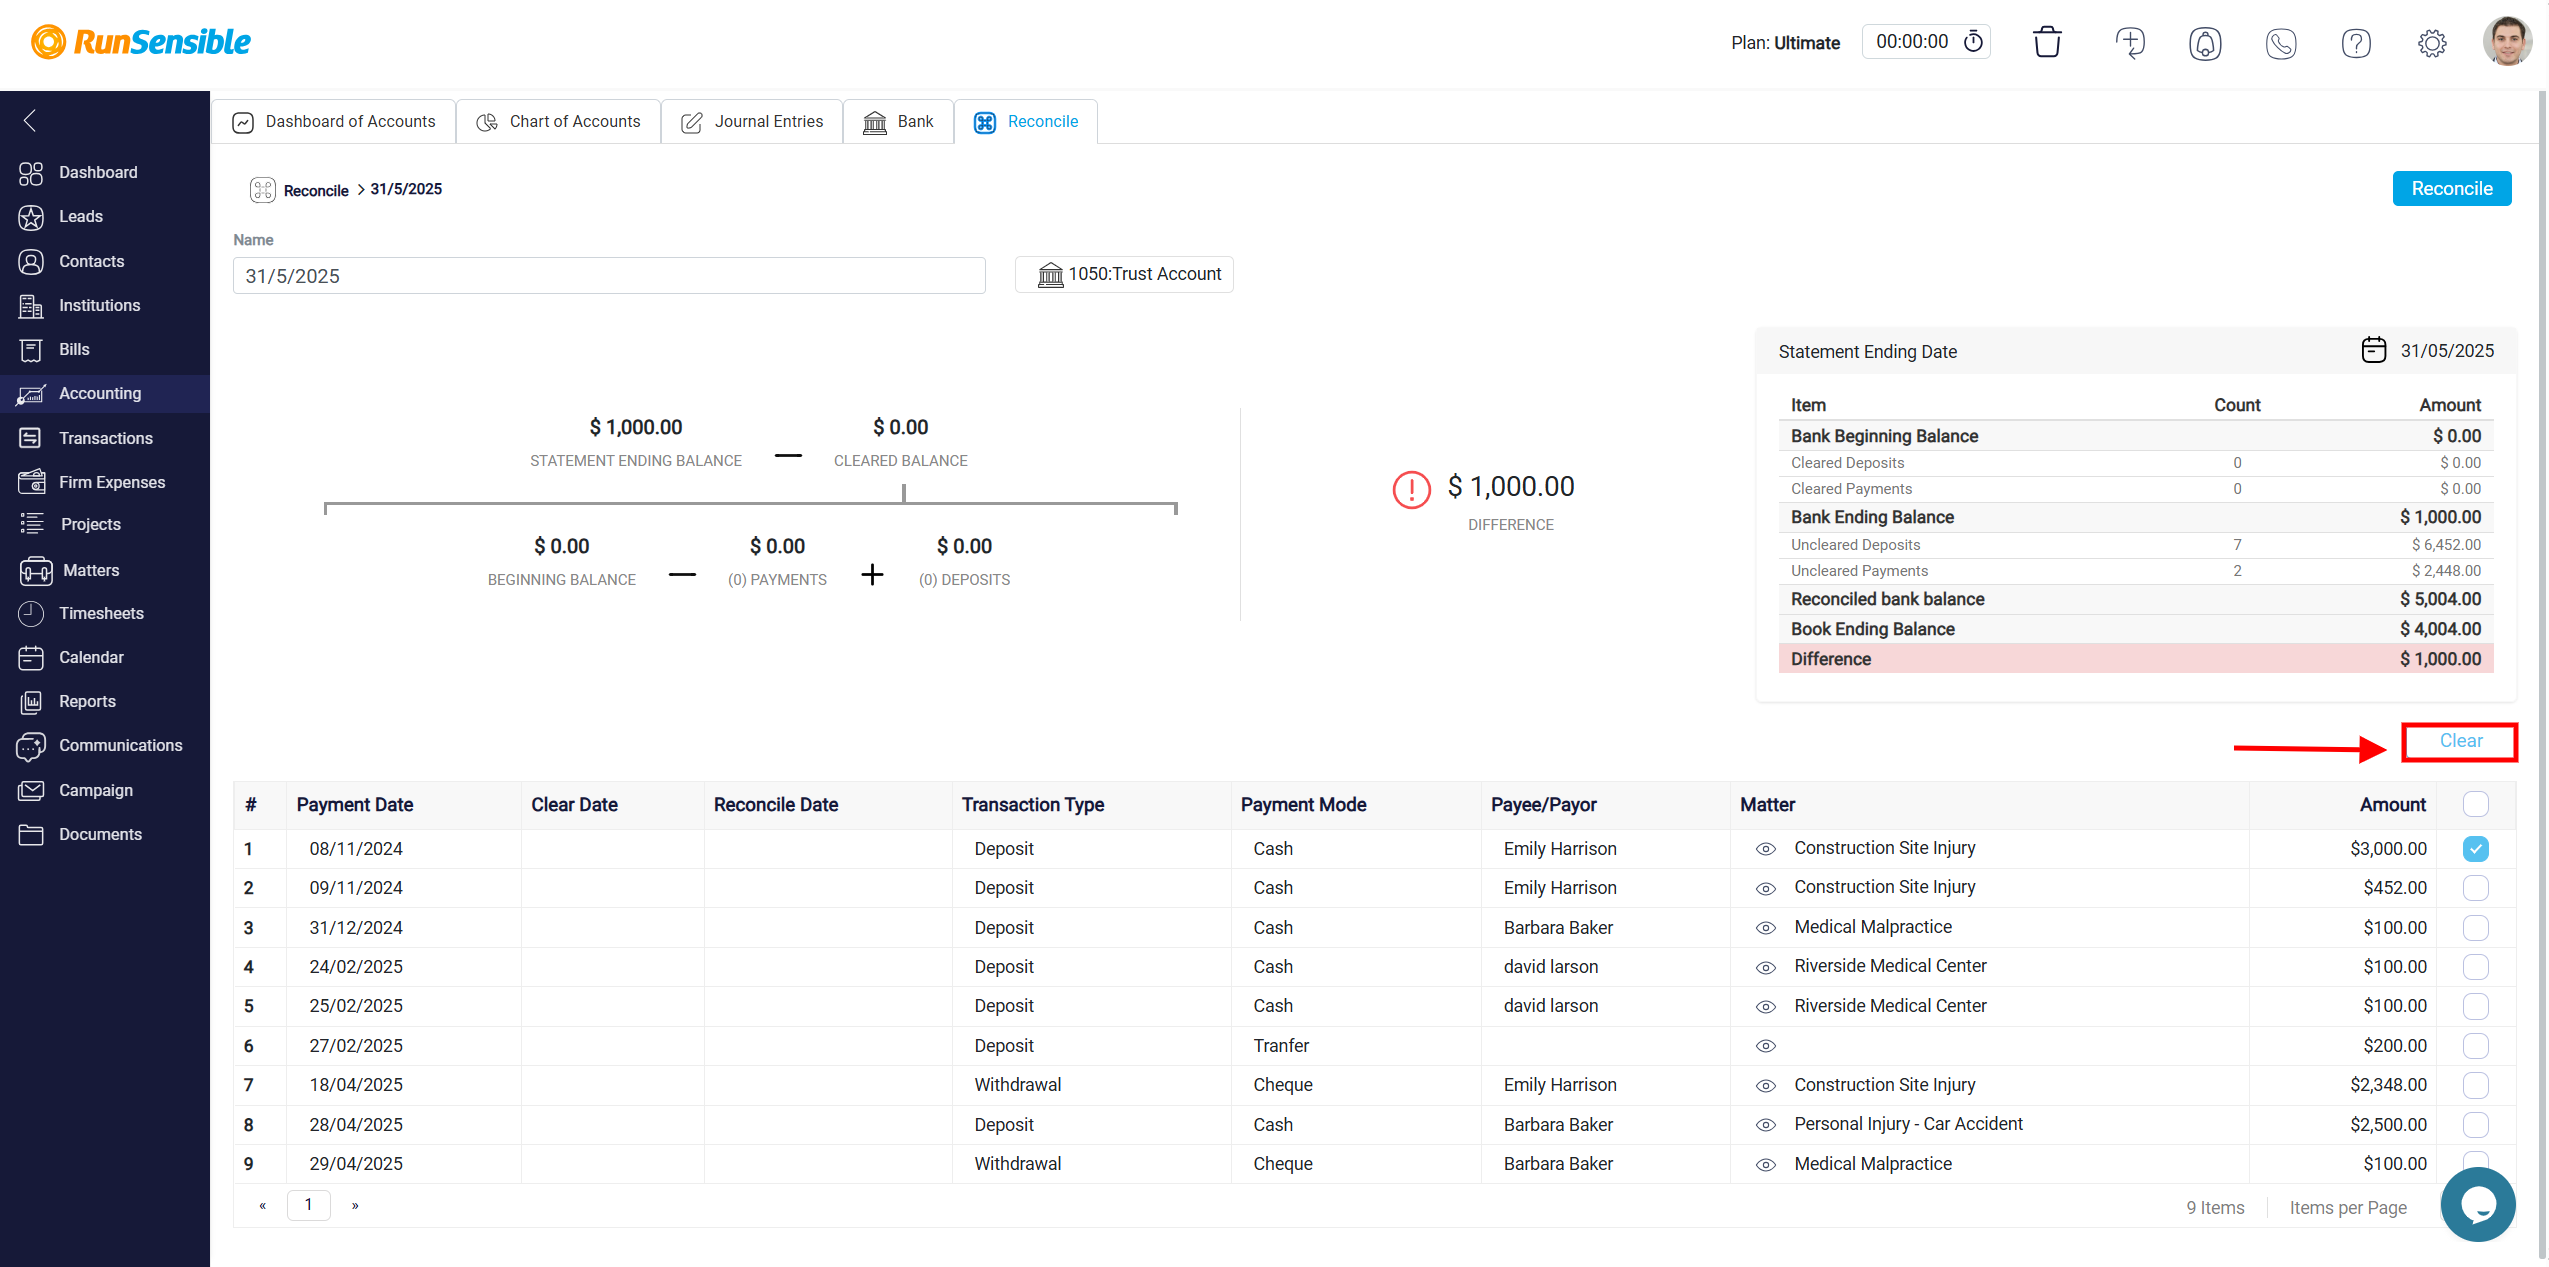
After you have verified all transactions and marked the ones that match, click the Clear button located at the top of the transaction list. This action updates the system, recalculates the cleared balance, and adjusts the difference accordingly. The goal is to reduce the difference between your bank balance and internal records to zero, indicating that all matching transactions have been accounted for.
Resolving Missing Transactions in Bank Reconciliation
When reconciling your accounting records with your bank statement, a difference may remain even after all known transactions have been cleared. This typically indicates that one or more transactions from the bank report have not been entered into the accounting system. To address this, carefully review your bank report and compare it with the transaction list within your system. Focus on identifying any bank-related expenses, such as service charges or automatic withdrawals, that the bank has processed but which have not been recorded in your books. Other common causes include outstanding checks, where payments have been recorded in your system but have not yet been processed by the bank, and deposits in transit, where received funds have been documented internally but do not yet appear on the bank statement. Delays in bank processing, especially for electronic transactions, can also result in temporary discrepancies. Identifying these missing transactions is essential for ensuring the reconciliation process reflects accurate financial data.
Recording Missing Transactions in Existing Matters
When a missing transaction is detected during the reconciliation process, the first step is to determine whether it is associated with a matter that already exists in your system and has prior transactions related to the same bank account currently being reconciled. If the matter exists, it should appear in the transaction list linked to this bank account. Locate the relevant matter by browsing the transaction list and selecting the eye icon to open its detailed view. Within the matter details panel, navigate to the appropriate section—either the Bill tab or the Expense tab—depending on whether the transaction represents a billed item or an expense. You can manually record the missing transaction by entering the required details, including the transaction amount, date, and description. Once the entry is saved, return to the reconciliation interface, where the new transaction will now appear as an uncleared item. To include this entry in the reconciliation calculation, mark it as cleared. This ensures the transaction is recognized in the system’s balance and contributes to resolving any discrepancies.
Adding Missing Transactions to New Matters
If the missing transaction pertains to a matter that has not yet been created or if the relevant matter exists but does not contain any prior transactions related to the specific bank account being reconciled, it becomes necessary to either create the matter or identify the correct one from your matter list. Begin by accessing the matter management section within the system. If the matter does not exist, initiate its creation by inputting the required details. If it already exists but is not linked to the current bank account, search for it and open the matter’s details. Proceed to the Bill or Expense tab based on the type of transaction and manually enter the missing transaction by providing complete and accurate information. Once the entry is saved, return to the reconciliation interface. The newly recorded transaction will now appear in the list of uncleared items, from which you can mark it as cleared. This step allows the transaction to be reflected in the reconciliation, ensuring it matches the corresponding line on your bank statement.
Finalizing the Reconciliation Process
After all missing transactions have been identified, entered, and marked as cleared, the system should reflect a zero difference between your internal records and the bank statement. This indicates that all transactions have been accurately reconciled and that no unaccounted items remain. To complete and save the reconciliation process, click on the Reconcile button located at the top right corner of the screen. This final action confirms the reconciliation for the selected date range and secures the data, maintaining the integrity of your financial records.