
Overview of Bills in the Bill Tab
The Bill tab gives you a complete view of the all the invoices relating to this matter create new one and record transaction for them.
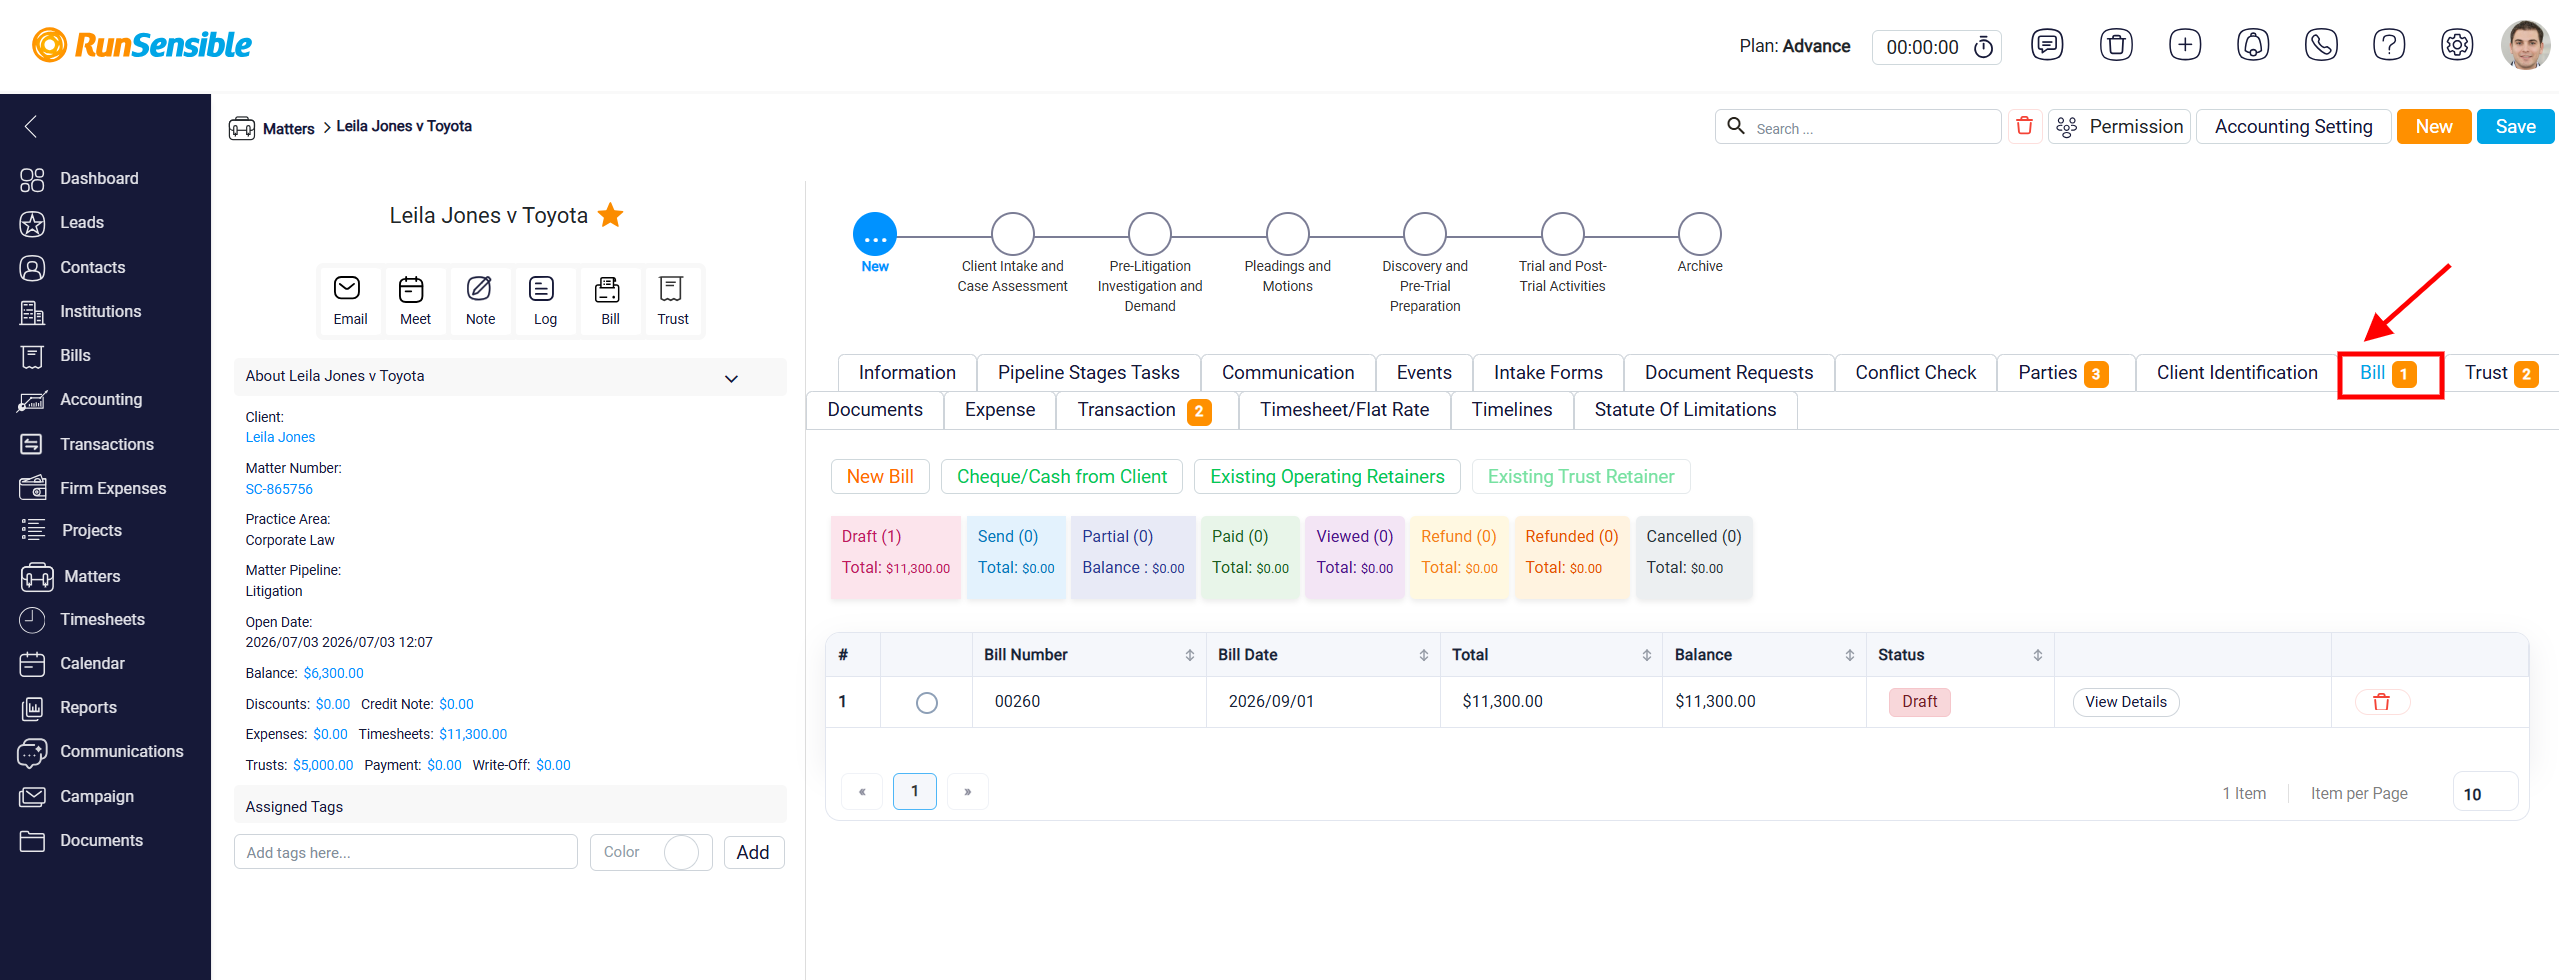
If there are no records in the Bill tab, the table shows a No Data message, meaning no bills or trust records have been created for the matter yet.
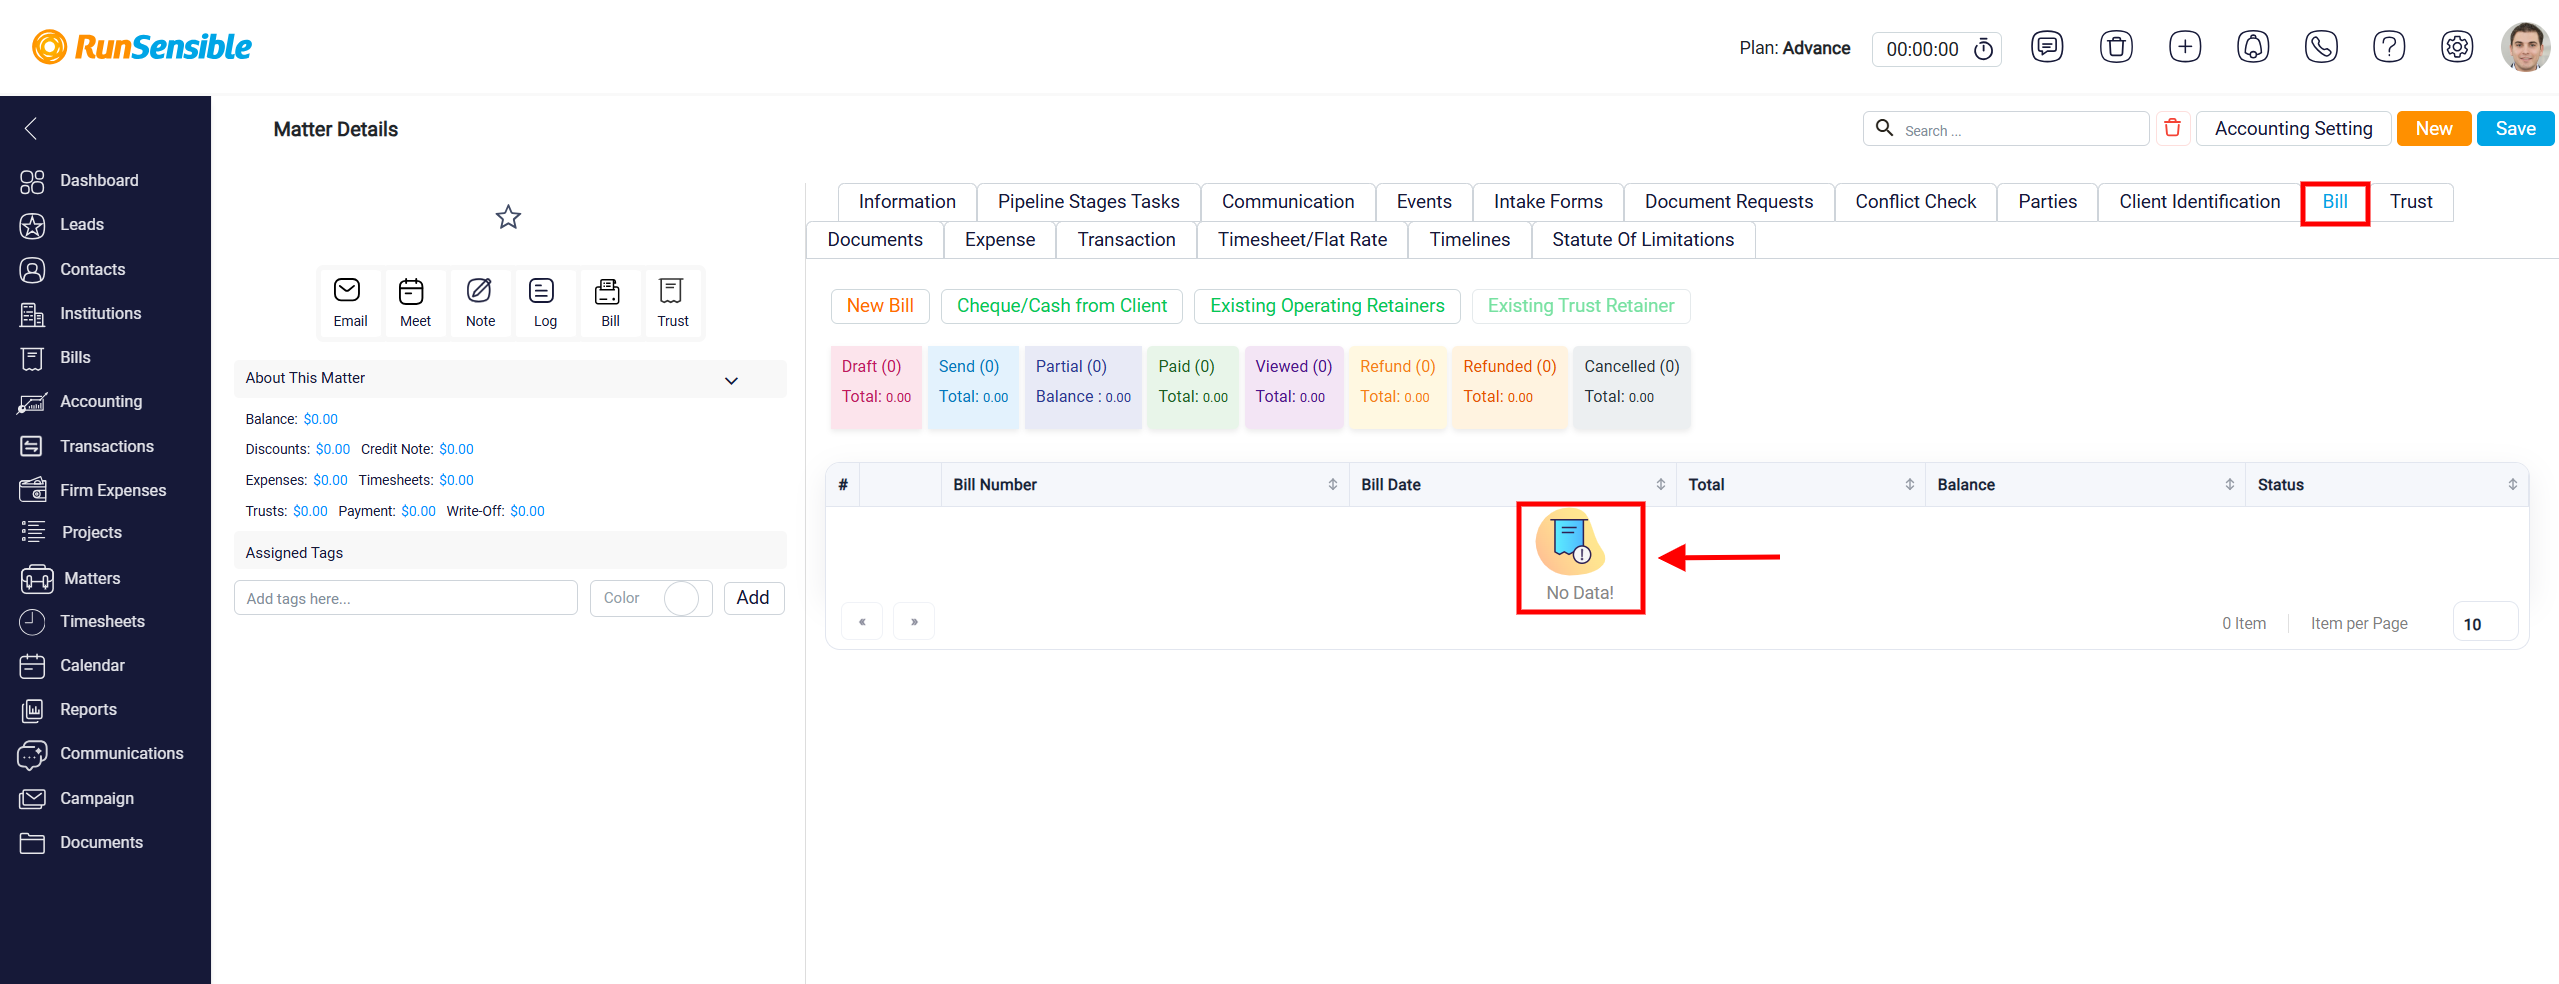
Once you open the bill tab you will see a complete list of all the bills (invoices) records relating to the matter. Also the tab shows colored status boxes. These boxes summarize the financial records by status, such as Draft, Sent, Partial, Paid, Viewed, Refunded, and Cancelled. Each status box shows how many records are in that status and the total amount connected to those records. This gives you a quick overview of the matter’s billing situation before reviewing the full table.
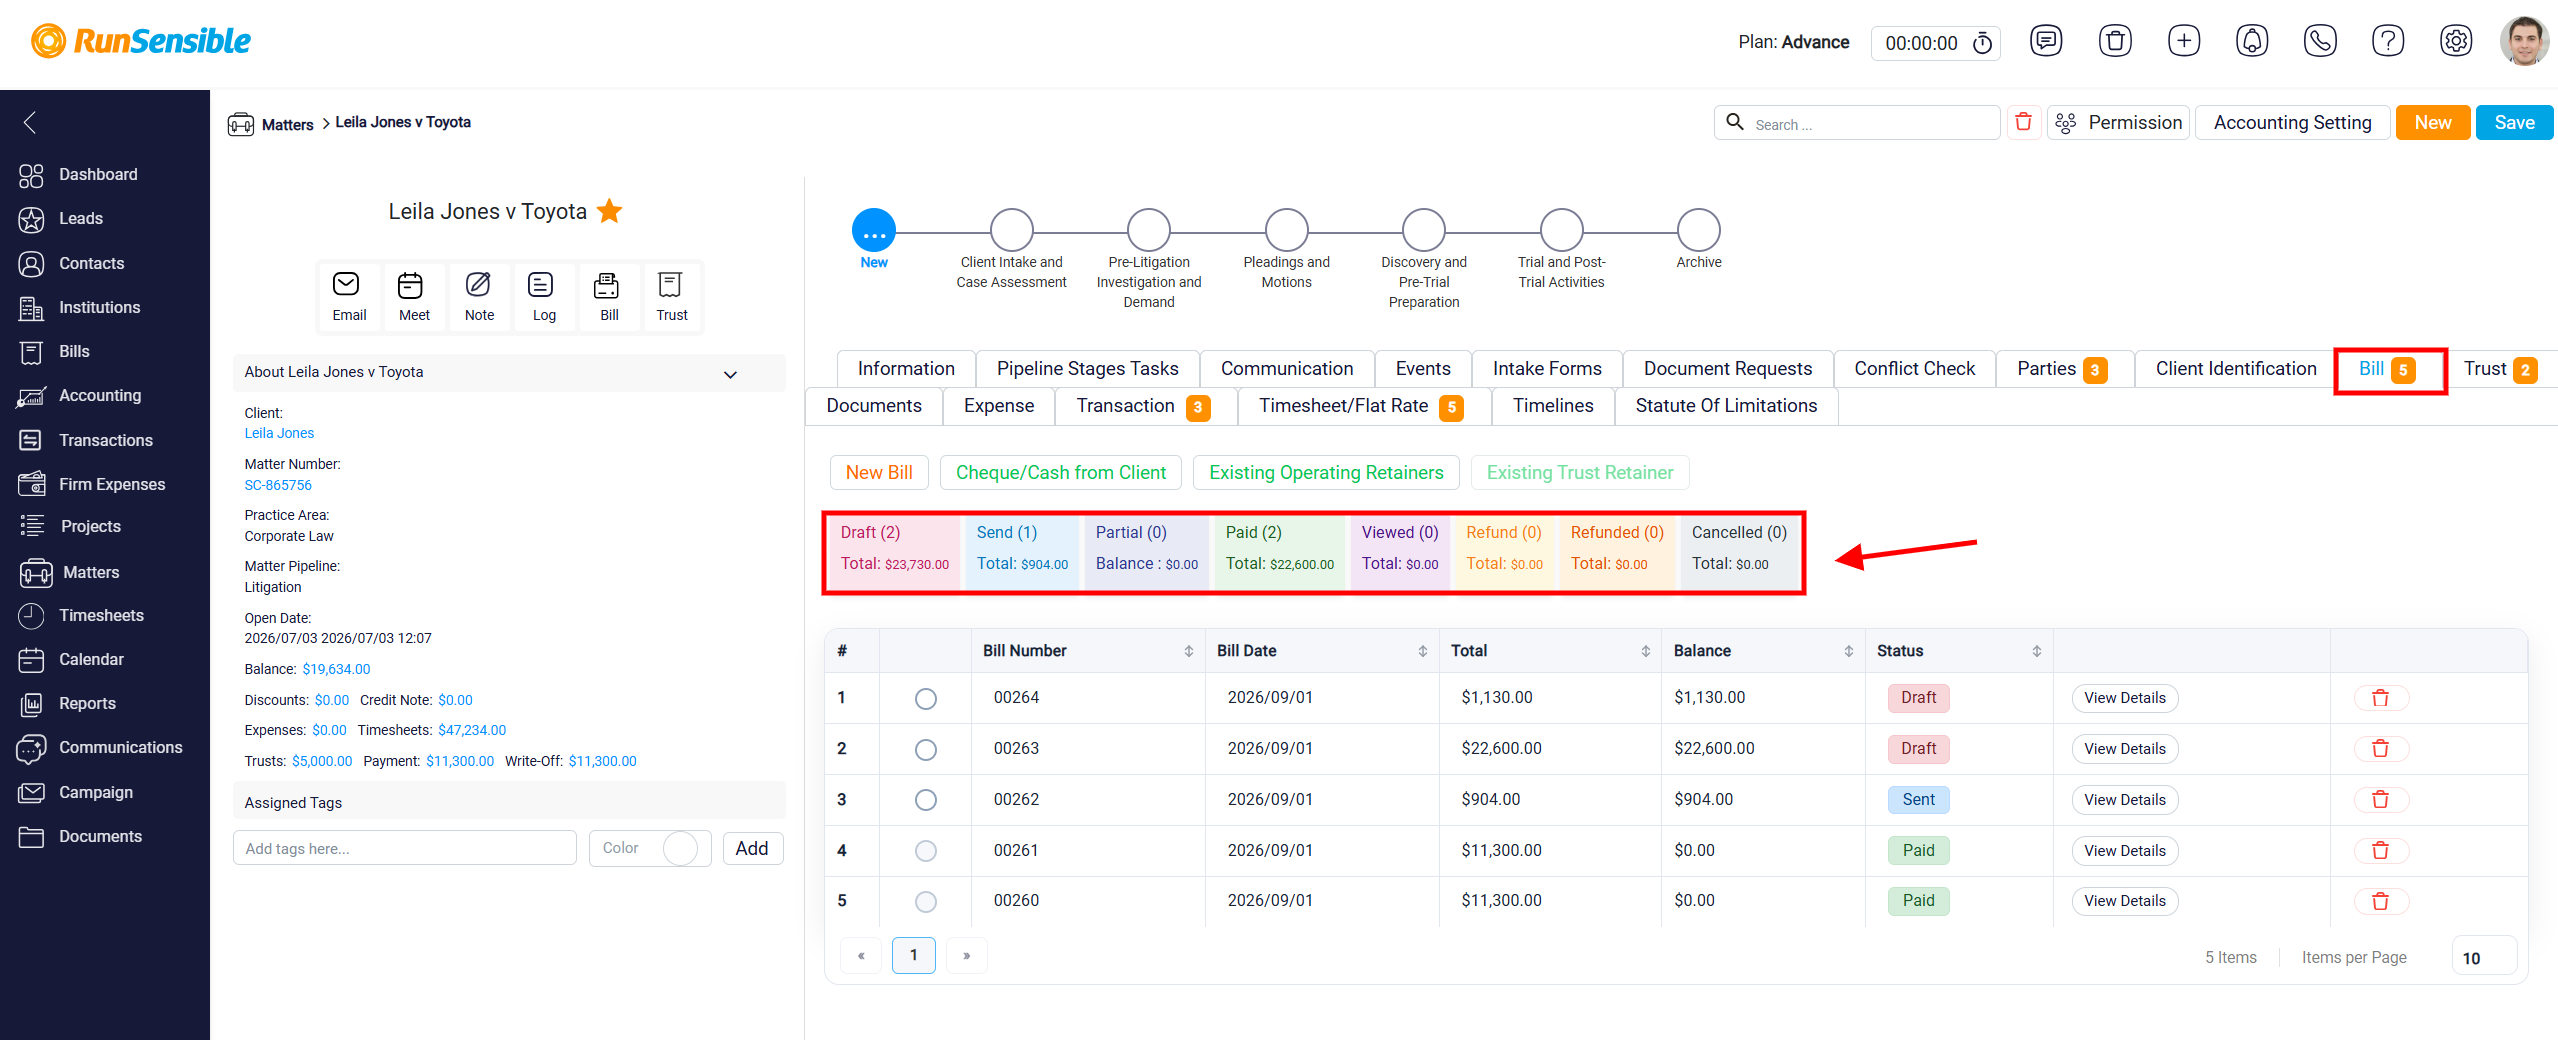
These boxes are filterable as well you can click on only one of them and see all the bill records with that status.
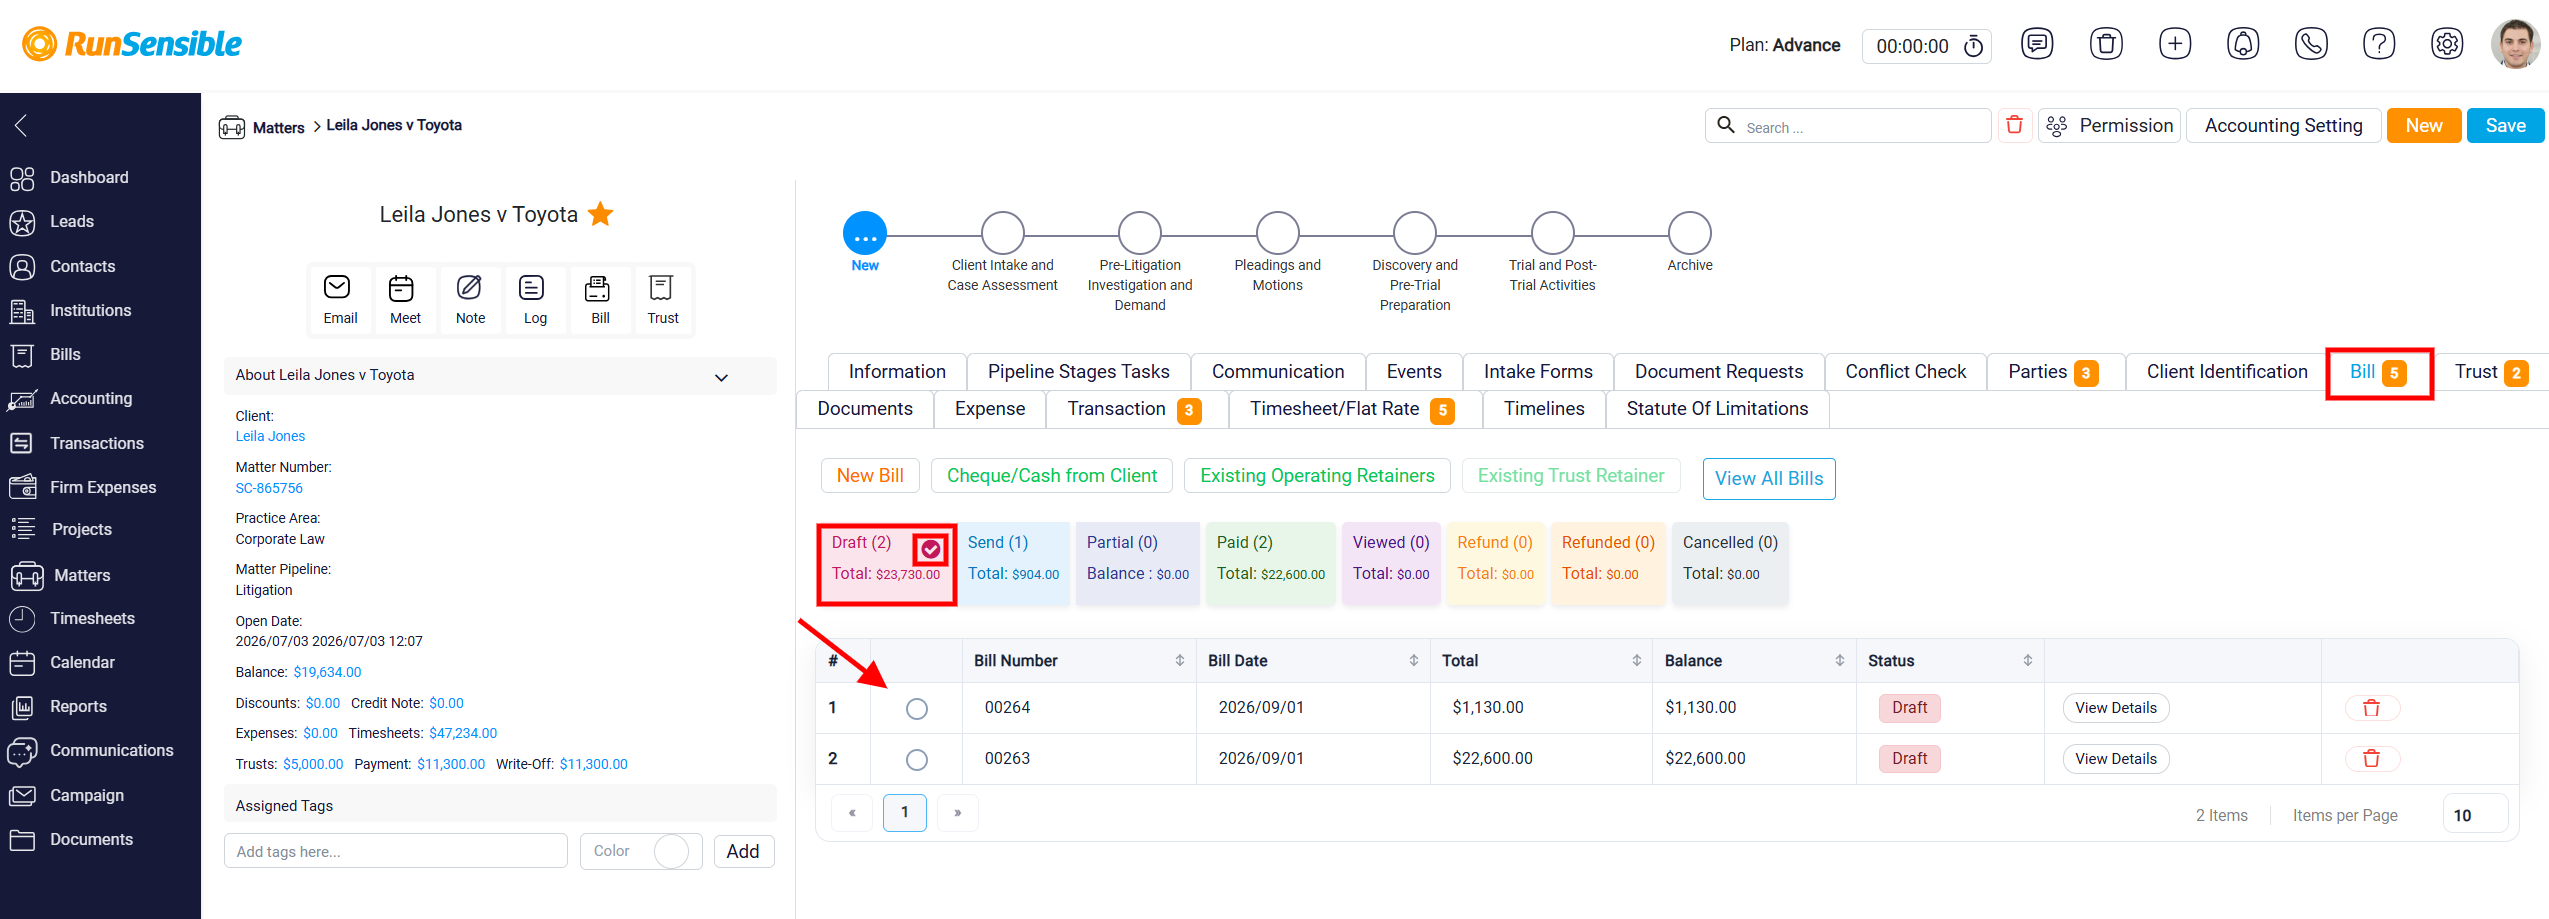
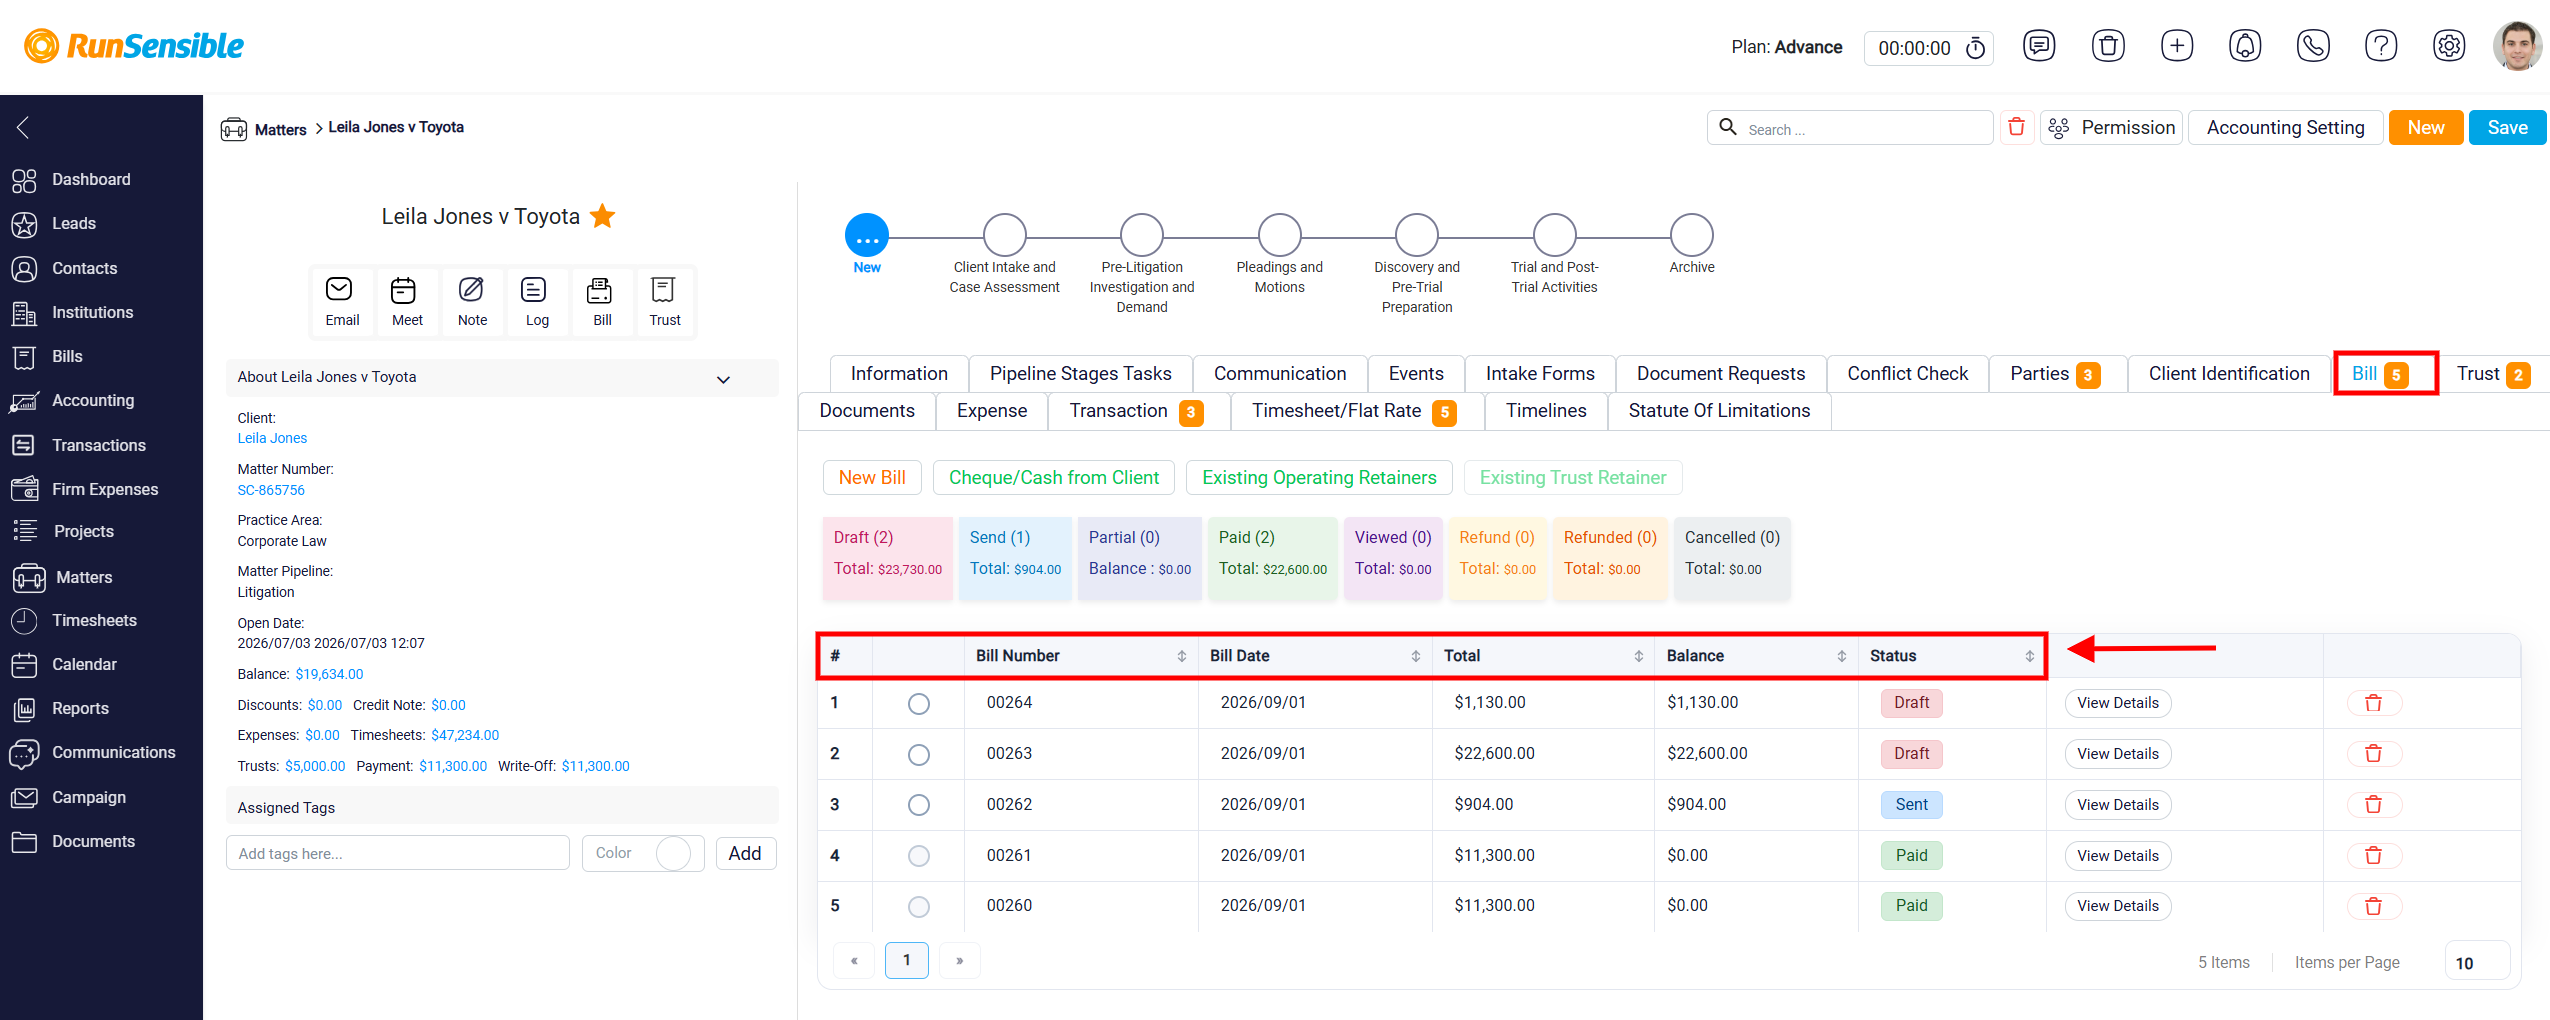
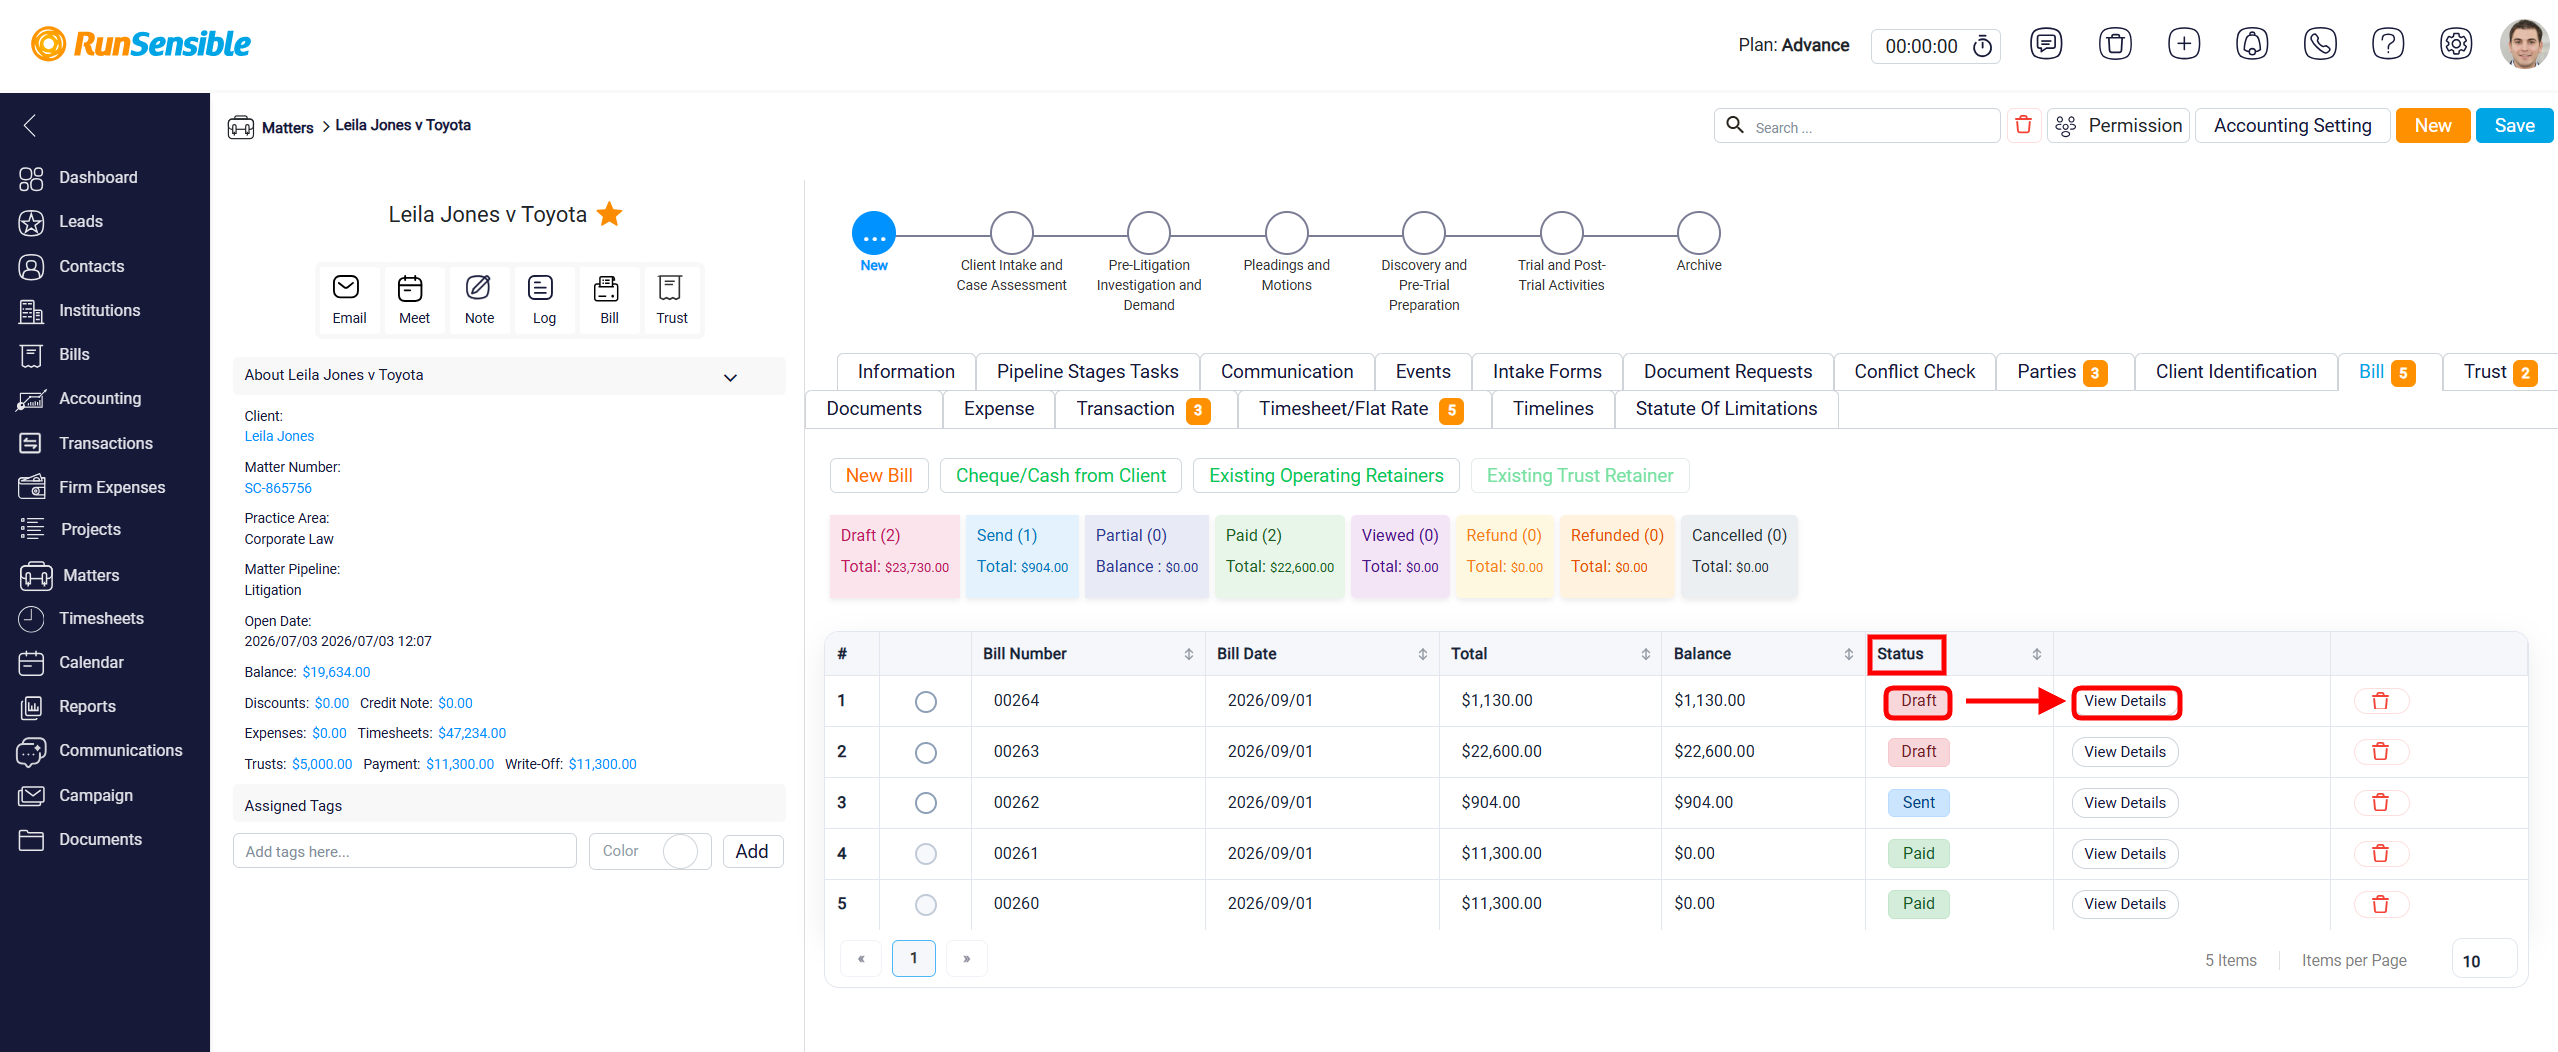
The main table lists the bill and trust records connected to the matter. Each row represents one financial record. The Bill Number column shows the unique number assigned to the bill or trust record, making it easier to identify and reference later. The Bill Date column shows the date the bill was created. The Total column shows the full amount of the record, while the Balance column shows the remaining unpaid amount. The Status column shows whether the record is still a Draft, Partially Paid, has been paid, or has another status.
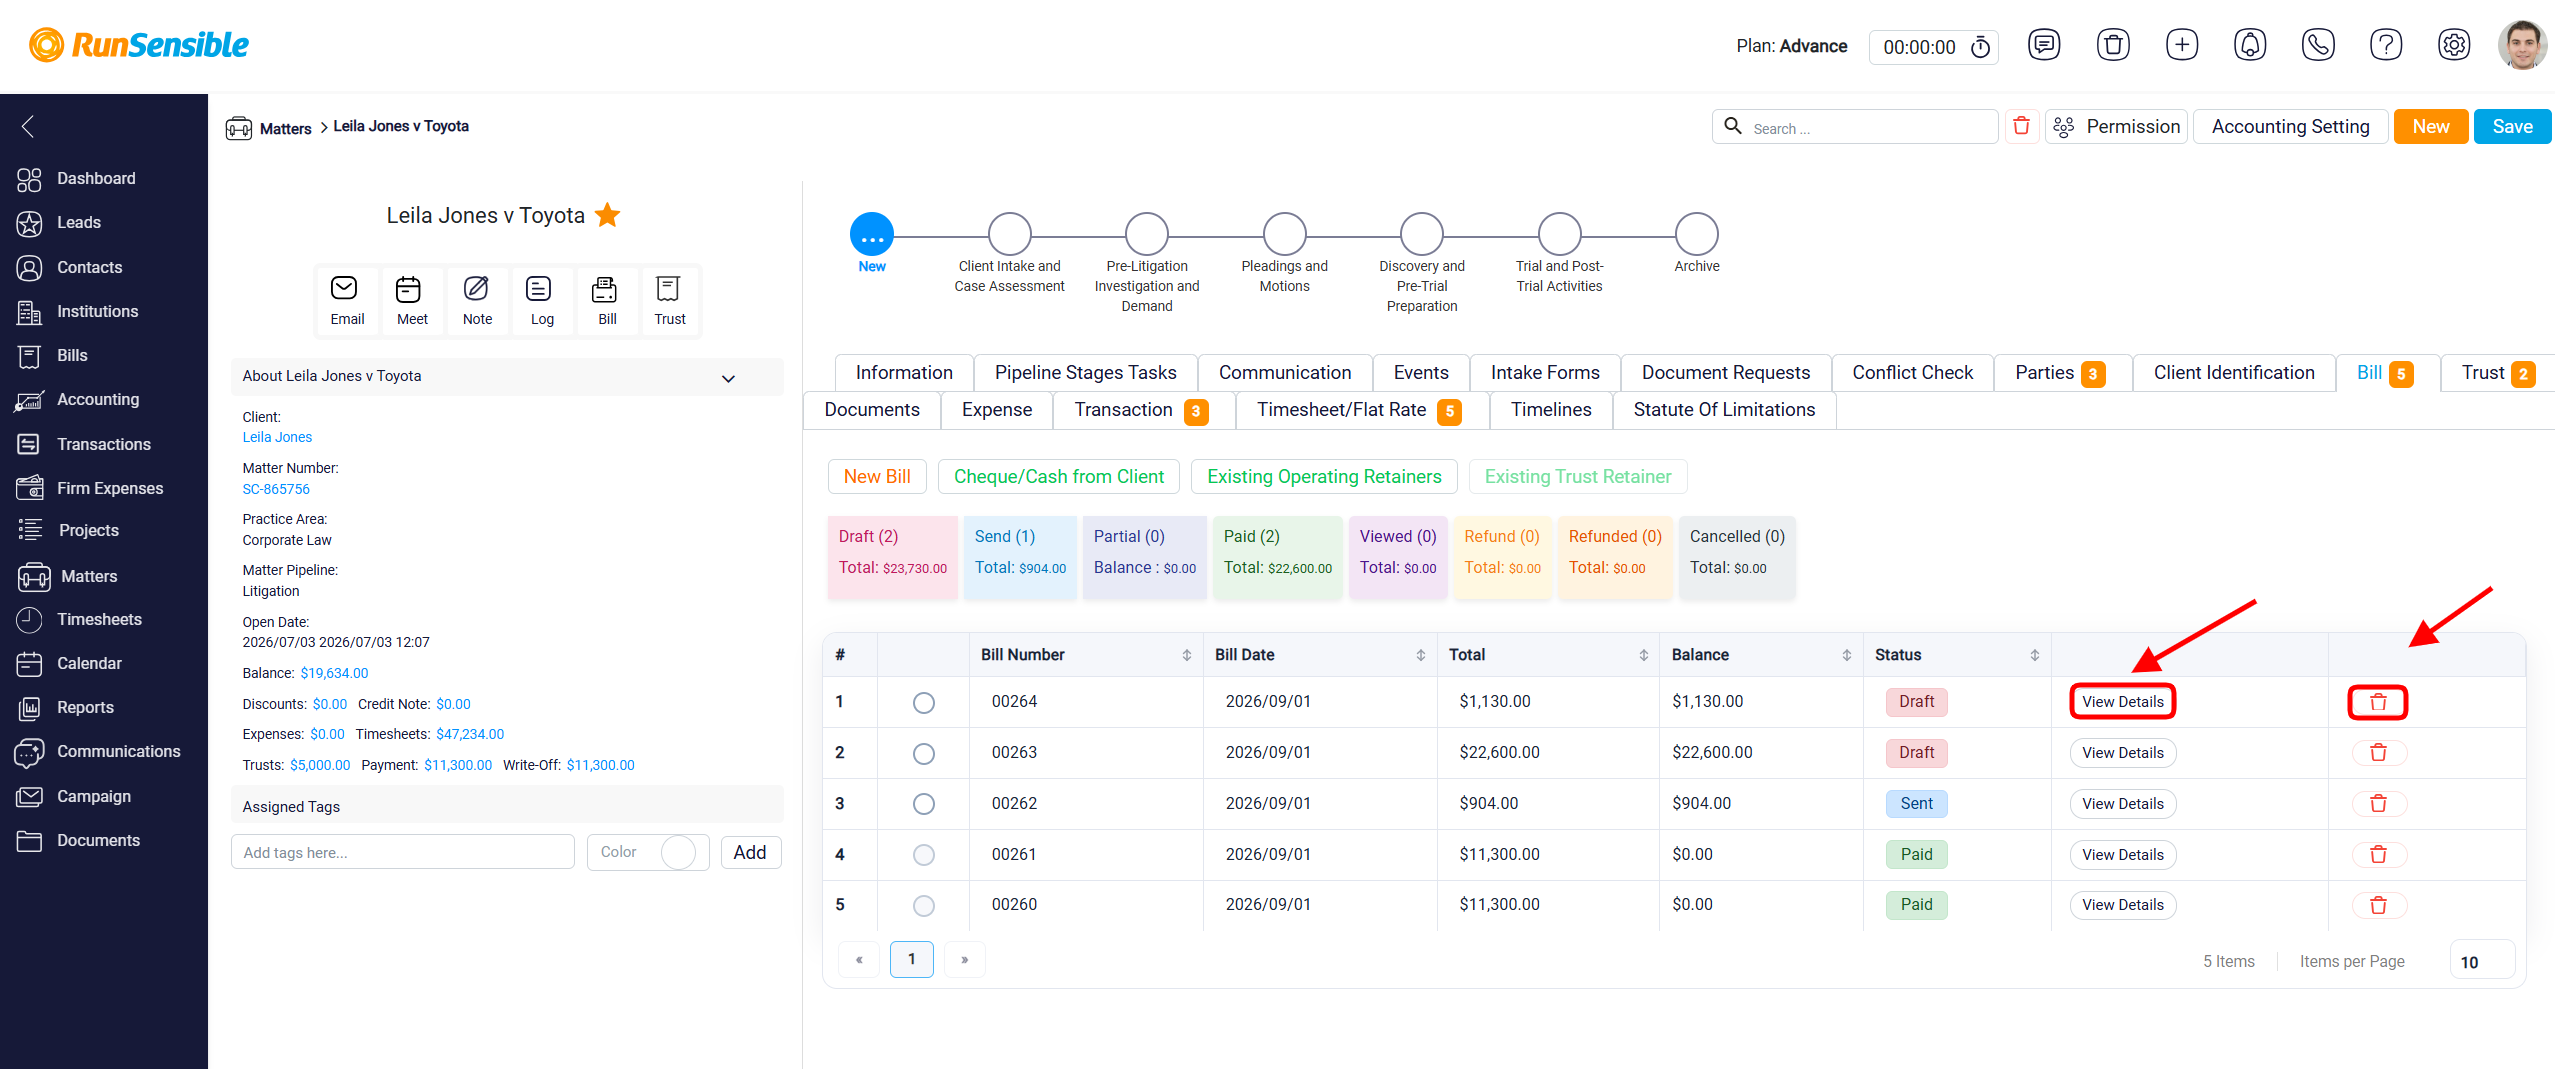
On the right side of each record in the Bill tab, you will find options to help you manage the bill. The View Details button opens the detailed panel for the selected bill, where you can review all related information and make necessary updates. From this panel, you can manage actions such as editing bill details, sending the bill to the client, or marking it as paid.
A Delete icon is also available beside each record. Click this icon to remove the bill when it is no longer needed.
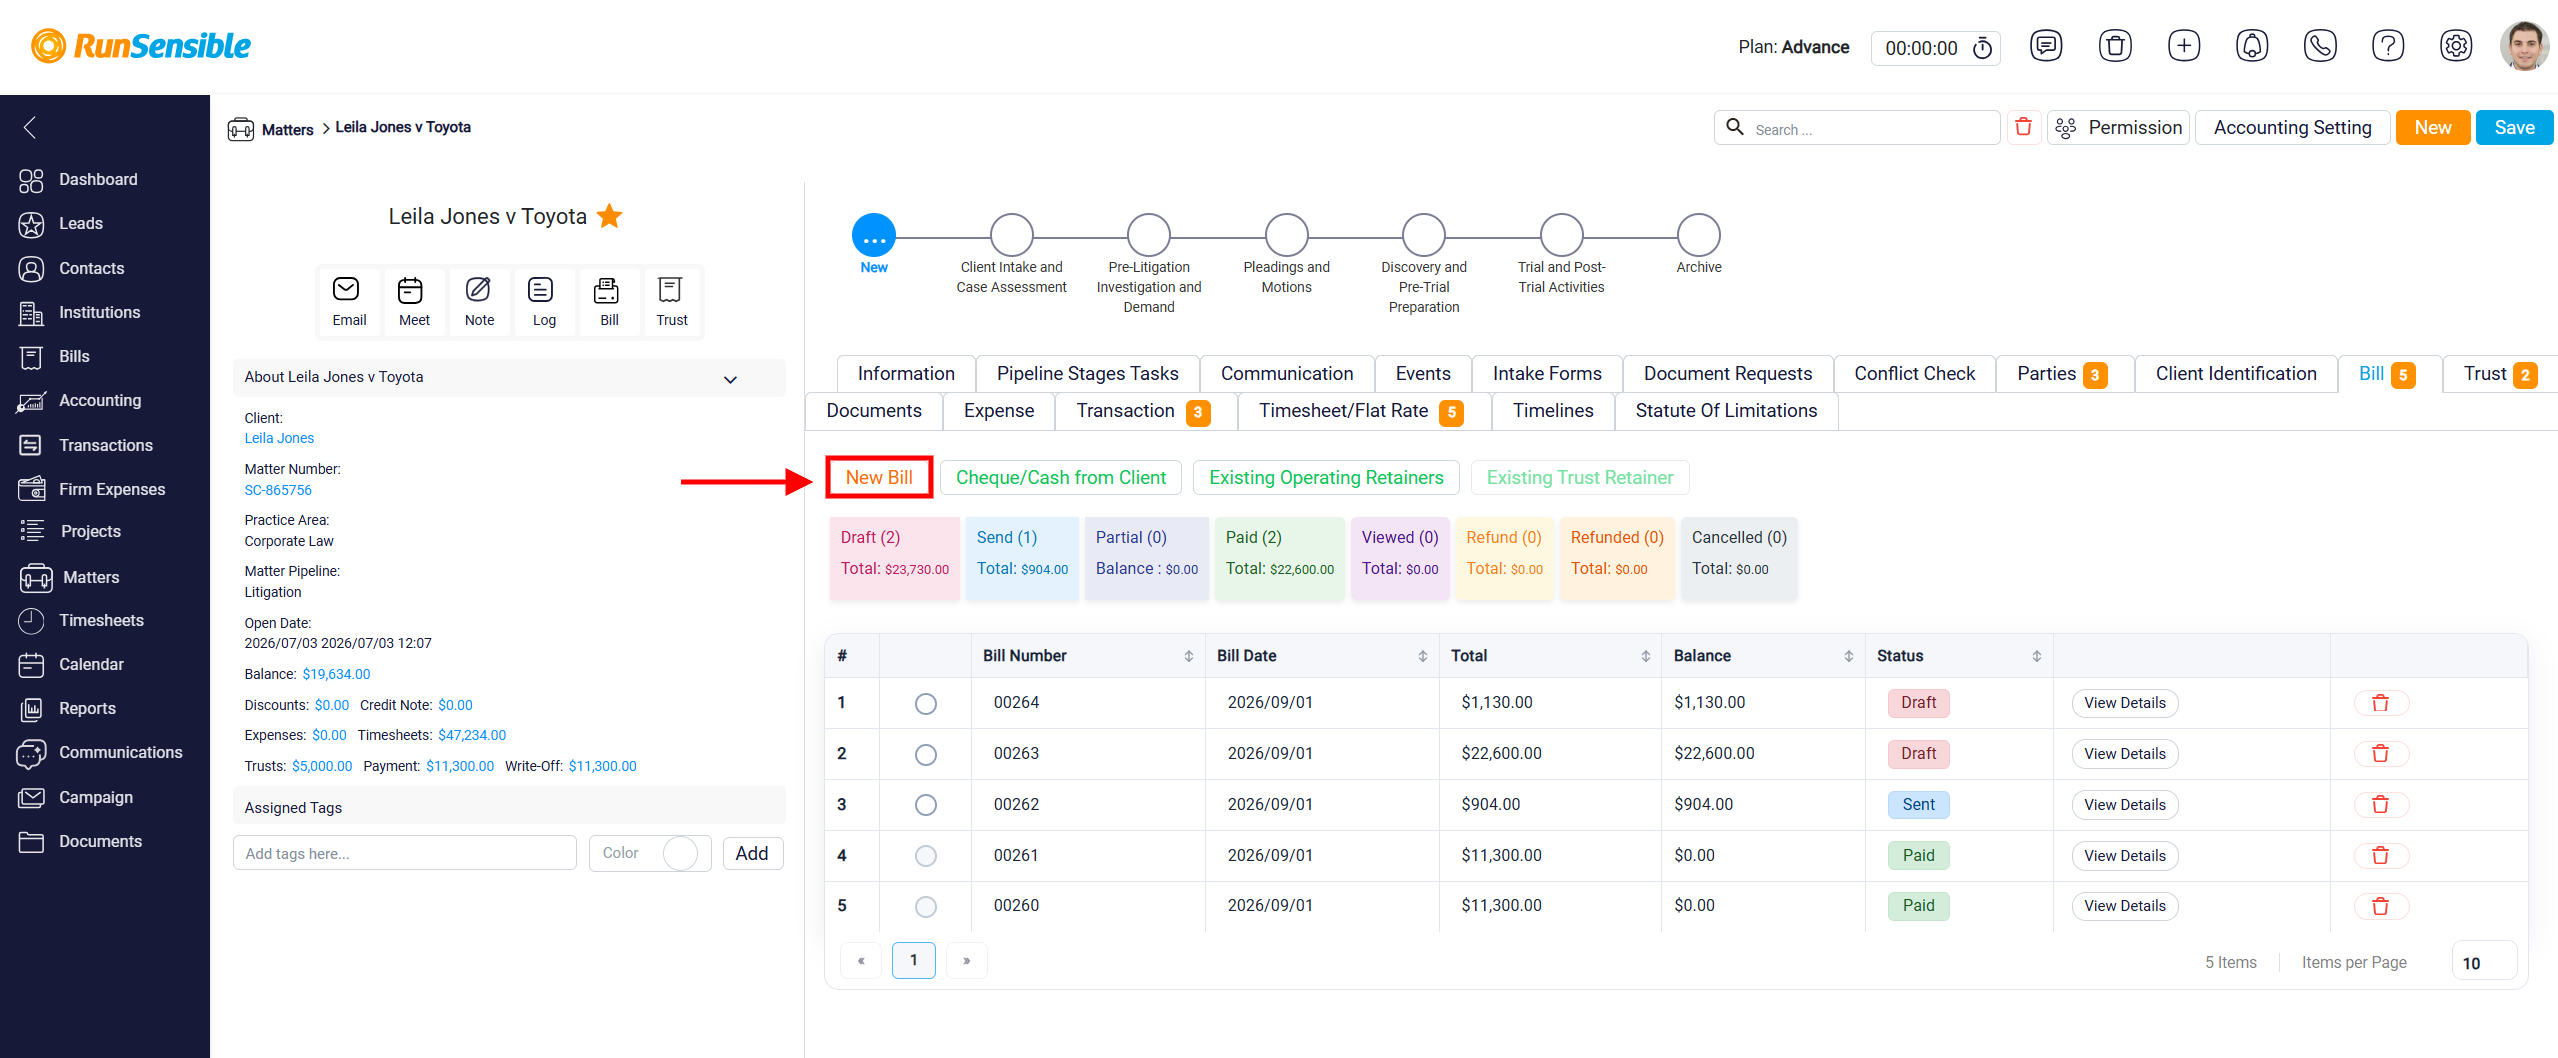
At the top of the tab, there are action buttons such as New Bill. The New Bill button works the same way as the Bill button on the left side of the Matter Details panel. It is used to create a new bill for the matter. Bills requests follow a two-step process in the system. First, you create the financial record by using the New Bill button. This creates the bill request and records what you expect the client to pay.
To learn how to create a new bill, please visit Creating a Bill for a Matter.
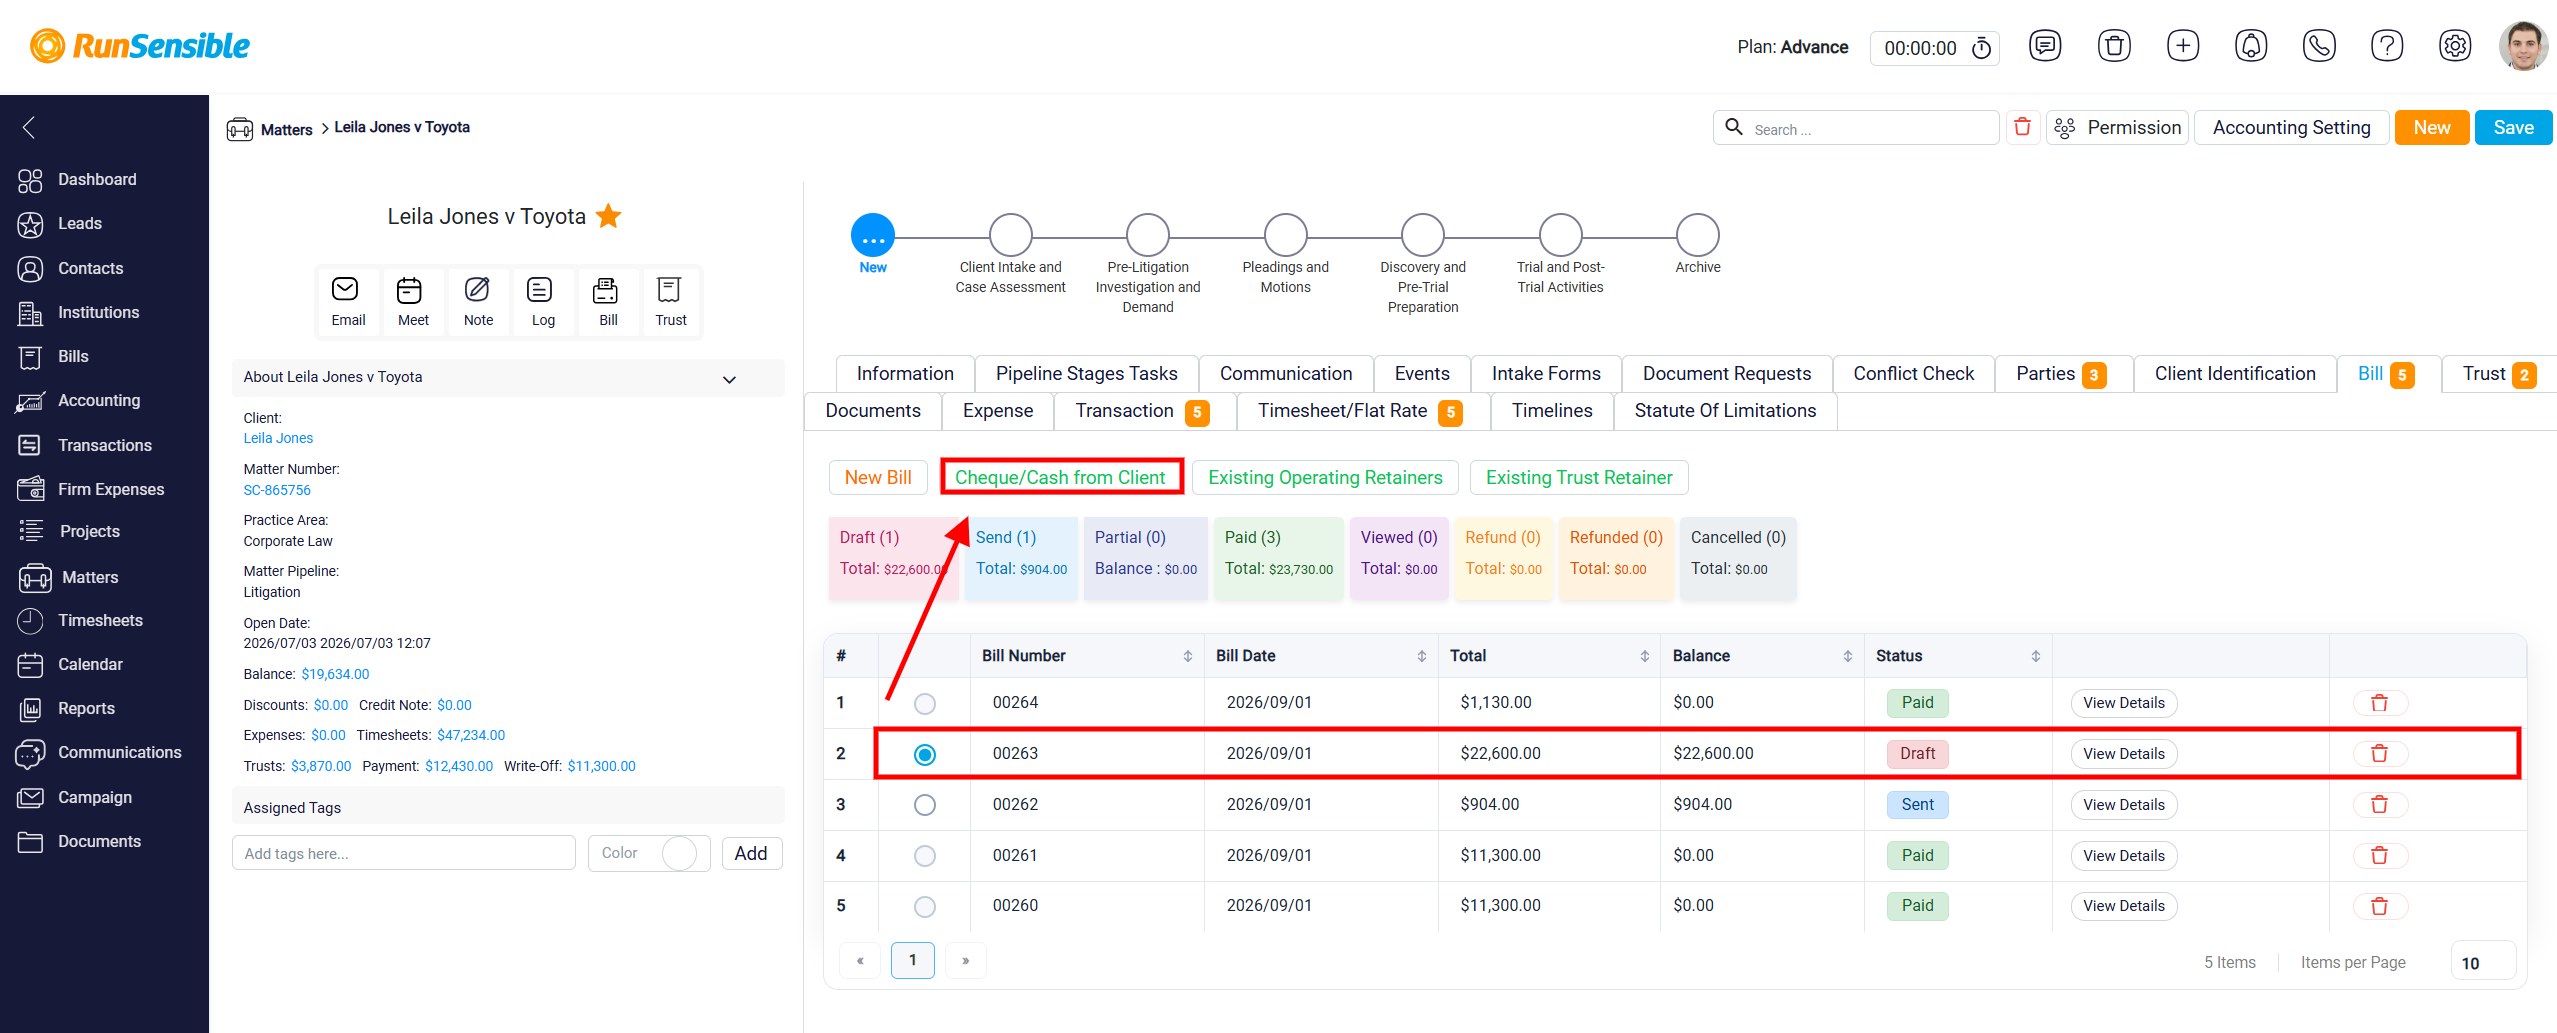
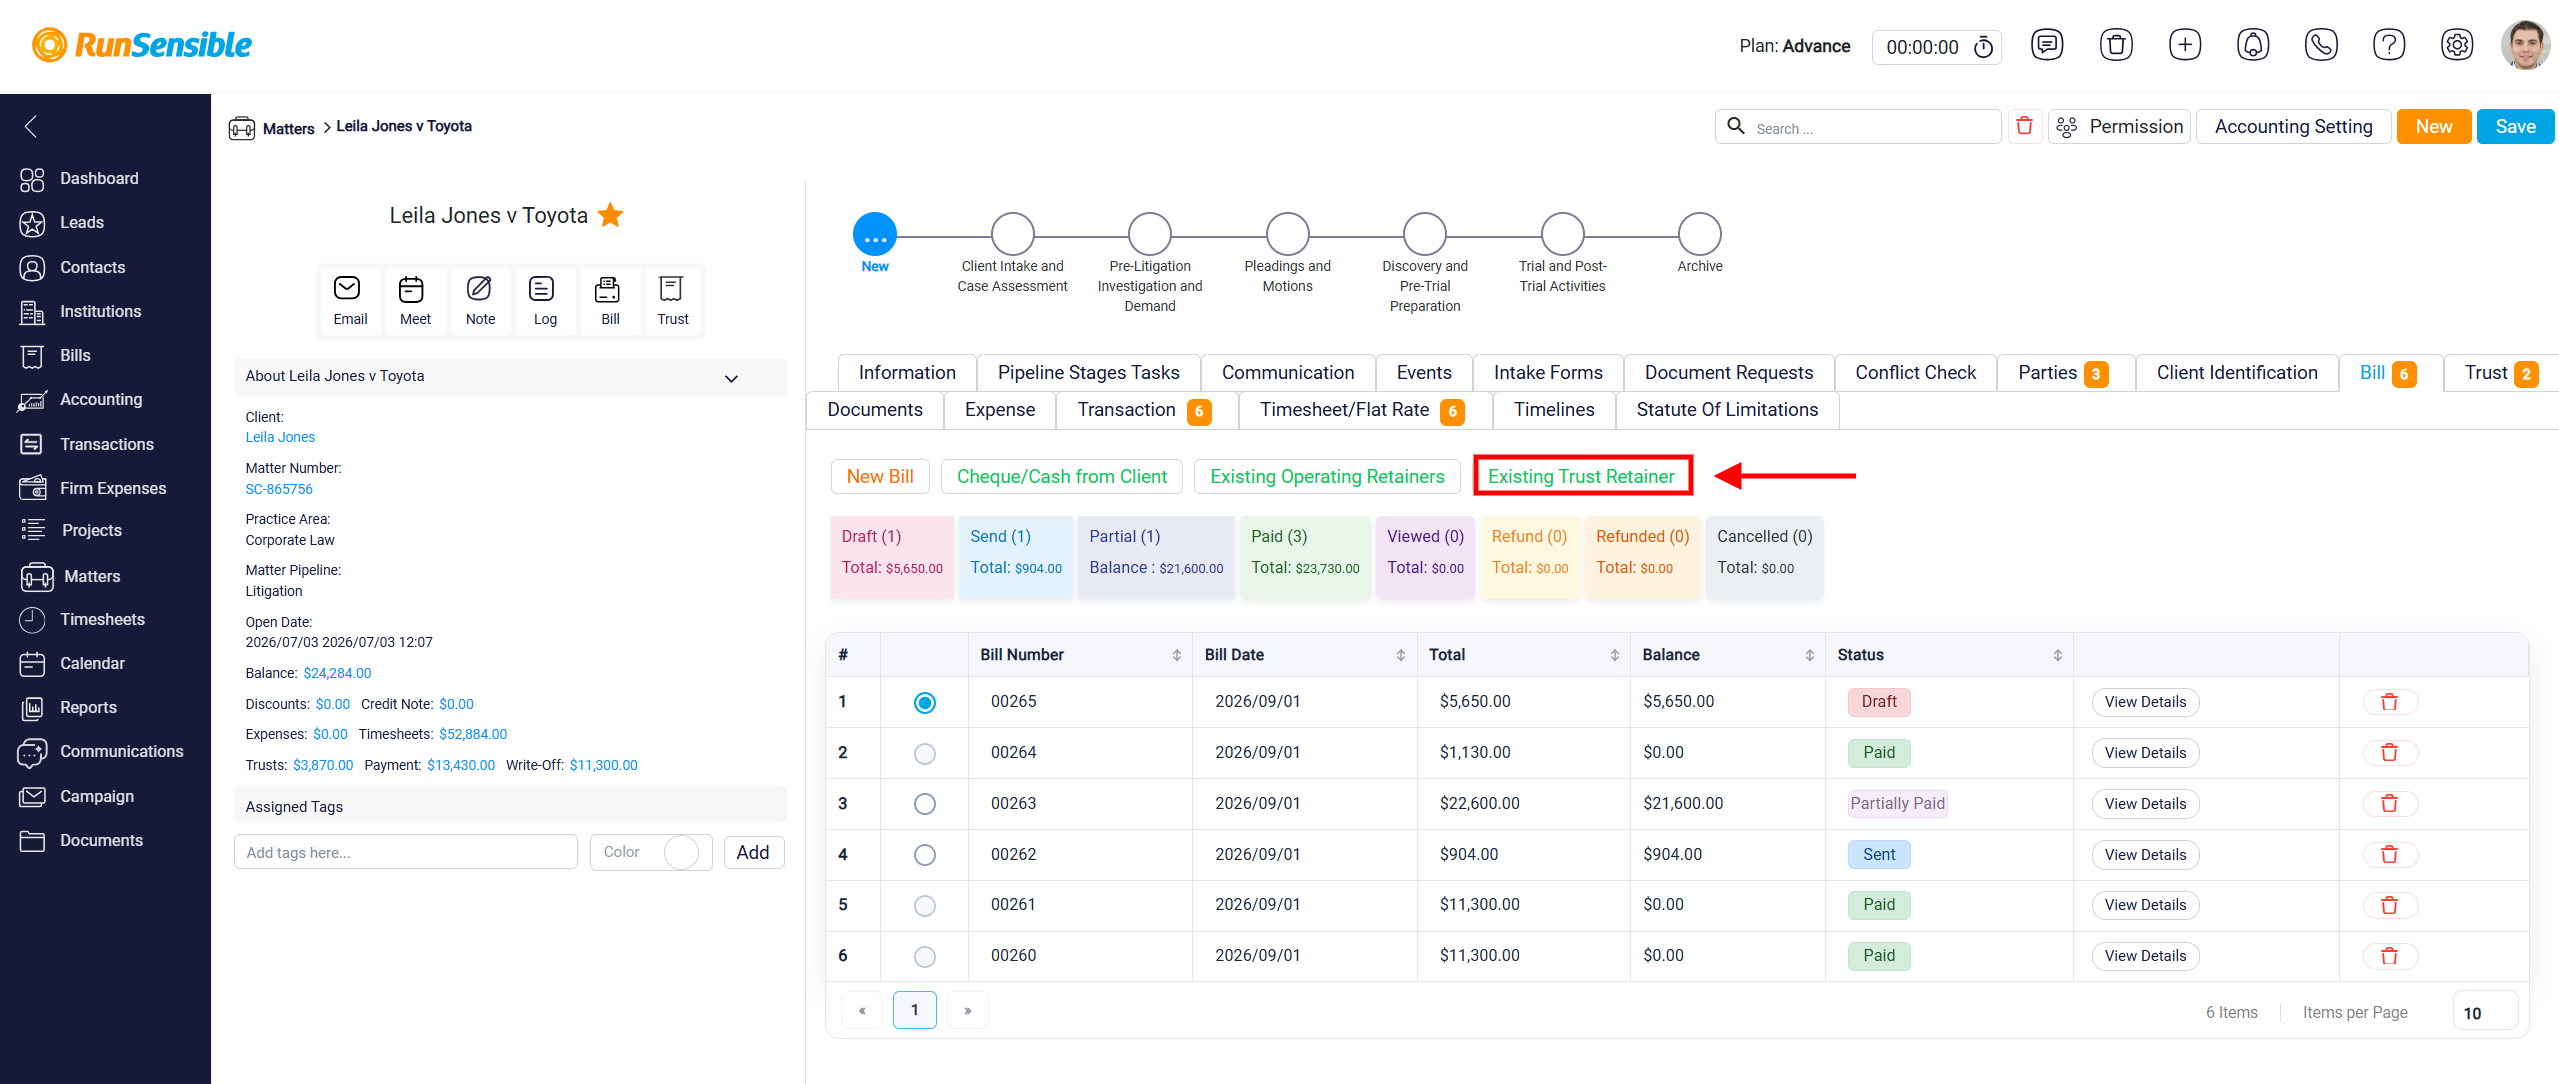
When a new bill is created, its status is automatically set to Draft. To record a payment directly from the client such as by cash, cheque, wire, credit, debit, or another payment method, select the draft bill, then click Cheque/Cash from Client.
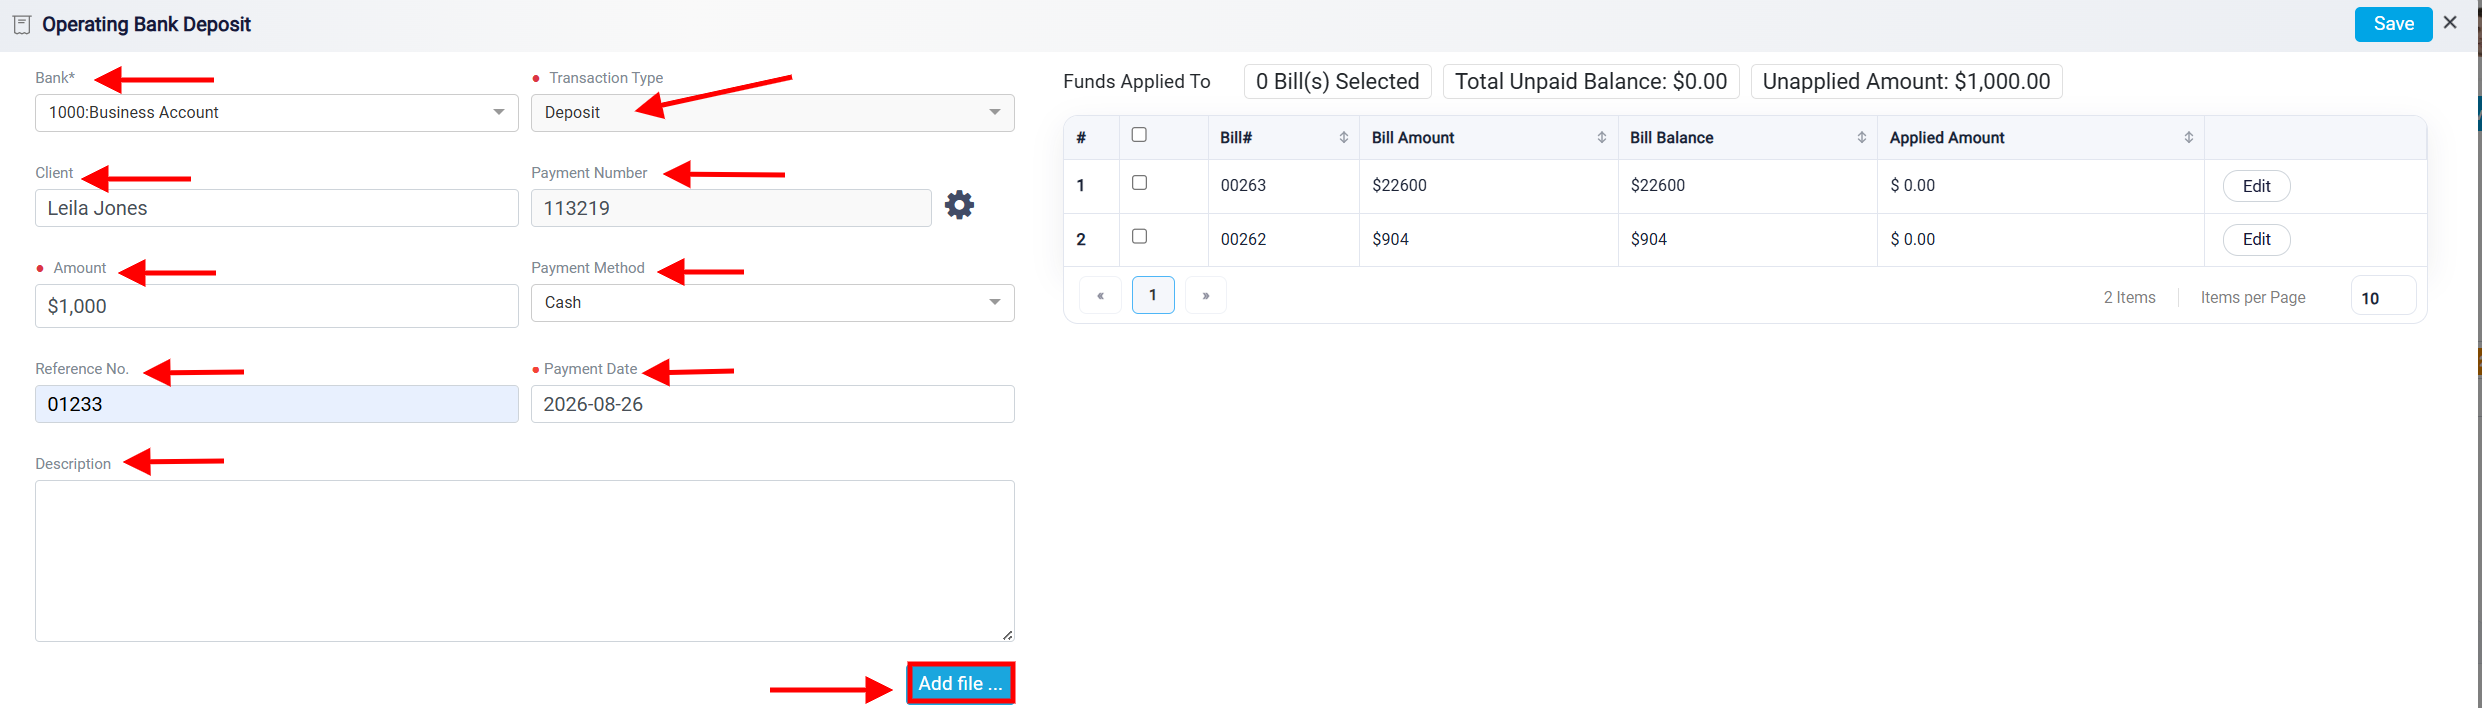
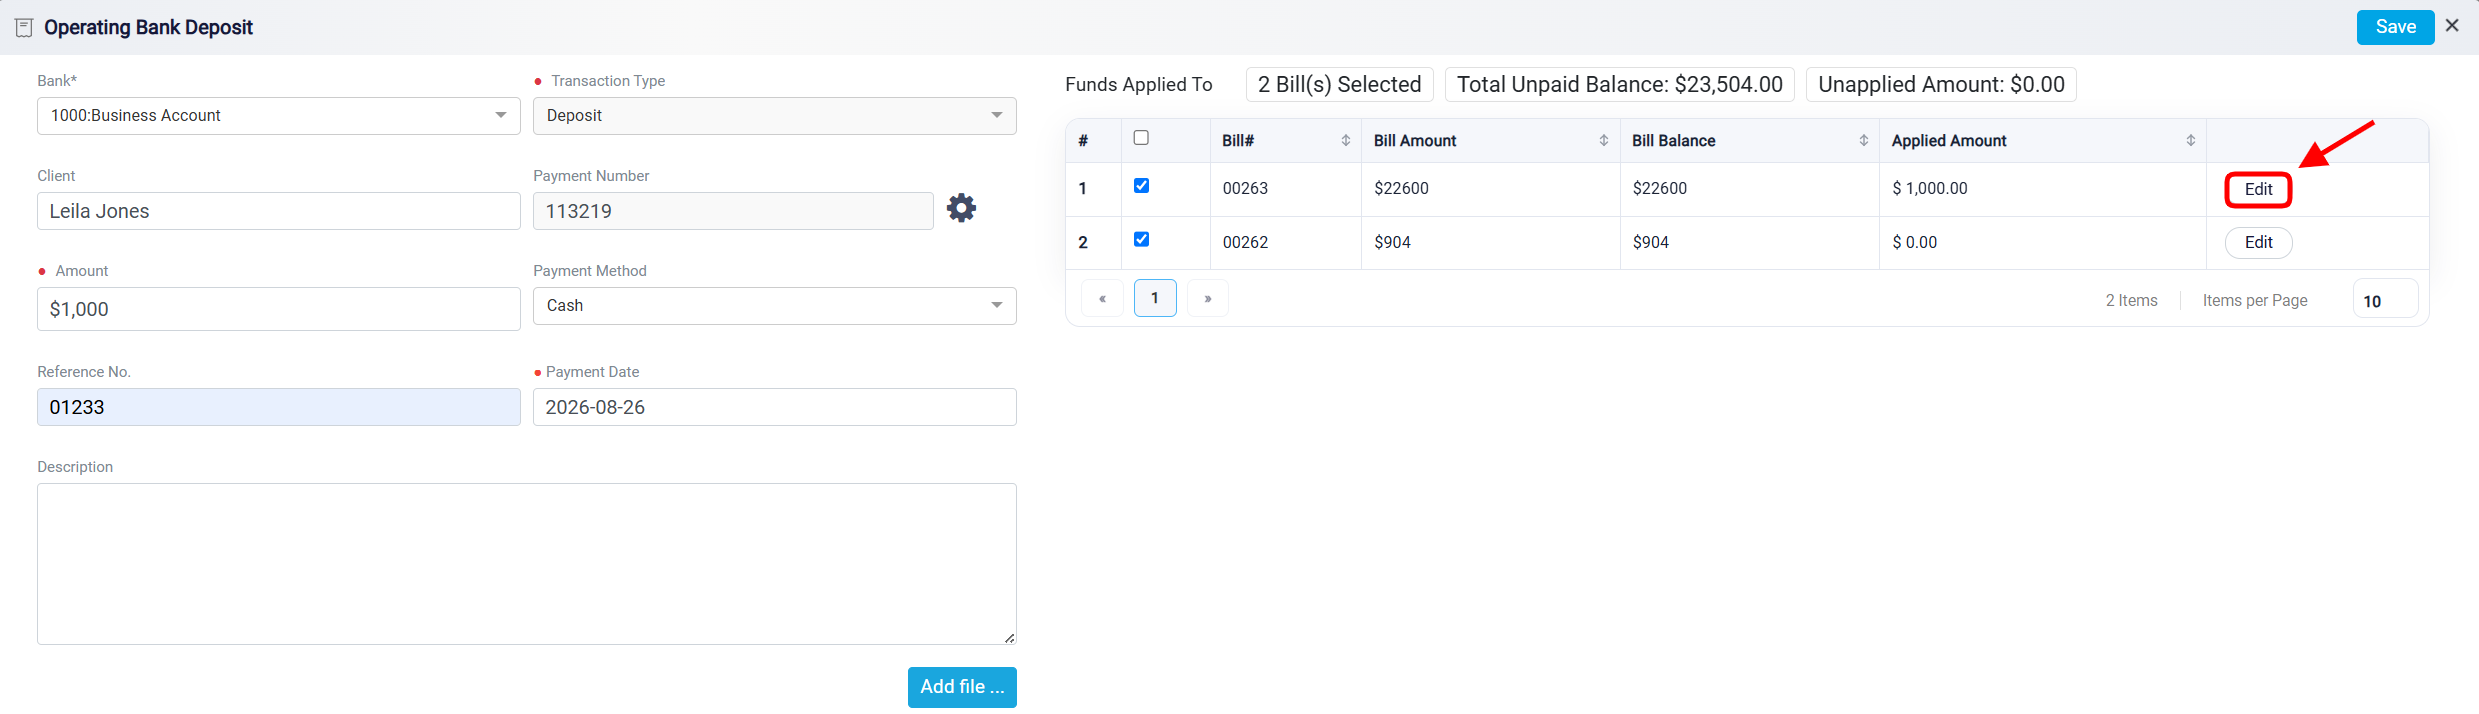
When you choose Cheque/Cash from Client, the Operating Bank Deposit panel opens. This panel is used to record money received from the client into an operating bank account and apply that money to one or more unpaid or partially paid bills.
On the left side of the panel, you enter the main payment details. The Bank field is a dropdown that shows the operating bank accounts available in the system. Select the account where the received payment should be deposited. The Transaction Type field is set to Deposit and cannot be changed, because this panel is used to record money coming into the operating account.
The Client field shows the client connected to the matter by default. If the payment was made by someone other than the matter’s client, you can enter or select that person’s name for better record keeping. The Payment Number gives the payment a reference number inside the system.
The Amount field is where you enter the total amount received from the client. The amount you enter is important because it is the total payment you are recording. This amount can be used to fully pay one bill, partially pay one bill, fully pay multiple bills, or fully pay some bills and partially pay another and it also can be added to the client general retainer (operating) account in the case of the client pay amount of money more that the amount of the bill that you have which you can keep this money as a liability to the client and in the future you can use this money for the paying the bills of the same client and after that returning the left over money after finishing the case using he credit memo process within the transaction tab which will be explain when we start talking about the transaction tab. After entering the total payment amount on the left side, you decide on the right side how that money should be applied to the client’s outstanding bills.
You can also select the Payment Method, such as cash, wire, cheque, credit, debit, or e-transfer. The Reference No. field can be used for a cheque number, transfer number, or other external reference. The Payment Date records when the payment was received, and the Description box can be used to add any extra notes about the transaction.
The Add file button allows you to attach supporting documents to the payment record, such as a receipt, cheque image, transfer confirmation, or other proof of payment.
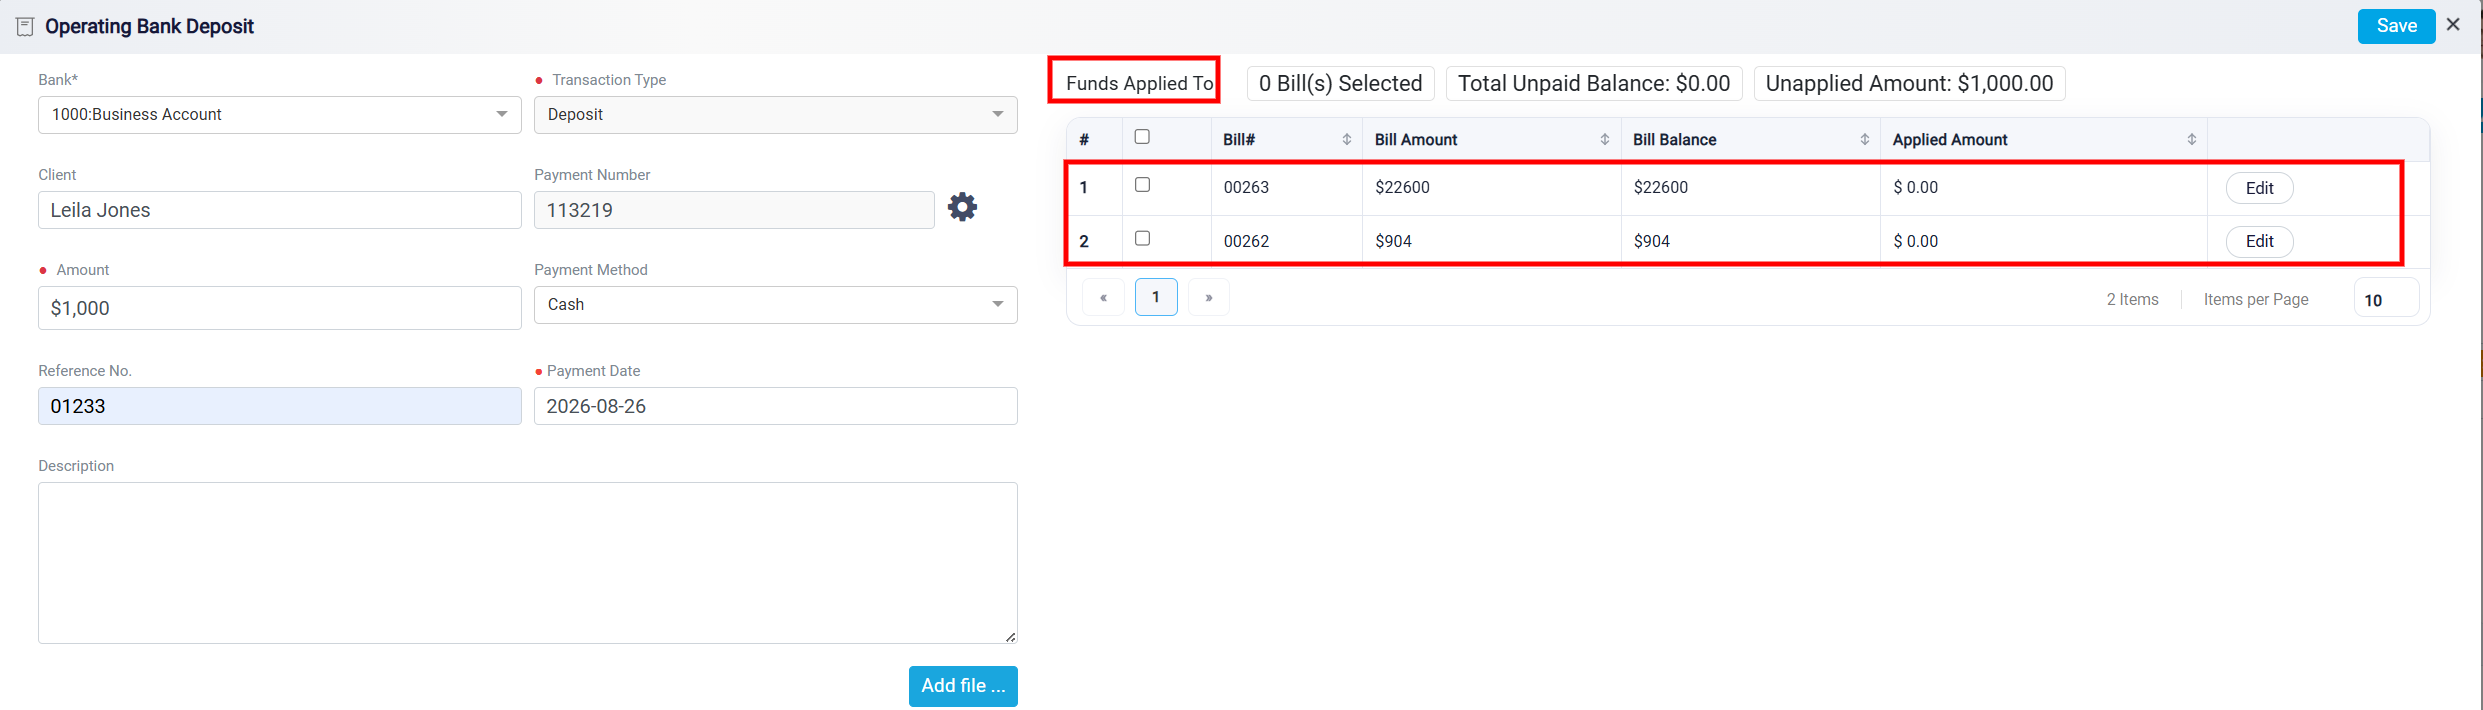
The right side of the panel shows the bills that can receive the payment. This section is labeled Funds Applied To and lists the client’s bills that still have an open balance. These are usually bills with a draft or partially paid status, meaning they have not been fully paid yet.
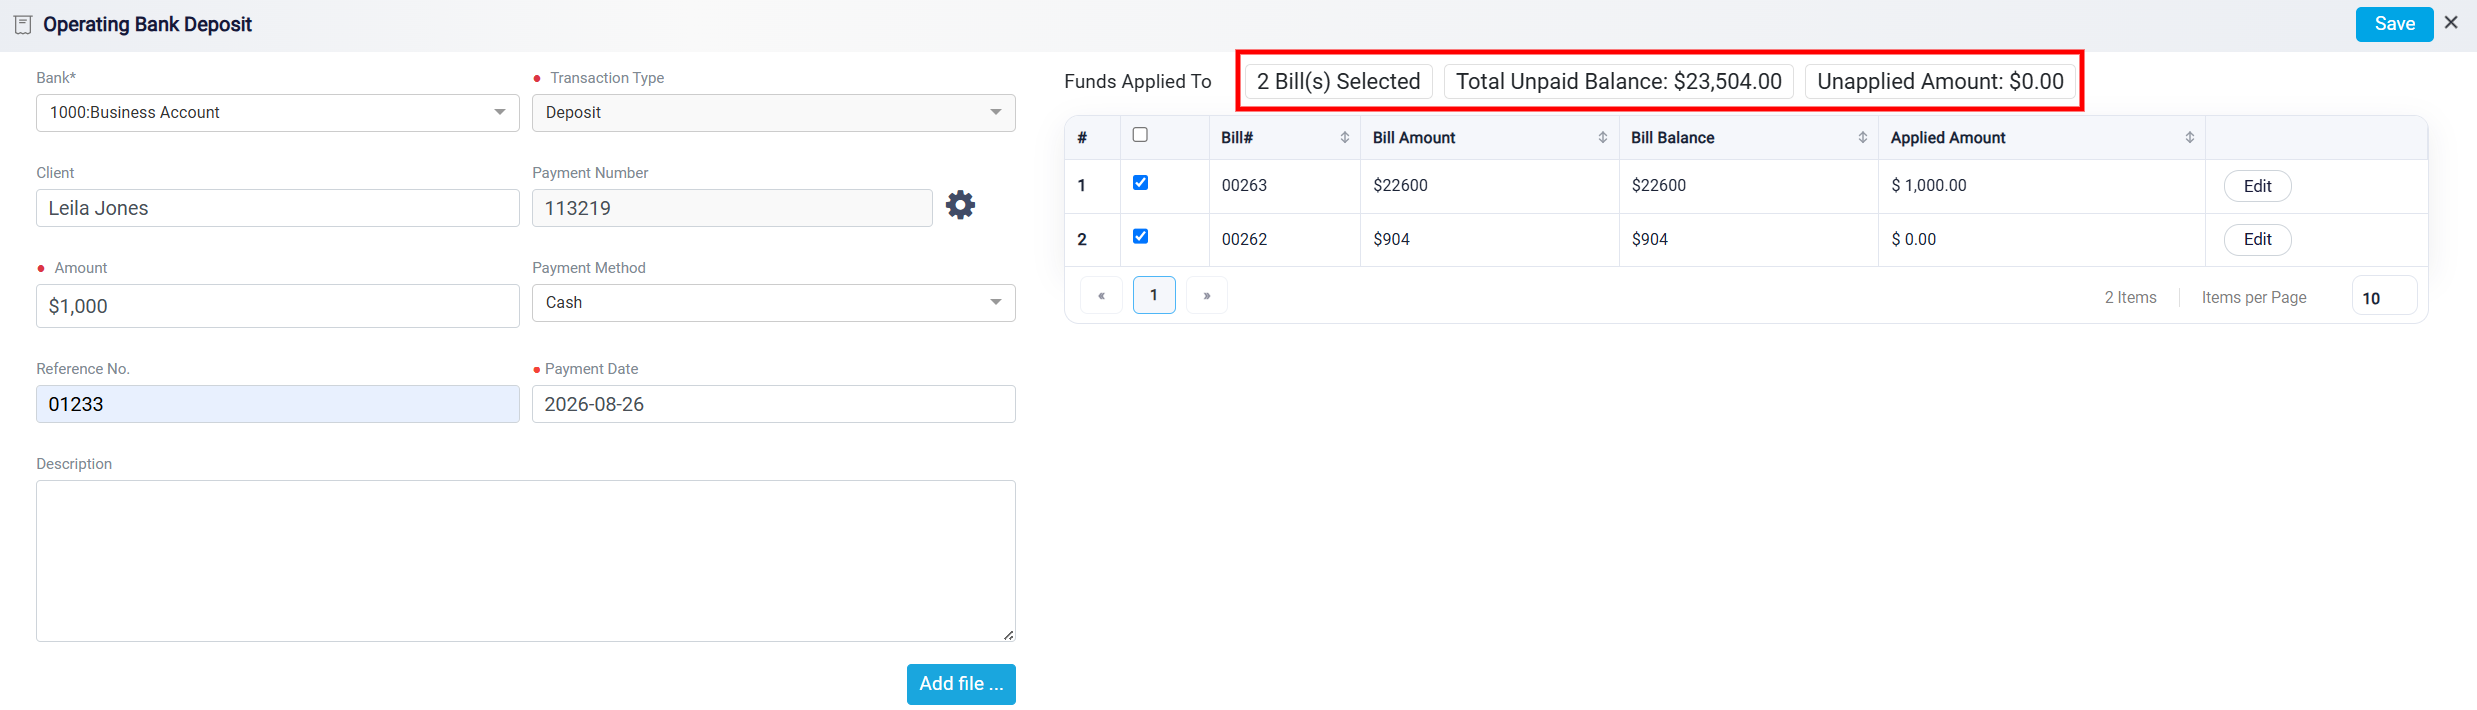
At the top of this section, the Total Unpaid Balance amount shows how much of the payment has not yet been applied to bills. At first, this amount matches the amount entered in the Amount field on the left side. As you apply money to bills, the remaining amount decreases. When the remaining amount reaches 0.00, the full payment has been assigned. But as I mentioned you can save the transaction with money not being applied to any invoices which will be added to the client general retainer (operating) account.
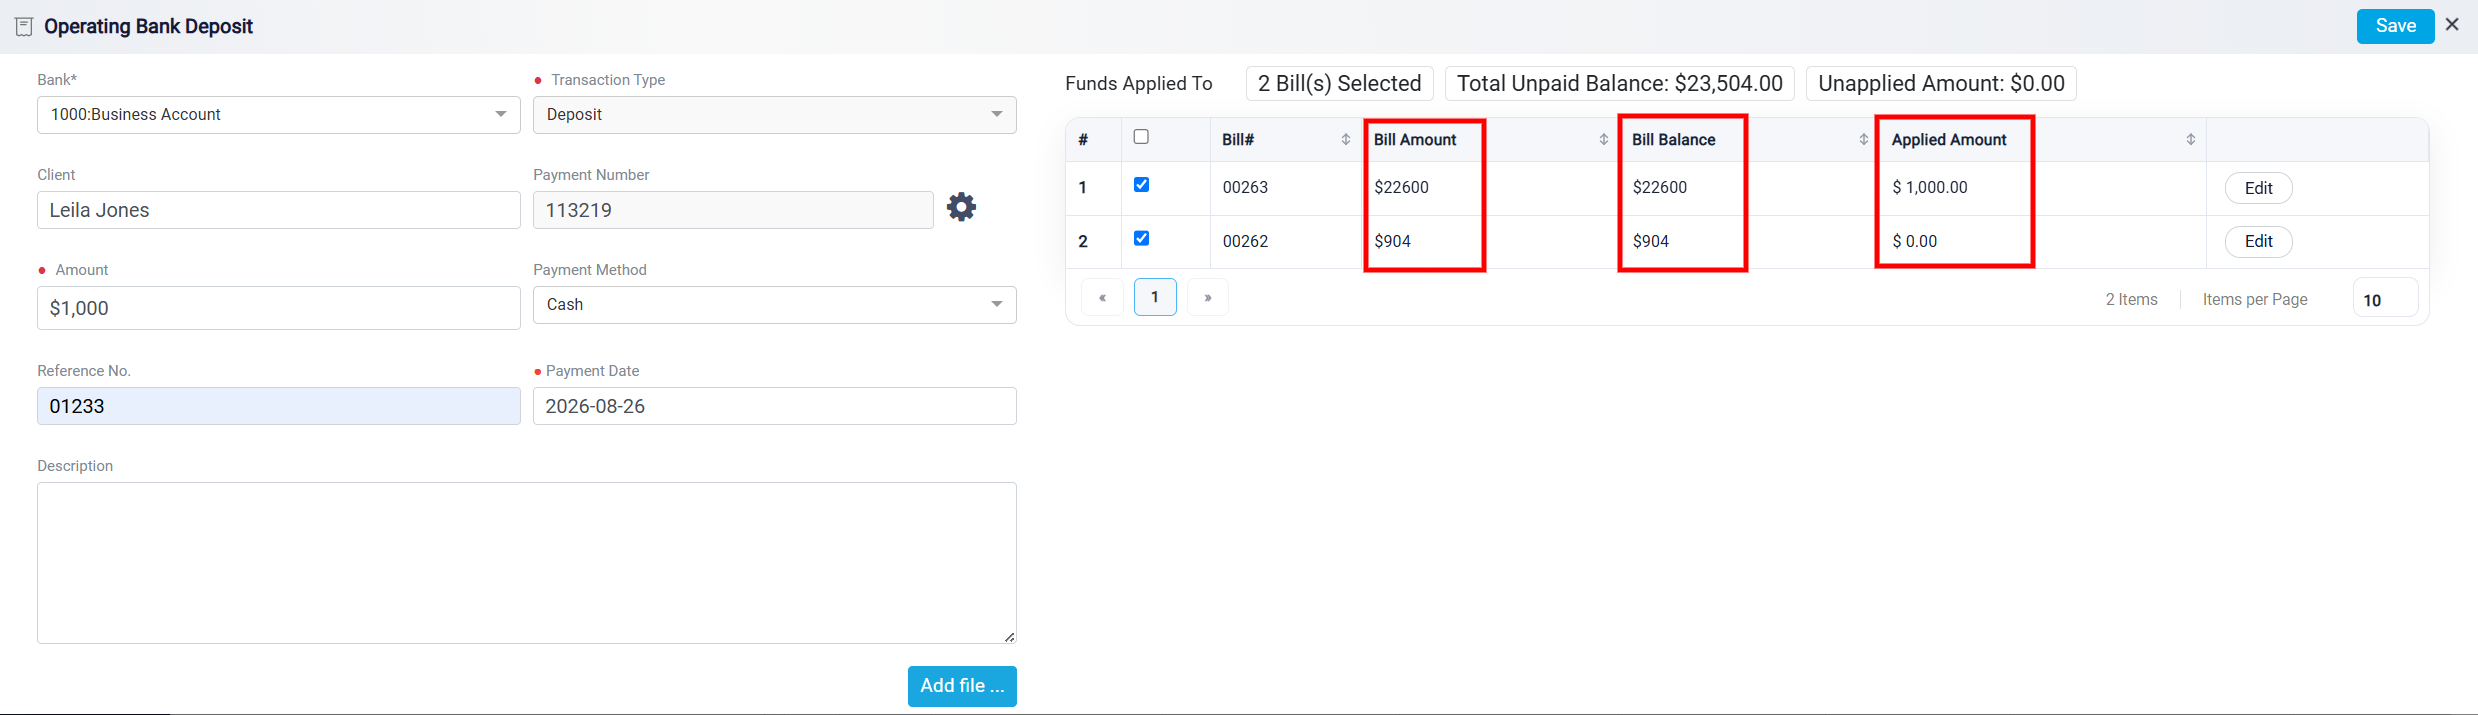
Each bill row shows important billing information. The Bill Amount is the original total amount of the bill when it was created. The Bill Balance is the amount still unpaid. If the bill balance is the same as the bill amount, no payment has been recorded for that bill yet. If the balance is lower than the original bill amount, the bill has already been partially paid.
The Applied Amount column shows how much of the current payment is being applied to that bill. You can apply the full remaining balance to make the bill paid, or apply a smaller amount to leave the bill partially paid. The amount applied to a bill cannot be more than that bill’s open balance. When you select a bill using the checkbox, the system applies the available remaining payment amount to that bill. If the remaining payment is greater than the bill’s open balance, the system applies only the amount needed to cover that bill’s balance. When you select a bill using the checkbox, the system applies the available remaining payment amount to that bill. If the remaining payment is greater than the bill’s open balance, the system applies only the amount needed to cover that bill’s balance.
If you want to apply a different payment amount, click the Edit button on the bill row. This is helpful when you want to split a single client payment across multiple bills or make a partial payment on a bill.
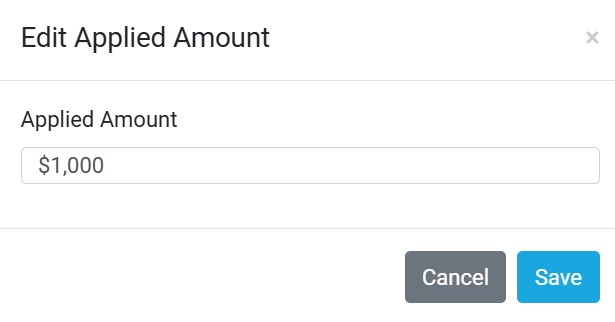
After you click Edit, the Edit Applied Amount panel will open. In this panel, you can enter an amount that is less than the bill’s total balance, allowing you to partially pay that bill.
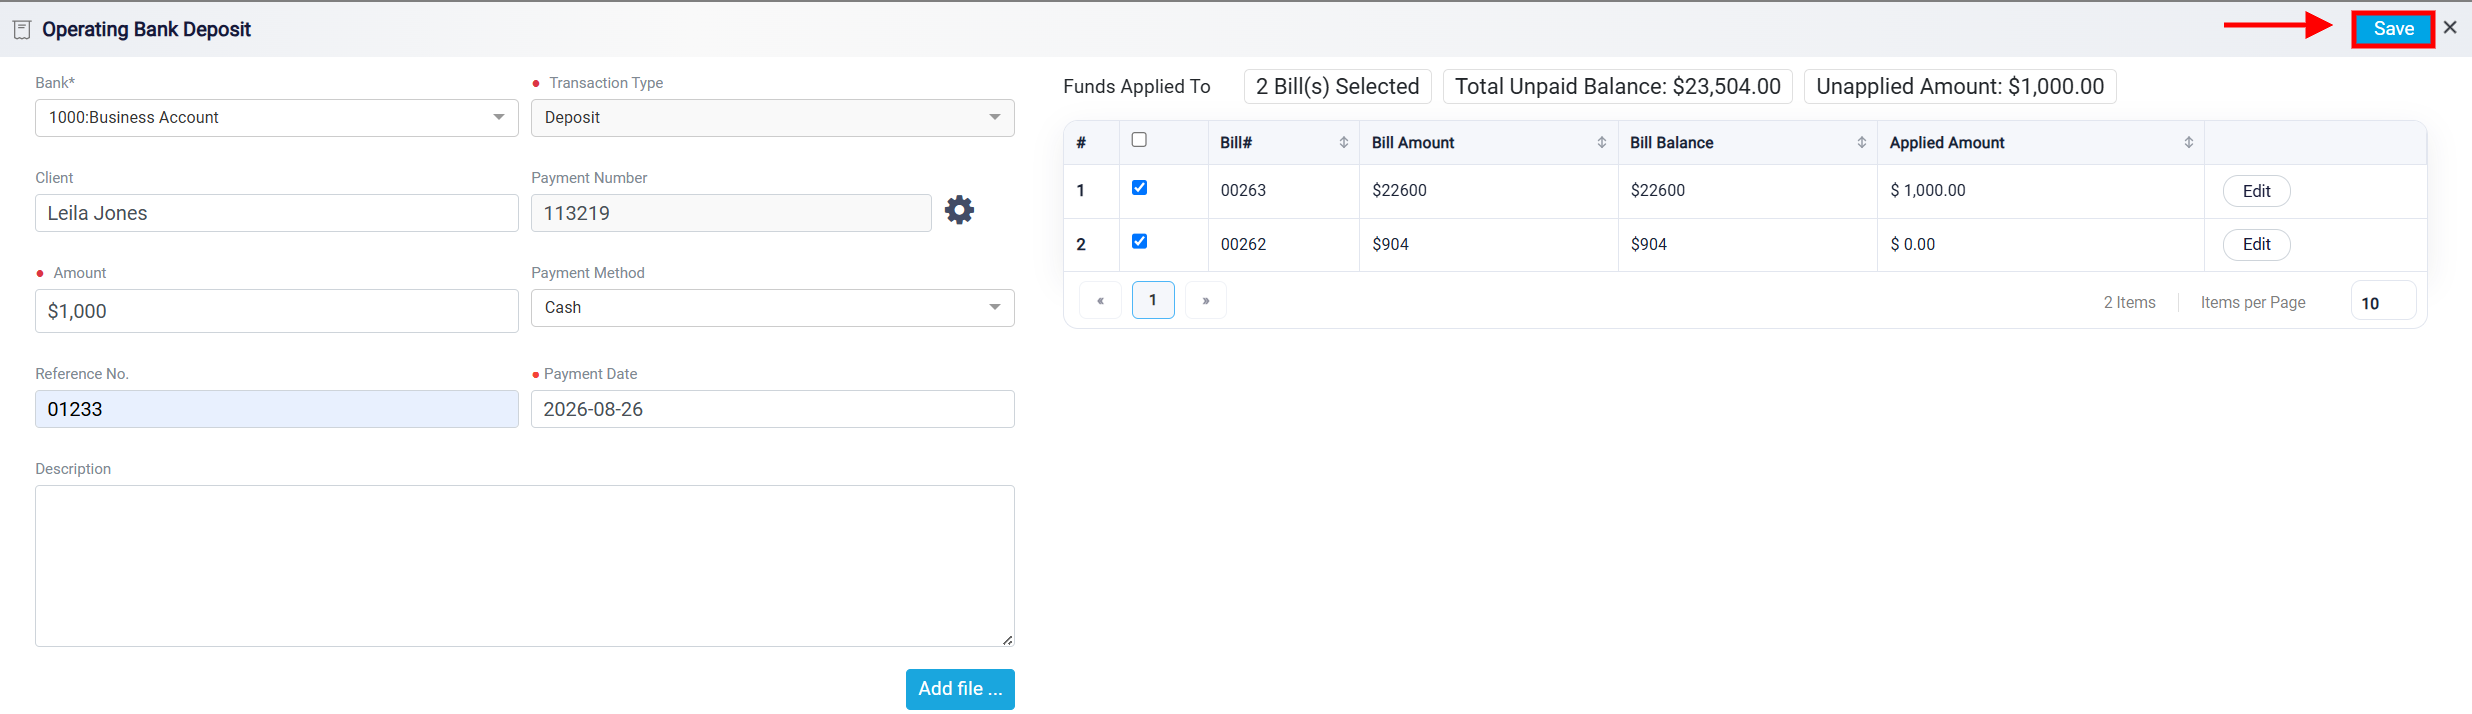
After you have complete all the information click on the Save button.
The next button within the record payment button option is called Existing Trust Retainer which is the exact option which you can use in order to use the money that you saved within the client general retainer (operating) account during the previous process in order to record transaction to pay that bill relating to this matter.
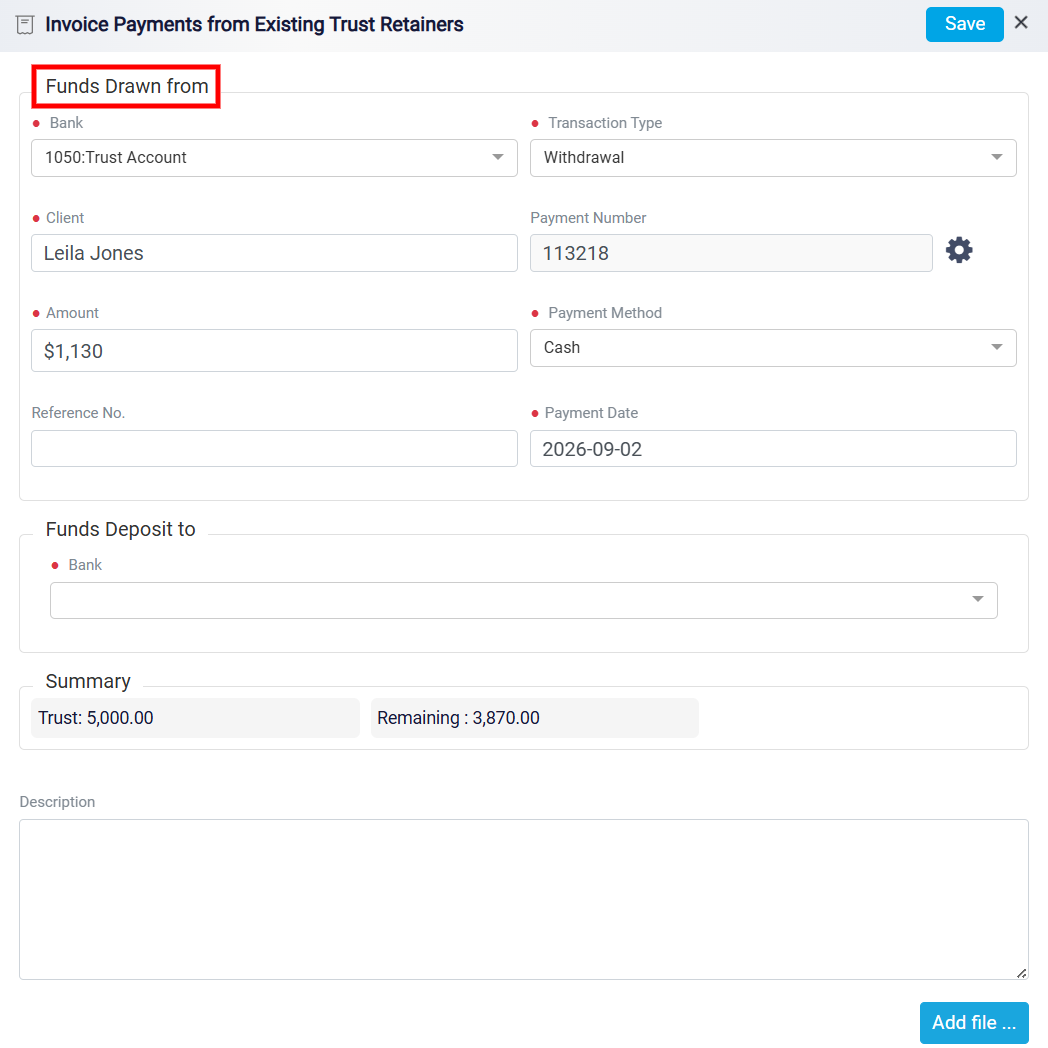
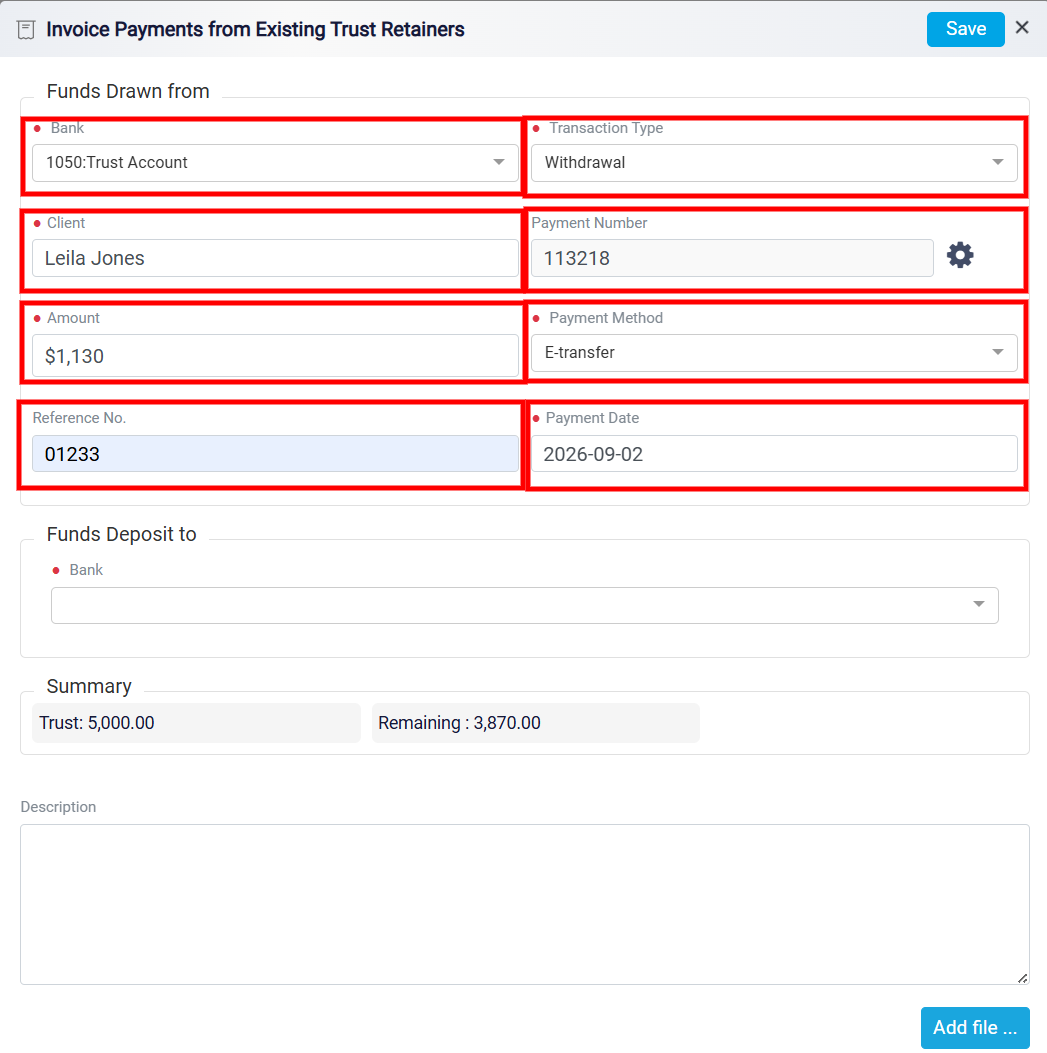
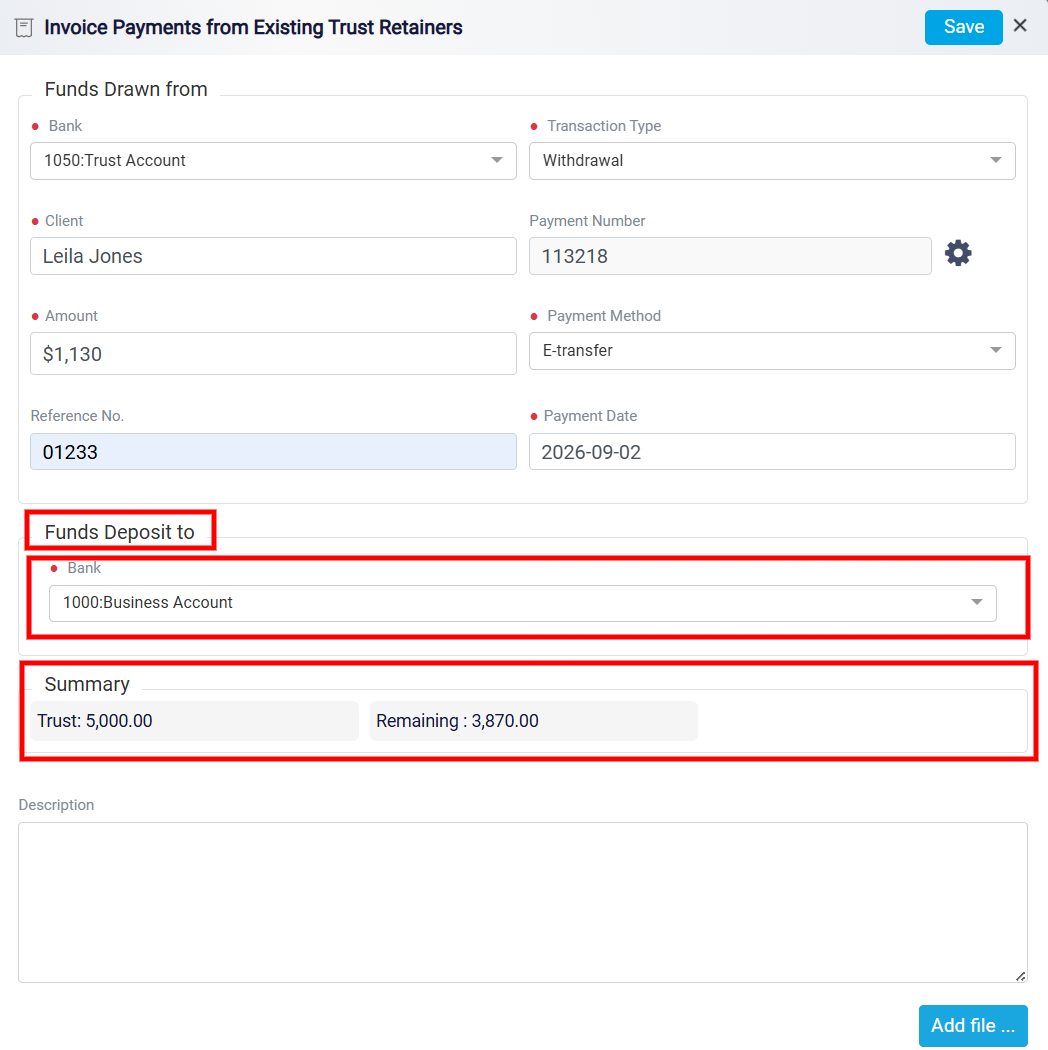
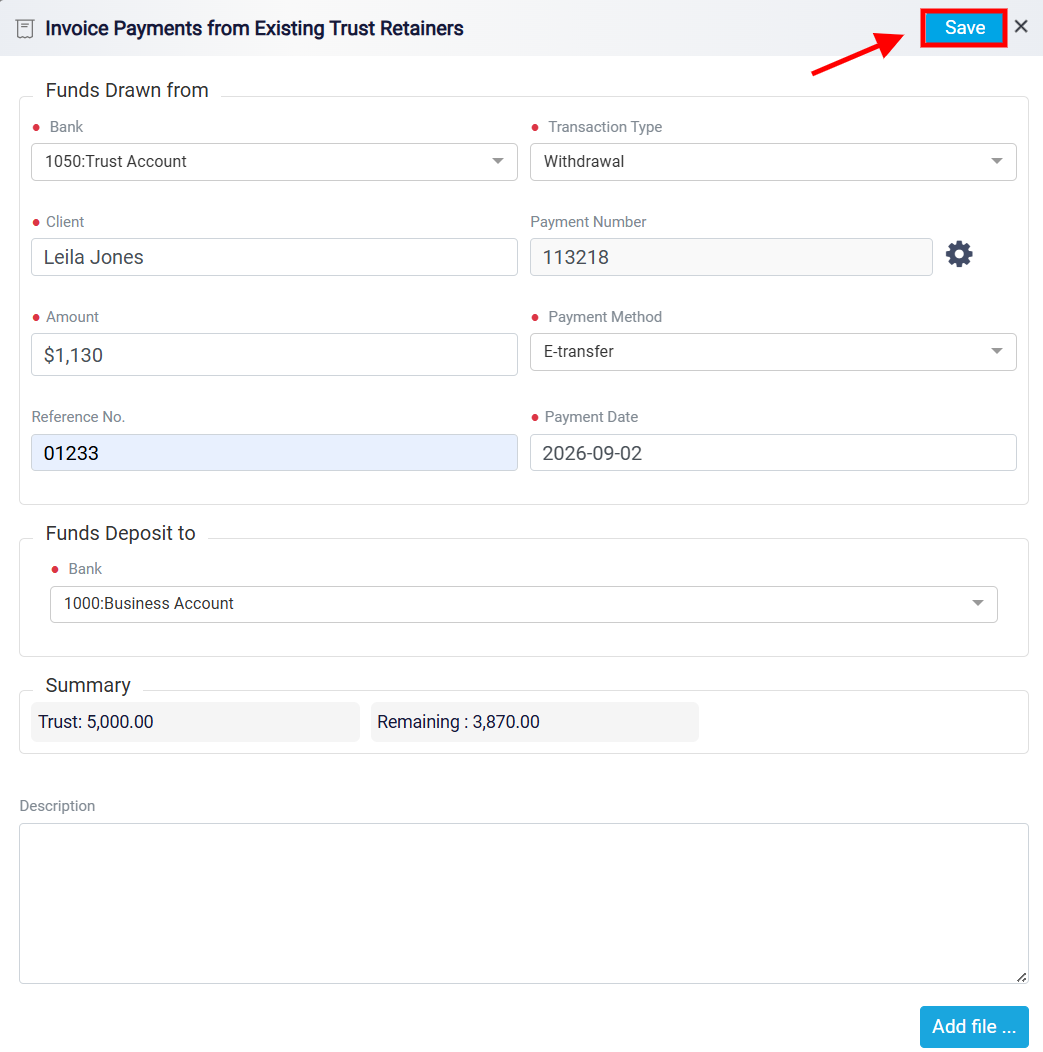
Under Funds Deposit to, select the bank account that will receive the funds withdrawn from the trust account.
The Summary section displays the client’s available Trust balance and the Remaining balance after the payment is applied. For example, if the client has $5,000.00 in trust and $1,130.00 is applied to the bill, the remaining trust balance will be $3,870.00.
You can also enter additional information in the Description field and use Add file to attach supporting documentation.
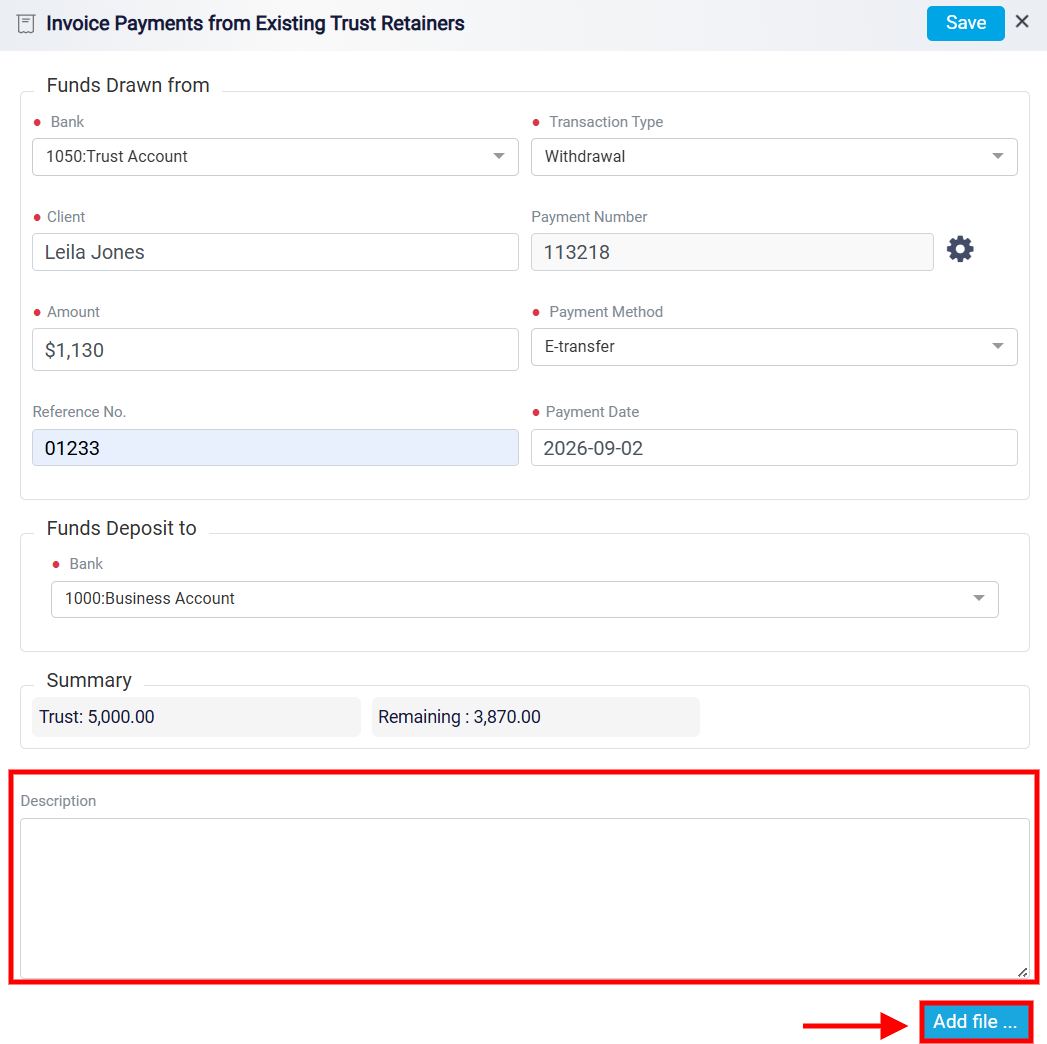
After reviewing all the information, click Save to record the transaction and apply the trust funds to the bill.
 Alternatively, to proceed with the bill and receive payment, click View Details next to the draft bill.
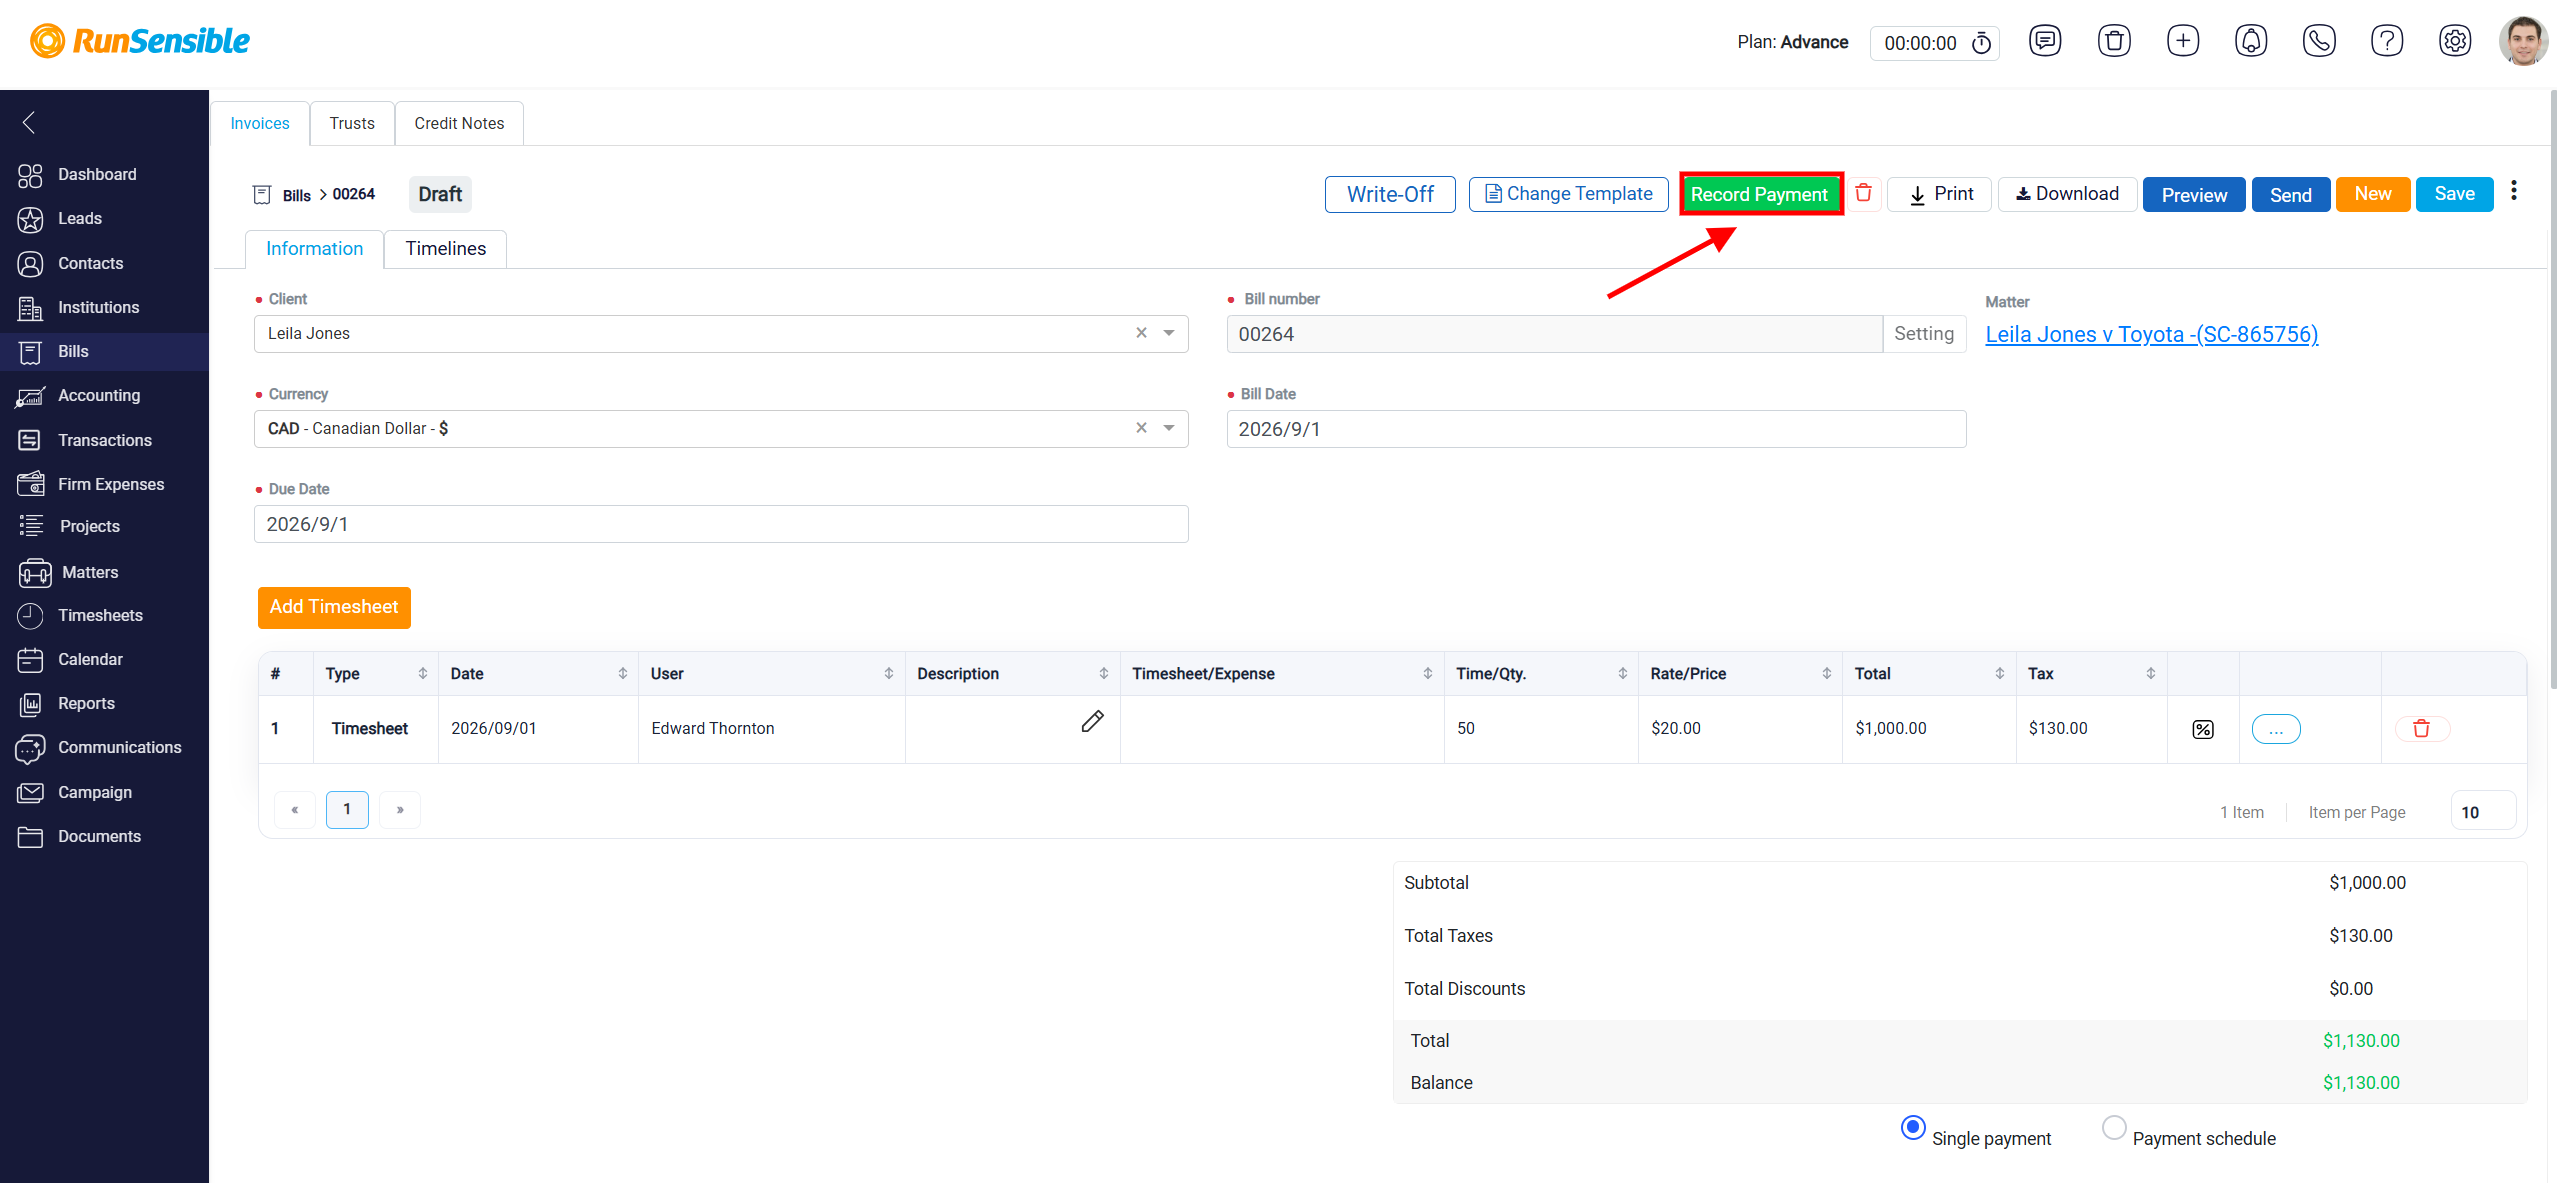
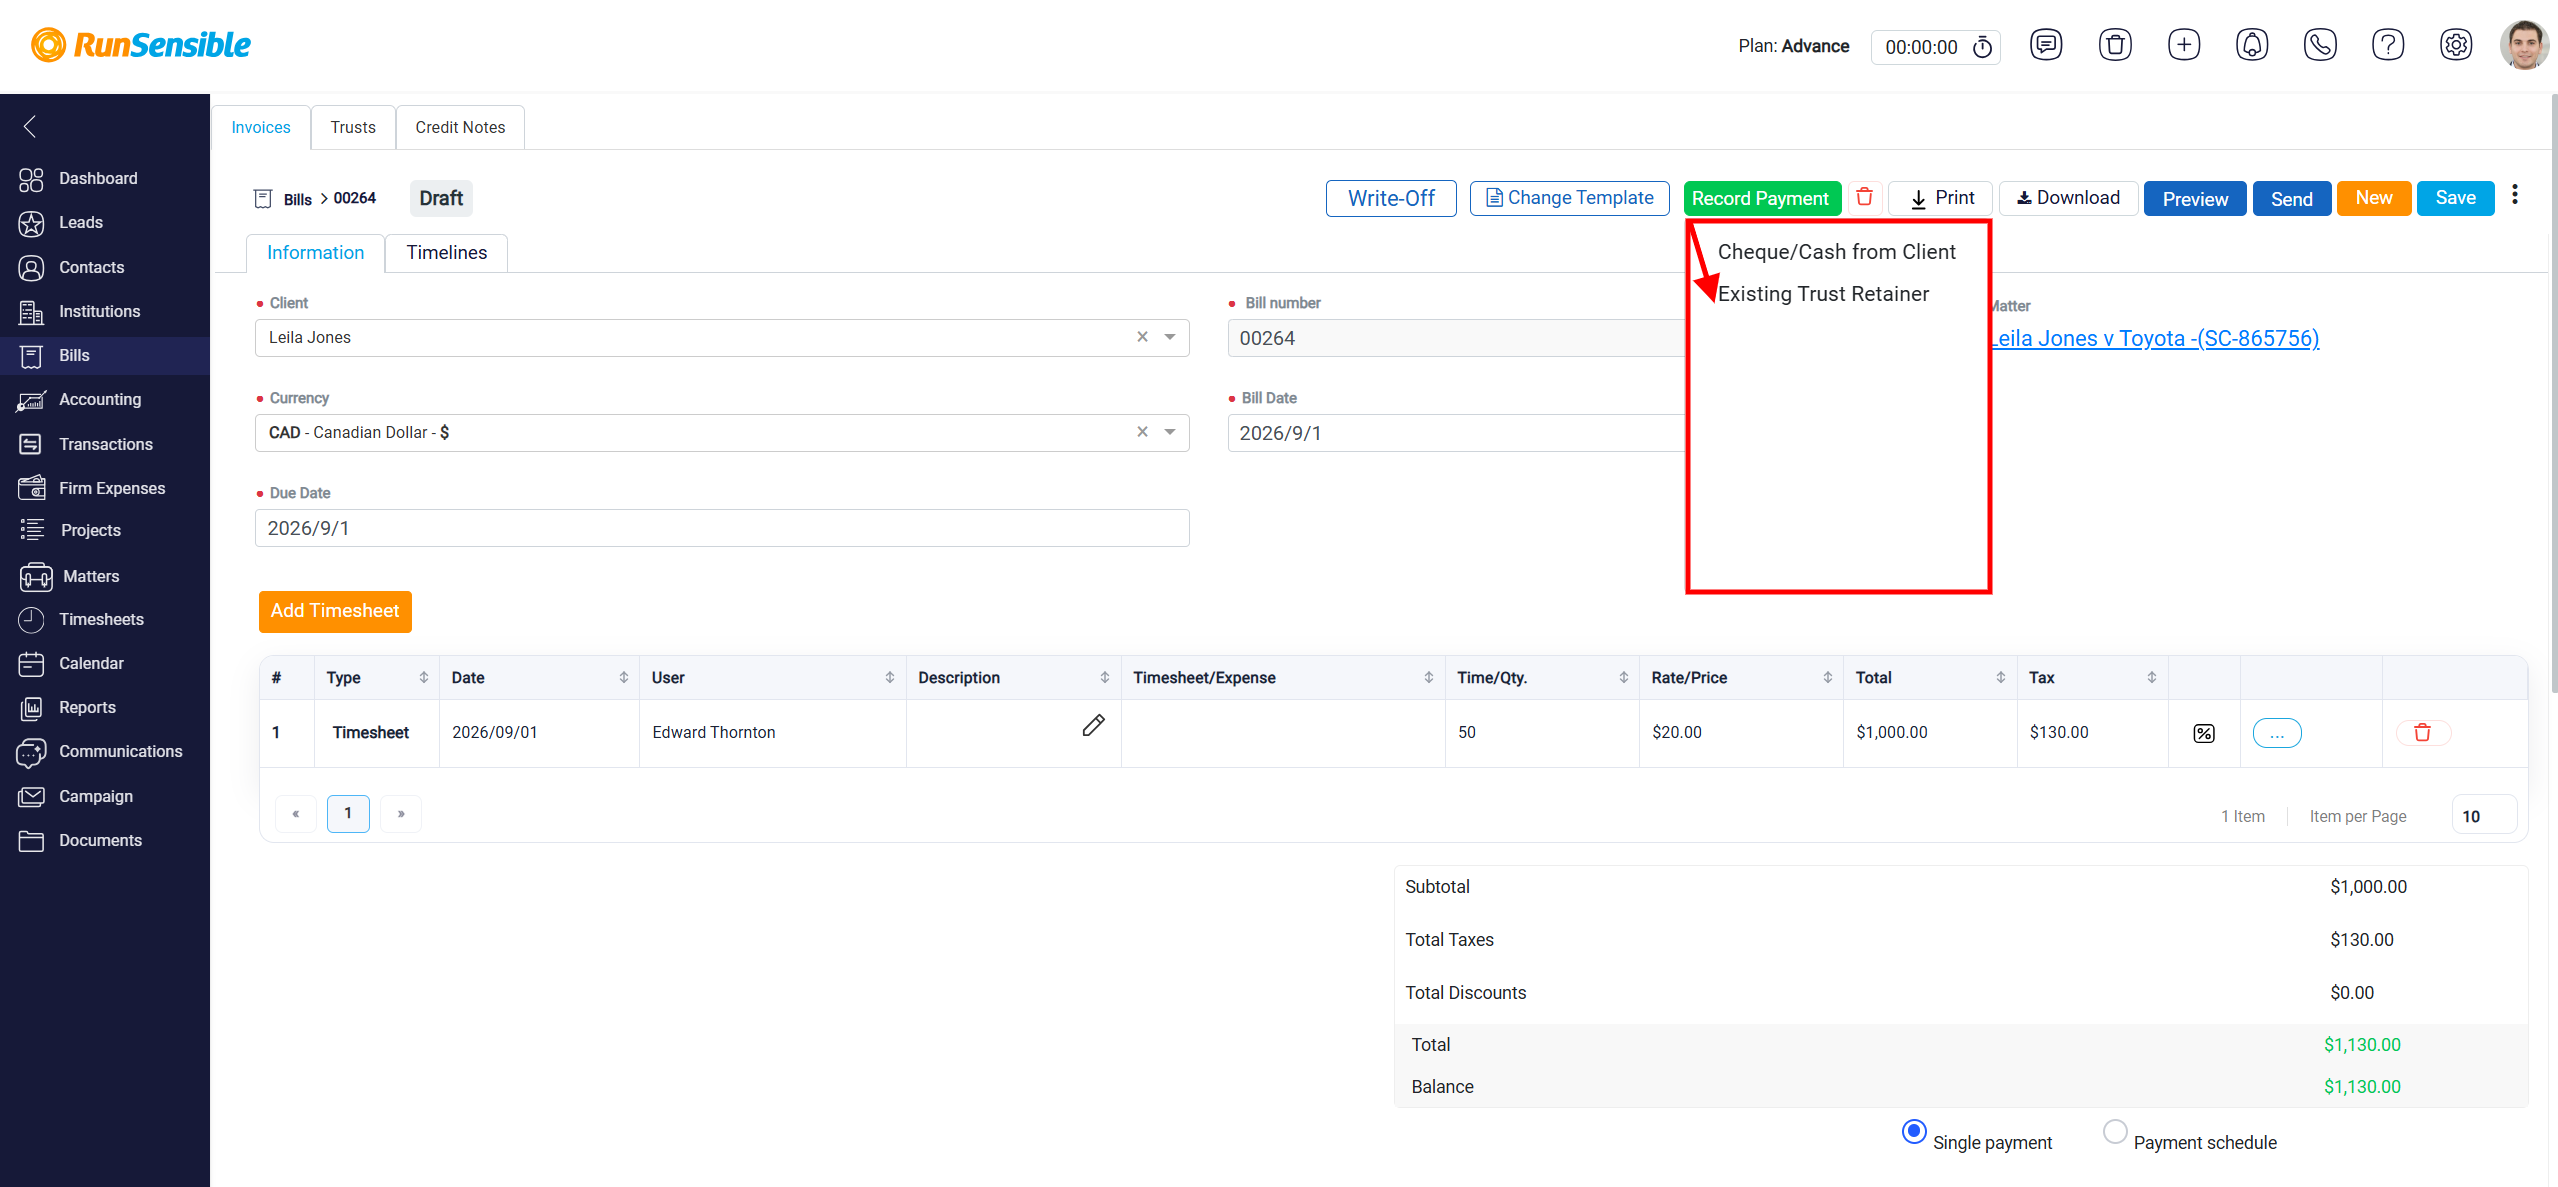
When you click Record Payment, the system gives you two options, Cheque/Cash from Client and Existing Trust Retainer.
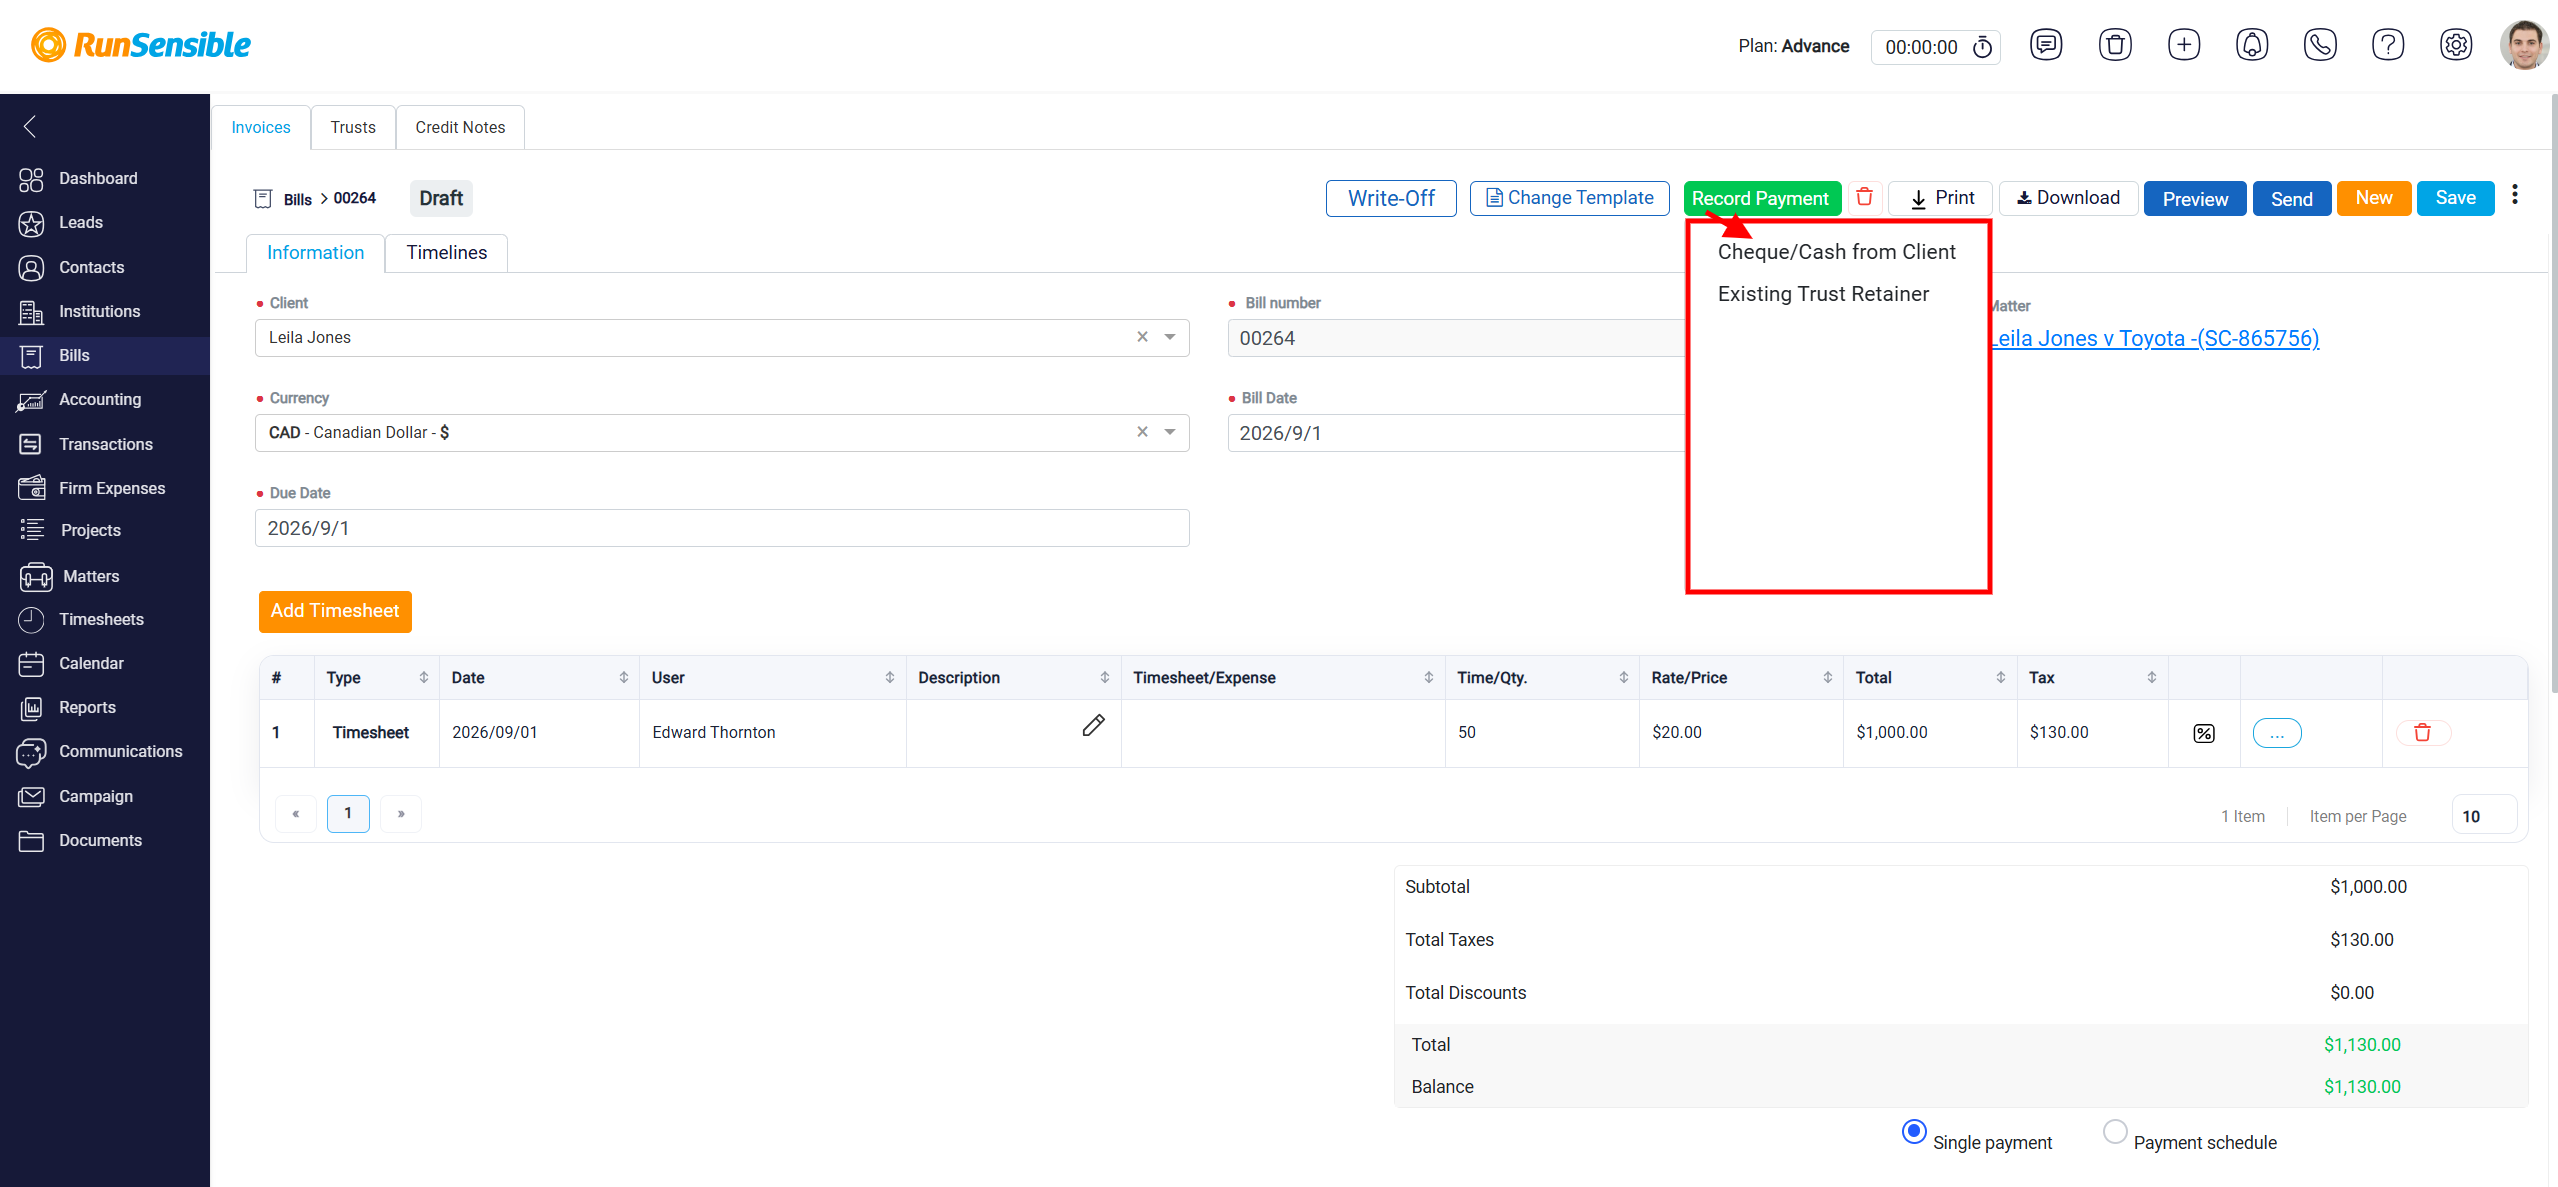 When you choose Cheque/Cash from Client, the Invoice Payment from Client Funds panel opens. This panel is used to record money received from the client into an operating bank account and apply that money to one or more unpaid or partially paid bills.
On the left side of the panel, you enter the main payment details. The Bank field is a dropdown that shows the operating bank accounts available in the system. Select the account where the received payment should be deposited. The Transaction Type field is set to Deposit and cannot be changed, because this panel is used to record money coming into the operating account.
The Client field shows the client connected to the matter by default. If the payment was made by someone other than the matter’s client, you can enter or select that person’s name for better record keeping. The Payment Number gives the payment a reference number inside the system.
To learn how to customize payment number, please visit Customizing Payment Number.
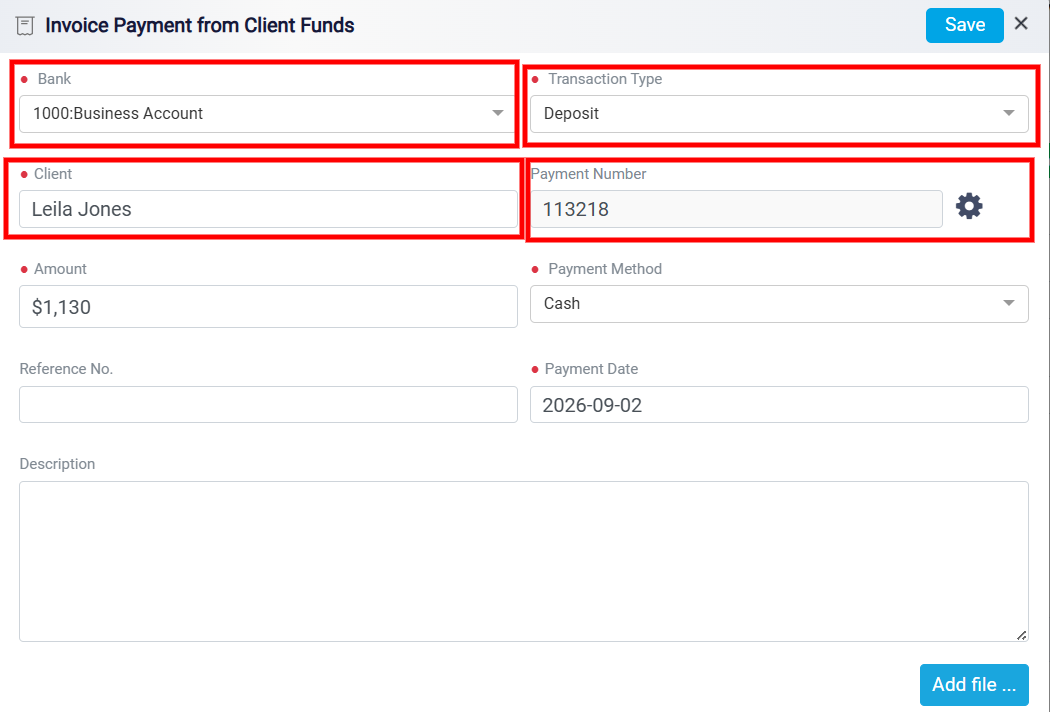
The Amount field is where you enter the total amount received from the client. The amount you enter is important because it is the total payment you are recording. This amount can be used to fully pay one bill, partially pay one bill, fully pay multiple bills, or fully pay some bills and partially pay another and it also can be added to the client general retainer (operating) account in the case of the client pay amount of money more that the amount of the bill that you have which you can keep this money as a liability to the client and in the future you can use this money for the paying the bills of the same client and after that returning the left over money after finishing the case using he credit memo process within the transaction tab which will be explain when we start talking about the transaction tab. After entering the total payment amount on the left side, you decide on the right side how that money should be applied to the client’s outstanding bills.
You can also select the Payment Method, such as cash, wire, cheque, credit, debit, or e-transfer. The Reference No. field can be used for a cheque number, transfer number, or other external reference. The Payment Date records when the payment was received, and the Description box can be used to add any extra notes about the transaction.
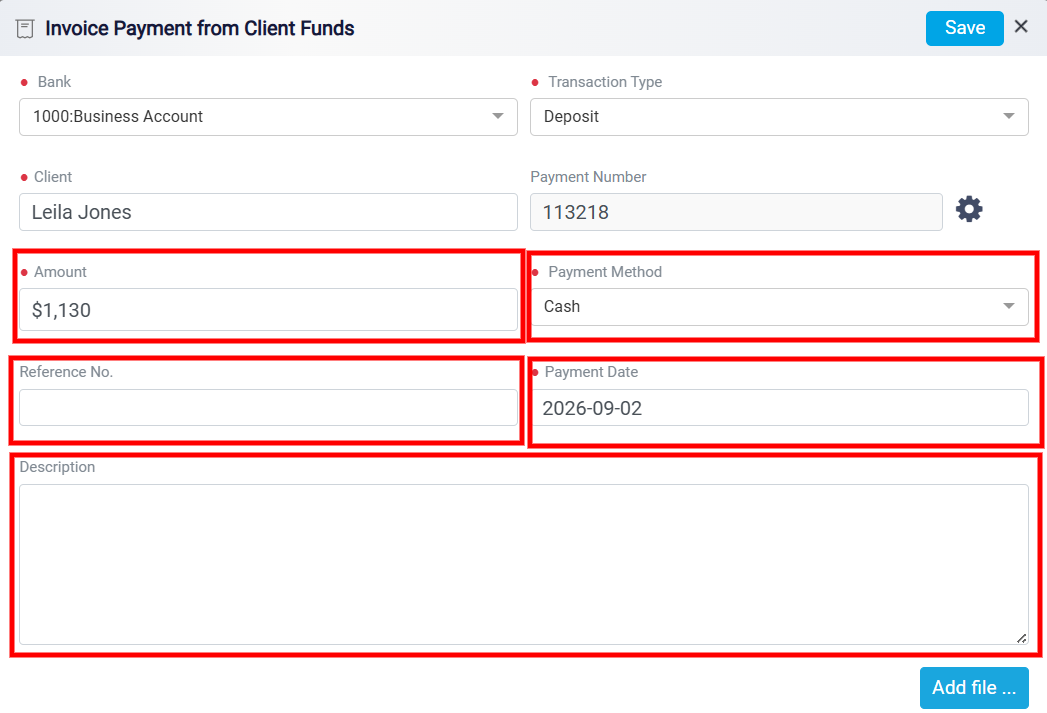
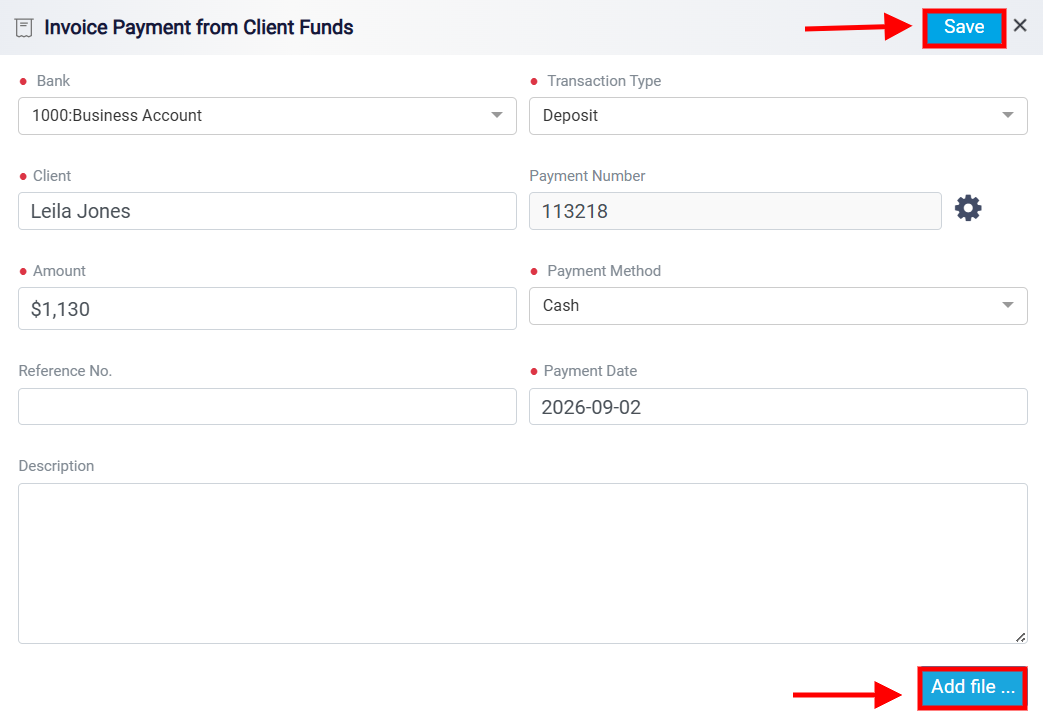
The Add file button allows you to attach supporting documents to the payment record, such as a receipt, cheque image, transfer confirmation, or other proof of payment. After you have complete all the information click on the Save button.
The next option available under Record Payment is Existing Trust Retainer. This option allows you to use funds previously deposited into the client’s trust retainer account to record a payment toward the bill associated with the matter.
For more detailed information on this topic, please refer to the Billing help page.